1
Instructions for use
Washing machine
WM76M
W3LW.U
Carefully read the instructions for use before using the washing machine.
Introduction
Dear Customer,
We thank you for purchasing this quality ASKO product.
We hope it meets all your expectations. Scandinavian design combines pure lines, everyday functionality, and high quality. These are the key characteristics of all our products, and the reason why they are highly appreciated across the globe.
We kindly recommend that you read these instructions before using the appliance for the first time. The instruction manual also includes information on how you can help protect the environment.
The following symbols are used throughout the manual and they have the following meanings:
Information, advice, tip, or recommendation
Warning – general danger
Warning – danger of electric shock
Warning – danger of hot surface
Warning – Risk of Fire
Original instructions
SAVE THESE INSTRUCTIONS FOR FUTURE REFERENCE!
Important safety instructions
 SAVE THESE INSTRUCTIONS FOR FUTURE REFERENCE!
WARNING
To reduce the risk of fire, electric shock, or injury to persons when using your appliance, follow basic precautions, including the following:
|
|
Read all instructions before using the appliance. |
|
2 |
Risk of Suffocation and Injury from Entrapment: Do not allow children to play on or in the appliance. Close supervision of children is necessary when the appliance is used near children. |
|
3 |
Do not operate appliance while away from the home. |
|
4 |
|
|
5 |
Use only detergents and softeners for machine wash. The manufacturer may not assume responsibility for any damage and eventual discoloring of gaskets and plastic components as a consequence of incorrect use of bleach and/or coloring agents. |
|
6 |
|
|
7 |
|
|
8 |
Do not add gasoline, dry-cleaning solvents, or other flammable or explosive substances to the wash water. These substances give off vapors that could ignite or explode. |
|
9 |
Before the appliance is removed from service or discarded, remove the door to the drying compartment. |
|
10 |
Do not reach into the appliance if the tub or agitator is moving. |
|
11 |
Do not install or store this appliance where it will be exposed to the weather. |
|
12 |
Do not tamper with controls. |
|
13 |
Do not repair or replace any part of the appliance or attempt any servicing unless specifically recommended in the user-maintenance instructions or in published user-repair instructions that you understand and have the skills to carry out. |
|
14 |
Do not use spare parts that have not been recommended by the manufacturer (e.g. parts made at home using a 3D printer). |
|
15 |
|
|
16 |
|
|
17 |
|
 WARNING: Risk of Fire – Do not wash articles that have been previously cleaned in, washed in, soaked in,
or spotted with gasoline, dry-cleaning solvents, or other flammable or explosive substances,
as they give off vapors that could ignite or explode.
WARNING: Risk of Fire – Do not wash articles that have been previously cleaned in, washed in, soaked in,
or spotted with gasoline, dry-cleaning solvents, or other flammable or explosive substances,
as they give off vapors that could ignite or explode.GROUNDING INSTRUCTIONS
a) For a grounded, cord-connected appliance:
This appliance must be grounded. In the event of malfunction or breakdown, grounding will reduce the risk of electric shock by providing a path of least resistance for electric current. This appliance is equipped with a cord having an equipment-grounding conductor and a grounding plug. The plug must be plugged into an appropriate outlet that is properly installed and grounded in accordance with all local codes and ordinances.
 WARNING: Improper connection of the equipment-grounding conductor can result in a risk of
electric shock. Check with a qualified electrician or service representative or personnel
if you are in doubt as to whether the appliance is properly grounded.
WARNING: Improper connection of the equipment-grounding conductor can result in a risk of
electric shock. Check with a qualified electrician or service representative or personnel
if you are in doubt as to whether the appliance is properly grounded.
Do not modify the plug provided with the appliance: if it will not fit the outlet, have a proper outlet installed by a qualified electrician.
b) For a grounded, permanently connected appliance:
This appliance must be connected to a grounded metal, permanent wiring system, or an equipment-grounding conductor must be run with the circuit conductors and connected to the equipment-grounding terminal or lead on the appliance.
This manual does not cover every possible condition and situation that may occur. Use common sense and caution when installing, operating, and maintaining any appliance.
General
Carefully read the instructions for use before using the washing machine.
Instructions for use are available on website https://auid.connectlife.io
Please, do not use the washing machine without reading and understanding these instructions or use first.
This appliance is not intended for use by persons (including children) with reduced physical, sensory or mental capabilities, or lack of experience and knowledge, unless they have been given supervision or instruction concerning use of the appliance by a person responsible for their safety.
Failure to observe the instructions for use or inappropriate use of the washing machine may result in damage to the laundry or the appliance, or injury to the user. Keep the instruction manual handy, near the washing machine.
Your washing machine is intended solely for household use. If the washing machine is used for professional, for-profit purpose or purpose exceeding normal use in a household, or if the washing machine is used by a person who is not a consumer, the warranty period shall be equal to the shortest warranty period required by relevant legislation.
Follow the instructions for correct installation of the washing machine and connection to the water and power mains (see chapter ).
Any repair or maintenance tasks on the washing machine should only be done by trained experts. Unprofessional repair may result in an accident or major malfunction.
The washing machine may only be used with the supplied power cord.
To avoid danger, a damaged power cord may only be replaced by the manufacturer, a service technician, or an authorized person.
WARNING
The washing machine may not be connected to the power mains using an extension cord.
Do not connect the washing machine to power mains using an external switching device such as a program timer, or connect it to power mains that is regularly switched on and off by the power supply provider.
WARNING
In case of incorrect washing machine connection, incorrect use, or servicing by an unauthorized person, the user shall bear the cost of any damage as such damage shall not be covered by warranty.
WARNING
In case of a defect, only use approved spare parts by authorized manufacturers.
Do not install the washing machine in a room where the temperature can drop to below 41°F (5°C), as washing machine parts may be damaged in case of water freezing.
Place the washing machine on a level and stable solid (preferred on concrete) surface.
The ventilation openings in the base of washing machine must not be obstructed by a carpet.
Before connecting the washing machine to the power mains, wait for at least 2 hours until it reaches room temperature.
Do not connect the washing machine to an electrical outlet intended for an electric shaver or hair dryer.
Before the first use of the washing machine, remove all transit bolts (see chapter / ). Warranty shall be void in cases of such damage.
Connection to water and power supply has to be executed by an adequately trained technician or expert.
To connect the washing machine to water supply, make sure to use the supplied water supply hose and gaskets. Water pressure has to be between 14.5–145 PSI (0,1–1 MPa) (approximately 14–142 PSI (1–10 kp/cm2), 1-10 bar, 14.5–145 PSI (10–100 N/cm2)).
Always use a new water supply hose to connect the washing machine to water supply; do not reuse an old water supply hose.
The end of the water discharge hose should reach into a water drain line.
Before the start of the washing cycle, press the door on the indicated spot until it locks into place. The door cannot be opened during washing machine operation.
We recommend removing any impurities from the washing machine drum before the first wash using the Universal wash (extra hot) program (see ).
Only use the washing machine for washing laundry, as described in the instruction manual. The machine is not intended for dry cleaning.
Only use agents for machine washing and care of laundry. We shall not be responsible for any damages or discoloration of gaskets and plastic parts resulting from incorrect use of bleaching or coloring agents.
Bleaches that contain chlorine can be replaced with oxygen-based bleaches. Otherwise, a neutralization cycle should be performed by running the Cotton program at the highest temperature. For best results, use hydrogen peroxide or oxygen-based detergents.
Excessive use of products containing chlorine compounds increases the risk of premature failure of appliance components. This depends on the concentration of chlorine, exposure time, and temperature.
Do not use colorants (dyes) or bleaching substances (substances for discoloration or removal of colorants) as they contain sulphuric compounds that could cause corrosion.
After the washing cycle, close the water tap and pull out the washing machine plug from the power socket.
Clean the pump filter whenever the symbol appears on the display unit.
When descaling, only use descaling agents with added anti-corrosion protection. (Only use non-corrosive descaling agents.) Follow the manufacturer's instructions. Finish the descaling process with several rinse cycles or by running the (Drum Cleaning) (Drum Cleaning program) in order to remove any residual acid (e.g. vinegar etc.).
No silver ions are released during the washing program.
The warranty does not cover consumables, minor deviations in color, increased noise that results from appliance age and which does not affect the functionality of the appliance, and aesthetic defects on components, which do not affect the functionality and safety of the appliance.
The maximum amount of laundry in lbs/kg is indicated on the washing machine rating plate.
Danger of hot surface
At higher washing temperatures, the door glass will heat up. Be careful to avoid burns. Make sure children do not play near the door glass.
Child safety
Children of less than 3 years should be kept away unless continuously supervised.
Children should be supervised to ensure that they do not play with the appliance.
Activate the Child lock. See chapter .
Before closing the washing machine door and running the program, make sure there is nothing except laundry in the drum (e.g. if a child climbed into the washing machine drum and closed the door from the inside).
Keep the detergent and fabric softener out of reach of children.
Should a child swallow detergent, give plenty to drink immediately, i.e., one or two glasses of milk or water. Do not try to induce vomiting. Seek medical advice immediately: The National Poison center phone number is 1-800-222-1222.
Always close the door and start the appliance as soon as you put in the detergent.
Always keep small children away from the machine when it is open. There may be some detergent residue left inside the machine.
If laundry detergent gets in someone’s eyes, rinse them with plenty of water for at least 15 minutes.
The washing machine is made in compliance with all relevant safety standards.
This washing machine may be used by children aged 8 years and above and by persons with reduced physical, sensory or mental capabilities or lack of experience and knowledge, but only if they are supervised during the use of the washing machine, if they have been provided relevant instructions regarding safe use of the washing machine, and if they understand the hazards of inappropriate use.
Children shall not play with the appliance.
Children may not clean the washing machine or perform any maintenance tasks without supervision.
Always turn the power off to the machine when it is not in use.
Water overflow protection
Transporting/Storage during the winter
If you transport or store the appliance in vehicles or rooms that are not heated and where the temperature could drop to below freezing point, please do the following:
-
Close the water supply to the washing machine, undo the water supply hose from the water supply tap, and wait until the water flows out of the tap and the hose.
-
After the drain pump filter is emptied, there can still be a small amount of water in the machine. This, however, does not affect the quality and will not damage the appliance.
-
If the washing machine is to be transported, the transport protection has to be re-installed before transport (see chapter ).
Electrical hazard warning during servicing
Certain internal parts are intentionally not grounded and may present a risk of electric shock only during servicing. Service Personnel – Do not contact the following parts while the appliance is energized: motor, pump and control unit.
REGULATORY NOTICE FCC (Federal Communications Commission)
FCC Declaration of conformity
This device complies with Part 15 of the FCC Rules. Operation is subject to the following two conditions:
-
This device may not cause harmful interference, and
-
this device must accept any interference received, including interference that may cause undesired operation.
Responsible Party - U.S. Contact Information
Hisense USA Corporation
(Distributor of ASKO brand)
5995 Windward Pkwy, Alpharetta, GA 30005, USA
Phone: +1-800-898-1879
FCC Statement:
-
Changes or modifications not expressly approved by the party responsible for compliance could void the user’s authority to operate the equipment.
-
NOTE: This equipment has been tested and found to comply with the limits for a Class B digital device, pursuant to part 15 of the FCC Rules. These limits are designed to provide reasonable protection against harmful interference in a residential installation. This equipment generates, uses and can radi-ate radio frequency energy and, if not in-stalled and used in accordance with the instructions, may cause harmful interference to radio communications. However, there is no guarantee that interference will not occur in a particular installation. If this equipment does cause harmful interference to radio or television reception, which can be determined by turning the equipment off and on, the user is encouraged to try to correct the interference by one or more of the following measures:
-
Reorient or relocate the receiving antenna.
-
Increase the separation between the equipment and receiver.
-
Connect the equipment into an outlet on a circuit different from that to which the receiver is connected.
-
Consult the dealer or an experienced radio/ TV technician for help.
-
-
This equipment should be installed and operated with a minimum distance of 20 cm between the radiator and your body.
Before using the appliance for the first time
Packing material
Transport protection
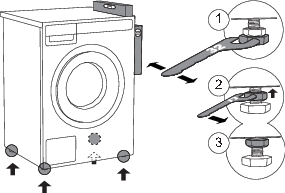
Before using the appliance, remove the three transport bolts and plastic plugs which protect the appliance during transport.
Use a 9/16" (15 mm) or 11/16" (17 mm) (depending on the model) wrench to loosen and remove the bolts as shown in the figures.
To remove the plastic plugs holding the bolts, squeeze them and (1) then pull them out (2).
Remove the caps from the plastic plugs. Push the caps into the holes (1), in which the plastic plugs were located. Save the bolts and plastic plugs (2) in case you have to move your washing machine again.
|
Art. No. |
ID: |
|---|---|
|
270698 |
Bolt |
|
551188 |
Plastic cap (transport lock) |
|
Please order three pieces of each item! |
|
If you wish to transport the washing machine, reinstall the bolts and plastic caps to lock the machine. This will prevent any damage to the machine due to vibrations during transport. If you have lost the transport bolts or plastic caps, replacements can be ordered at your dealer.
Care and maintenance instructions
Do not use any solvents or cleaning agents that could damage the washing machine (please observe the recommendations and warnings provided by the cleaning agent manufacturers).
Opening the Door
The washing machine door is designed to open on the right side, with a visual indicator in the form of a sticker placed on the front of the door, clearly marking the spot for gripping and opening.
It can be removed depending on aesthetic preference.
Installation and connection
To reduce the risk of severe injury or death, follow all installation instructions.
Remove all packaging. When removing the packaging, make sure not to damage the appliance with a sharp object.
Cosmetic damage must be reported to your dealer within five days from the date of purchase. After unpacking the washer, thoroughly check the unit for cosmetic damage.
Before connecting the washing machine to the power mains, wait for at least 2 hours until it reaches room temperature.
Save these instructions.
Read these instructions carefully and completely before you install the machine.
The installation should be carried out by a qualified person who is familiar with all local codes and ordinances for electrical and plumbing connections.
Selecting the room
Do not place the washing machine behind lockable or sliding door, or door with a hinge on the opposite side of the door hinge of the washing machine. Place it in the room in such a way that the washing machine door can be freely opened.
The floor on which the washing machine is placed must have a concrete base. It should be clean and dry; otherwise, the washing machine may slide. Also, clean the bottom surface of adjustable feet.
The washing machine must stand level and stable on a solid base.
Positioning the washing machine
The washing machine can be installed as a built-in or a free-standing unit.
When installing the washing machine, the wall outlet should be freely accessible.
Necessary clearance around the washing machine for best performance
The washing machine may not be in contact with a wall or adjacent structures. For optimum washing machine operation, we recommend observing the clearances from the walls as indicated in the figure. In case of failure to observe the minimum required clearances, safe and correct washing machine operation cannot be ensured. Moreover overheating can also occur.
For safety reasons, maintain a minimum clearance of 1" (25 mm) between the back of the appliance and the wall, and at least 1 5/8" (40 mm) between the top of the appliance and any overhead structure.
Opening the washing machine door (bird's-eye view)
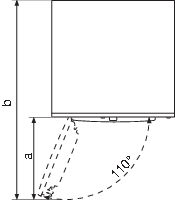
The washing machine door width (a) is 17 3/4" (450 mm).
The washing machine depth with the door open (b) is 41 1/2" (1055 mm).
The washing machine door can be opened up to the angle of 110°.
Placement on a pedestal
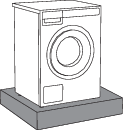
If the appliance is installed on a platform or a similar structure, then the appliance must be fixed to it, to avoid the risk of falling. ASKO original accessories are available for this purpose, complete with mounting instructions.
Adjusting the washing machine feet
Place the washing machine so that it is stable. It is important that the machine is level to prevent excessive vibrations during spin cycles. Each foot of the washer is adjustable, so you can level the washer on any surface. Once it is level, securely tighten the lock nuts on the feet to prevent excessive vibration during spin cycles.
1Level the washing machine in all directions and traverse direction by rotating the adjustable feet (using a spanner no.1 1/4" (32mm)).
The feet allow levelling by +/- 3/8" (1 cm).
2When the appropriate height of feet is set, use a wrench no.11/16" (17mm) to firmly tighten the lock nuts (counter nuts) towards the bottom of the machine
 .
.
3Tighten the jam nuts (counter nuts) to the end position.
Incorrect levelling of the washing machine with the adjustable legs may cause vibration, appliance sliding across the room, and loud operation. Incorrect levelling of the washing machine is not subject to warranty.
Sometimes, unusual or louder noise may appear during washing machine operation; these are mostly the result of improper installation.
Freestanding appliance
The washer can be placed next to the dryer. It is essential that the machine is leveled and the locknuts are tightened to prevent excessive vibration during spin cycles. Also be sure to leave a minimum of 1/2" (25mm) of space between the washer and the dryer.
The surface on which the appliance is placed should be clean and level.
The washing machine and the dryer can be placed next to each other.
To stack a dryer on top of a washing machine, use the front feet attachments and the tipping guard. See the next section below.
Stacking an ASKO dryer on top of an ASKO washing machine
At least two people are required to install the tumble dryer on top of a washing machine.
ASKO washers should never be stacked on a counter or a dryer. You can, however, stack an ASKO dryer on an ASKO washer. Refer to your Dryer Use and Care Guide for instructions on how to do this.
To stack a dryer on top of a washing machine, use the front feet attachments (plastic footrests (C)) and the tipping guard (A+B), supplied in the dryer drum.
For detailed instructions on how to install the ASKO tumble dryer on the ASKO washing machine, refer to the instructions provided with your ASKO tumble dryer.
The tipping guard (A+B) corresponds to ASKO washing machines and cannot be installed on washing machines of other brands.
The washing machine on which you wish to install the dryer must be able to bear the weight of the dryer (see washing machine’s rating plate or technical information).
All ASKO washing machines can bear the weight of the dryer.
Built-in
Installation under the counter
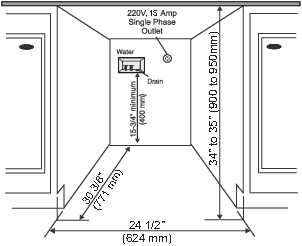
ASKO washers can be installed beneath a cabinet or worktop with a height of 35 1/2" to 37 1/2" (900 to 950 mm) or in a closet. There must be a gap of about 1/2" (12 mm) all around the machine including between the rear edge of the machine’s top panel and the back wall. The opening width must be at least 24 1/2" (624 mm). Space must also be available for the fill and drain hoses. See the illustration for measurements and positions.
If the drain outlet is higher than 24" (610 mm), the connections will need to be recessed.
Closet Install- Ventilation Requirements
ASKO's front panel controls make it possible to install the washers and dryers in a cabinet or closet.
Make sure that there is a minimum distance of 1/2" (12 mm) between the appliance and the cabinet or wall, and a minimum distance of 1" (25 mm) between the rear edge of the top panel of the appliance and the cabinet or wall. To provide adequate ventilation, we recommend doors with grilles. Otherwise, doors must have ventilation openings. See the figure for the minimum ventilation openings.
Ventilation Requirements of ASKO laundry concept (when installing the appliance in a closet)
Make sure there is clearance between appliances and cabinet or wall and 1" (25 mm) minimum clearance between the rear edge of the appliance top panel and the cabinet or wall.
When the closet or cabinet is closed with a door, we recommend using louvered doors to ensure proper ventilation.
Otherwise, the door must have ventilation gaps. See the figure for the dimensions of the ventilation openings.
Ensure that the washing machine door can be opened without hindrance after installation.
Failure to follow these instructions can negatively impact the appliance performance and may also result in failure of the appliance.
Moving the washing machine and transport after installation
If you are moving the washing machine without packaging, open the washing machine door and pull the appliance by holding the washing assembly, as indicated in the figure.
Connection to water supply
The water inlet hose is included inside the drum of the washing machine. Before use, it must be connected to the appliance and the water supply.
The machine has to be connected to water supply by an adequately trained person.
STANDARD CONNECTION
Use the water supply hose to connect the appliance. Water pressure has to be between 15–145 psi (approximately 0,1–1 MPa, 1–10 kp/cm2, 1–10 bar, 10–100 N/cm2).
If the hoses are newly installed, we recommend rinsing them to remove any impurities. Otherwise, these impurities could clog the filter in the water connection on the washing machine and thus cut off the water supply.
The water intake hose has to be fastened firmly enough for the hose to have a good seal. After connecting the hose, the seal must be checked for any leaks.
The washing machine has a sensor that detects water leakage. If there is water on the bottom of the washing machine, the sensor is activated and trigger a shut-off system to cut the water supply to the washing machine; washing process is stopped, water supply is shut off, the appliance engages the pump, and signals an error.
Only use the water supply hose supplied with the appliance. Do not attempt to install any used hoses or hoses not supplied by ASKO.
If the connection on the supply hose is of different dimensions than the water tap (e.g. 3/4” (1,9 cm) → 1/2” (1,22 cm), use an adapter.
When connecting the water supply hose, make sure to connect it in a way that allows adequate and unobstructed water supply.
Installing the drain hose
Upon delivery, the washing machine has a drain hose attached to the back wall (Figure 1), which must be connected to the drain.
If the drain hose is not correctly attached, safe and correct washing machine operation cannot be ensured.
The drain hose can be installed in three ways (see Figure 2):
1Into a wall drain with a siphon (A), which must be properly installed so that it can be cleaned;
2Into a sink or bathtub (B). Use a string to attach the hose through the opening in the elbow so that it does not slip to the floor;
3Directly into the sink drain (C). The diameter of the drain hose must be at least 1 5/8" (4 cm). The internal hose diameter should be at least 3/4" (18 mm) (D).
The end of the drain hose can be no more than 35 7/16" (900 mm) and at least 23 5/8" (600 mm) mm from the ground. The lower position (23 5/8" (60 cm)) is always recommended. Make sure the drain hose is not bent.
If the hose is extended, the internal diameter of the coupling must not be less than 1/2" (12.2 mm).
Do not extend the drain hose higher than 35 7/16" (900 mm) from the bottom of the unit.
Connecting to the household power
After installation, the washing machine should stand still for two hours before it is connected to the power mains.
Connect the appliance to a grounded power outlet. After installation, the wall outlet should be freely accessible. The outlet should be fitted with a ground contact (in compliance with the relevant regulations).
Electrical connections
The machine is delivered ready-fitted with a plug and is intended for connection to an ASKO Dryer, which is equipped with a matching receptacle. The plug supplied with the washer can only be used with an ASKO Dryer. If the washer is used separately or with another dryer, it must be on a separate 208-240 V single-phase circuit.
If the machine is to be used in a wet area, the supply must be protected by a residual current device.
As supplied: 208–240 V, 60 Hz, 2000 W heating element, 15 A fuse required.
Connection to a permanently wired supply point must be made only by a qualified electrician.
Connection upon delivery
Information about your washing machine is indicated on the rating (type) plate.
1 - Model type
2 - Model
3 - Serial number
4 - Article number
5 - FCC ID & IC ID
6 - QR code
7 - AUID code
Use type A ground fault circuit interrupter
We recommend using overvoltage protection to protect the appliance in case of a lightning strike.
The washing machine may not be connected to the power mains using an extension cord.
Do not connect the washing machine to an electrical outlet intended for an electric shaver or hair dryer.
Any repair and maintenance pertaining to safety or performance should be done by trained experts.
To reduce the risk of fire, electric shock, or injury to persons, read the chapter "IMPORTANT SAFETY INSTRUCTIONS" before operating this appliance.
ASKO Laundry Care - Hidden helpers (Hidden helpers)
The Hidden Helper (single shelf, basket, or ironing board) can be installed between the washing machine and the dryer, or on top of either appliance.
SLIM - Single Shelf
Pull-out shelf. It can be used as an additional surface when folding clothes and sorting socks or for storage. It also makes loading and unloading your laundry much easier. It can be installed between your washer and dryer.
BASKET
A large pull-out basket that is easily accessible via a push-pull door opening. Useful for removing laundry and carrying it to the wardrobe or workbench for ironing and folding.
IRONING BOARD
The ironing board is a clever solution. It is always handy when you need to iron your clothes, and it can be easily, safely and invisibly stored away when not in use.
A PEDESTAL DRAWER
A useful storage drawer with a height of 11 3/4" (30 cm). Ideal for storing your detergent, softener, coat hangers, pegs, user manuals and other useful items in the laundry area.
The pedestal drawer is installed under the washing machine or the dryer.
Availability depending on market
|
DENOMINATION |
White ART. No. |
Titanium ART. No. |
Graphite black ART. No. |
|---|---|---|---|
|
SLIM |
HS60W - 746295 |
HS60T - 746296 |
HS60G - 746297 |
|
BASKET |
HB150W - 746298 |
HB150T - 746299 |
HB150G - 746300 |
|
IRONING BOARD |
HI150W - 746311 |
HI150T - 746312 |
HI150G - 746314 |
|
A PEDESTAL DRAWER |
HP320W - 746315 |
HP320T - 746316 |
HP320G - 746317 |
Washing machine description
-
Main switch for turning On/Off
-
Program selector knob
-
Display unit
-
Program selector buttons
-
Button (Start/Pause)
-
Washing machine door
-
QR and AUID code
-
Rating plate with information about the washing machine (on the inside of the washing machine door)
-
Detergent compartment
-
Drain filter cover
-
Water drain hose
-
Drain filter pump (installed behind the drain pump filter)
Detergent compartment with Auto dose system (ADS)
-
Compartment for main wash liquid and powder detergent with the inscription »MainWash«
-
Softener compartment with the inscription »Softener«
-
Separator or movable barrier (3)
Use the upper position for washing powder. Use the lower position for liquid detergent.
-
Level gauge
The level gauge, which shows »ml« on one side and »tbsp« on the other. Pull it upwards and flip it to the other side.
-
Tank (A) for liquid detergent for ADS
-
Tank (B) for liquid detergent or softener for ADS
-
Release mechanism for the detergent compartment (on the bottom side)
Initial settings before use
When the machine is connected (see chapter ) and turned on for the first time, first set the following settings:
1 Choose language (Language)
Use the buttons 2 and 3 to navigate the list of languages and select the desired language.
Confirm your selection by pressing 4 Save.
After the language has been selected, the appliance informs you that it is necessary to remove all transport protection from the appliance. If you have already done so, continue setting up the appliance by pressing 4 Confirm.
After you have selected the language, rotate the button clockwise and select the setting to set the units of measurement.
2 Unit settings
Temperature unit (Temperature unit)
By pressing 1 set the unit of measurement for temperature:
-
Celsius °C or
-
Fahrenheit °F.
Liquid unit
By pressing 2 set the unit of measurement for liquids:
-
Millilitres ml or
-
Tablespoons tbsp.
Weight unit
By pressing 3 set the unit of measurement for weight:
-
Kilograms kg or
-
Pounds lbs.
Confirm your selection by pressing 4 Save.
3 Water hardness
By pressing 2 and 3 choose the water hardness between the following options: Soft / Normal / Hard.
For more information, press 1 Information.
How to determine the hardness of the water:
-
use the test strip,
-
contact your local water distributor.
Table for water hardness; see chapter /.
The amount of detergent also depends on the hardness of water. For details, see the detergent packaging. Please contact your local water supply company to check the water hardness in your area.
Before the product is dispatched from the factory, every appliance is tested.
As a result, there may be some residual water left in the drain pump filter. This, however, does not affect the quality and will not damage the appliance.
4 Auto dose system (ADS)
By pressing 2 you can choose between turning on or turning off ADS.
With this setting, you will choose which tank (A or B) the detergent will be dispensed from.
|
|
Liquid detergent for: colored, white, black, delicate or other laundry. |
|
|
Liquid detergent for: colored, white, black or delicate laundry, softener or other rinse aids. |
Do not pour detergents with bleach into tank B. Choose the amount of detergent according to the liquid detergent manufacturer's recommendations on the packaging.
In models with ADS the amount of detergent dispensed also depends on the water hardness setting.
5 Wi-Fi settings

You can turn on the Wi-Fi connection by pressing 3 and confirm your selection by pressing 4 Save.
If you have turned on the Wi-Fi connection, see setup procedure in the below chapter .
If you do not want to set the Wi-Fi connection at this time, use the program selector knob to move forward.
Your washing machine is now set up and ready to use.
Appliance connection with the ConnectLife application
The ConnectLife app is an advanced smart home platform that enables seamless connectivity between people, devices, and services. With the ConnectLife app you can easily monitor and manage your smart devices, receive notifications directly to your smart device and update software (available functions depend on your appliance and region).
To connect your smart device to the ConnectLife platform, you need a home Wi-Fi network (2.4 GHz networks are supported) and a smart device with the app ConnectLife.

STEP 1: Download the ConnectLife app by scanning the included QR code or searching for it in your favorite app store.
STEP 2: Install the ConnectLife app and create an account.
STEP 3: In the ConnectLife app, go to the »Add device« menu and select the appropriate type of device. Then scan the QR code (it can be found on the rating plate of the appliance; you can also enter the AUID/SN number manually).
STEP 4: The application then guides you through the entire process of connecting the appliance to your smart device.
After a successful connection, the appliance can be operated remotely via the application.
Useful tips for your smart device
How to enable Wi-Fi on the device?
-
Turn on the appliance. In the main menu, use the program selector knob to select System settings. Confirm your selection by pressing (4) Enter.
-
Turn the program selector knob to the right and select Wi-Fi settings. Confirm your selection by pressing (4) Enter.
-
If the Wi-Fi system is not switched on, turn it on by pressing (3).
-
Use the program selector knob to select Connection setup, and press (3) Enter. Then press (4) Next.
-
If you do not yet have the ConnectLife app installed on your smartphone (or any other smart device), install it now (scan the QR code on the screen), create your user account and login.
-
-
In the ConnectLifeapp, open the add device menu.
-
Follow the instructions in ConnectLife.
-
Select the type of appliance.
-
Scan the QR code (it can be found on the rating plate of the appliance).
-
-
On the appliance, press (4) Next.
-
The 5 minute countdown will begin. During this time, connect the app to the appliance.
-
-
In the ConnectLife app, instructions will guide you through the process of entering the appropriate data for your appliance to connect to your home network.
-
How to enable remote start of the appliance?
In the main menu, turn the program selector knob to the left to select Remote start . To activate, press the Start/Pause button (the door must be closed). The display will showRemote start/Activated.
The appliance is now ready for remote control through ConnectLife app.
Remote start will remain active for the next 24 hours unless cancelled. During this time, the appliance can enter standby mode and switch off the display. If this happens, the logo will remain lit, which means that Remote start is still active.
How to add another user or multiple users?
See chapter and observe points 1 and 2.
Use the programme selector knob to select Add device, and press (3) Enter. As a new user, if you do not yet have the ConnectLife app installed, install it on your smart device.
-
In the ConnectLife app, go to the Add device menu and follow the instructions.
-
On the appliance, press (4) Next.
-
-
The 3 minute countdown will begin. During this time, connect the app to the appliance.
-
-
You can then complete and confirm the setting in the app.
How to remove the users?
How to remove a user (Remove device)?
See chapter and observe points 1 and 2.
Use the program selector knob to select Remove device, and press (3) Enter. Press (4) Ok. Follow the instructions on the appliance screen.
This step will remove all active users of the appliance. If you want to operate the appliance remotely again you will need to repeat the process of adding a user.
Which Wi-Fi router can be used?
Only 2.4 GHz networks are supported. If the ConnectLife app cannot find your local network during the connection set-up process, check the following:
-
your router is operating at the frequency of 2.4 GHz,
-
your network is not hidden, and
-
your signal is strong enough.
Do you have more questions?
Visit us at www.connectlife.io or contact us at hello@connectlife.io.
Remote software upgrade
When you receive a software update notification, you can choose to update your software from the app menu in your settings. Upon confirmation, the update is performed, the appliance must be in standby mode during this time (more on standby mode in chapter ).
Check the software update options in the ConnectLife app.
Special features
Dose
To enter the Dose modes settings first select the desired washing program and press on the button 4.
Choose between:
-
Assistance with manual detergent dosing if you select Manual Assist by pressing 2 for On.
-
Dosing of detergent from tanks A or B, if you have previously selected On ADS (see next chapter ).
-
Choose soil level (you can choose between 3 levels).
-
If none of the options is selected, the washing machine will automatically pump the dispensed detergent from the manual dosing chamber.
-
The contents of reservoirs A and B do not affect the other compartments in the detergent dispenser compartment.
Manual assist
By turning on (On) manual assist, the washing machine will recommend the optimum amount of detergent according to the selected settings.
When you select the washing program and press Start/Pause, the manual detergent dosing program will offer the amount of detergent (left: concentrated /right: unconcentrated amount of liquid detergent).
Dose the recommended amount into the dosing container and press Start/Pause.
Assistance with manual detergent dosing must be selected each time the washing program is started. In some programs the function is not available.
Auto dose system (ADS)
-
Choosing the settings for ADS
-
Filling the tank for ADS
-
Switching off the auto dose in the ADS menu.
1Choosing the settings for ADS
The auto dose system (Auto Dose System) (hereinafter referred to as ADS) allows you to store and dispense softener and liquid detergent in separate reservoirs located in the dispensing tank, in addition to the manual detergent dispenser compartment.
When the ADS function is enabled, the appliance will automatically dispense the detergent and softener.
The ADS settings can be accessed via the Program settings. Select the desired program and select the Dose modes setting.
In the dose mode menu (Dose) enter the last possible selection of ADS by pressing the key 4.
Turn the program selector knob to navigate to the last option in the automatic dosing settings menu, then press button 4 to enter the settings.
Press button 2 to switch On ADS. Press button 3 for reservoir A or button 4 for reservoir B to enter the laundry type selection menu.
Turn the knob left or right to select the appropriate laundry type, then confirm your selection by pressing button 2. Press button 3 again to access the detergent quantity settings menu, where you can turn the knob left or right to set the desired amount (in ml).
The most recent setting is stored and it can be changed for the next washing cycle. In some programs the ADS setting is not available.
A, B. Choose the tank from which the detergent will be dispensed, depending on the type of laundry.
Type of laundry:
|
|
Liquid detergent for: colored, white, black, delicate or other laundry. |
|
|
Liquid detergent for different types of laundry, softener or other rinse aids. |
If tank B is set to liquid detergent for colored, white, black or delicate laundry, only one tank for ADS can be switched on at a time.
In the event that tank B is set to softener or other detergents, tanks A and B can be activated at the same time.
When there is a shortage of detergent in tank A or B, refill notifications and symbols will appear.
Follow the instructions on the display unit.
When selecting the Wool/Hand wash program use wool detergent and avoid using fabric softener.
By pressing the 1 button Exit you return to the Dose modes menu.
You can choose between: automatic detergent dosing from tank A (first choice) or from tank B (second choice). Confirm the selection by pressing the 2 button.
Before choosing tank A or B, you must fill the tank with liquid detergent.
C. Choose laundry soil level. Choose between:
-
Lightly soiled laundry
-
Normally soiled laundry
-
Heavily soiled laundry
The washing program will choose the suitable amount of detergent depending on the setting for soil level you choose.
Return to ADS settings
a, b. Amount (Concentration) of liquid detergent(ml/cycle from tank A or B).
Choose the amount of detergent according to the liquid detergent manufacturer's recommendations on the packaging.
For both tanks, you can specify the amount of agent to be dosed from 0,0026–0,0264 US gal (10 ml to 100 ml).
For this washing machine model, observe the recommendation for a half load, medium water hardness, and medium-soiled laundry.
The amount of detergent or softener dosed will be adjusted for:
-
Water hardness (available degrees are: soft, medium - normal and hard. The basic/preset degree is medium, which can be changed by the user. For correct functioning of the ADS system, we recommend setting the correct water hardness level (see chapter / ).
-
Selected washing programe.
-
Amount of laundry (load).
-
Set soil levels.
-
Set value of liquid detergent.
c. Changing the liquid detergent in the ADS
We recommend changing the detergent when the tank is empty. Otherwise the tank must be emptied and cleaned (See chapter Cleaning the dosing container).
When you change the detergent in the tank B, select the appropriate washing program based on the type of laundry.
In the case of the following combinations:
-
White laundry program + white laundry detergent + off ADS or
-
Program for colored laundry + colored laundry detergent (but not selected)
then, pour a different type of liquid detergent into tank B than the one selected in tank A. For example, if you have chosen the Black program, you will likely pour a detergent specifically designed for black laundry into the tank. For certain programs, you will be notified to select the appropriate detergent.
2Filling the compartment with liquid detergent
When you want to use the ADS function for the first time, you will need to fill the dosing container.
While the washing program is running, do not open the dosing container and do not add softener or liquid detergent to the ADS compartment.
Start dispensing the liquid detergent into the selected tank. The tank can be filled to the MAX mark (maximum amount of detergent that can be poured into the tank is 0,29 US gal (1,1 l).
DESCRIPTION OF THE DOSING CONTAINER
1 - Compartment for main wash liquid and powder detergent with the inscription »MainWash«.
2 - Compartment for softeners with the inscription »Softener«.
3 - Separator or movable barrier.
4 - Tank (A) for liquid detergent for ADS.
5 - Tank (B) for liquid detergent or softener for ADS.
FILLING PROCESS
1 - Pull out the dosing container.
2 - Open the lid of the ADS tank A and pour liquid detergent into it up to the mark »MAX«.
3 - Open the lid of the ADS tank B and pour liquid detergent, softener or other detergent up to the mark »MAX«.
4 - For washing without ADS, pour liquid or powder detergent into the front left compartment with the inscription »MainWash«.
5 - Pour the softener into the front right compartment for washing without ADS.
6 - Close the detergent container.
Do not place any powder detergent in the ADS compartment.
-
If the ADS system is activated, you can also add fabric softener or other liquid detergents (e.g. stain remover) to the dispenser.
-
At the beginning of the program, water will flow through the dispenser and collect all added agents, even if the ADS system is active.
-
The contents of the dispenser will be used – therefore, do not add any agents that are not required.
-
Improper use of additional detergents in the dispenser may cause excessive foaming in the machine.
Only use liquid detergents and softeners or gels recommended by the manufacturer for
use in Auto dose.
Do not mix different liquid detergents or softeners. If you are changing the liquid
detergent (type, manufacturer...), empty the dosing container completely and clean
the dosing container compartments (see chapter /Cleaning the dispenser tray).
Do not mix detergent and softener.
Do not use concentrated or strongly concentrated detergents or softeners (maximum
permissible viscosity is 800 mPa.s). You can only use them if you dilute them with water.
To prevent the dosing container from drying out, do not leave the dosing container
lid open for long periods of time.
We recommend pouring liquid detergent or softener only up to the MAX marking in the compartments.
Do not use any solvent-based, corrosive or gas-emitting products (e.g. liquid bleach).
3Switching off auto dose in the ADS menu.
In the dose modes menu (Dose) select the last option for ADS to access the settings.
By pressing 2 Switch off ADS. Thus, the system will not automatically dose the detergent.
Prewash cannot be selected if ADS is switched off.
When using a washing program with ADS switched off or disabled, add detergent to the manual detergent compartment.
Fill the compartment with liquid or powder detergent. Follow the markings on the separator/movable partition for powder/liquid detergent. When using powder detergent, lift the separator or movable partition upwards.
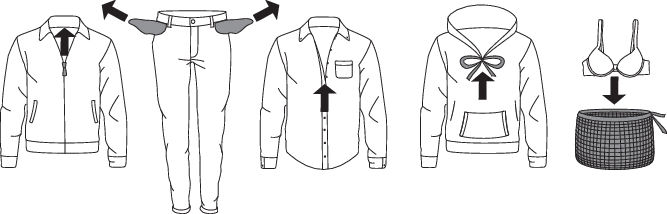
Tips before washing
This chapter includes several tips on how to prepare the laundry for washing.
Before using the washing machine, carefully remove any solid objects and particles from the textiles you intend to wash to prevent damage to the appliance or clogging of the pump filter. This includes (also check all pockets and flaps):
-
solid objects (e.g., screws, clips, small stones, hay, etc.),
-
food residues (e.g., bones, dried dough, etc.),
-
dried particles of construction materials (e.g., mortar, sand, mud, etc.).
The manufacturer assumes no responsibility for malfunctions resulting from failure to follow these instructions, which may also affect the validity of the warranty. Furthermore, the manufacturer does not cover service costs in the event of foreign objects in the pump or pump cleaning.
Laundry sorting
Sort the laundry according to:
-
how soiled it is,
-
color,
-
material,
-
recommended washing temperature.
Clothing
-
Sort the laundry by type of fabric, color, soiling, and recommended washing temperature (see ).
-
Wash the laundry that sheds a lot of fiber or lint separately from other laundry.
-
Empty the pockets. Coins, nails etc. could damage the machine and the fabric.
-
Close the buttons and zippers, tie any ribbons, and turn the pockets inside out; remove any metal clips that could damage the laundry and washing machine interior, or clog the drain.
-
Turn delicate items inside out. This will decrease the risk of tear and color fading.
-
Place very sensitive clothes and small items in a special-purpose laundry washing bag.
(A dedicated textile bag can be purchased separately.)
Laundry symbols
Observe the laundry symbols.
|
Cotton Normal wash; Sensitive laundry; |
|||||||||||
|
|
Max. washing temperature EX. HOT |
|
Max. washing temperature WARM |
|
Do not wash |
||||||
|
|
Max. washing temperature HOT |
|
Hand wash only |
||||||||
|
Bleaching |
|||||||||||
|
|
Bleaching in cool water |
|
Bleaching not allowed |
||||||||
|
Dry cleaning |
|||||||||||
|
|
Dry cleaning with all agents |
|
Perchloroethylene R11, R113, petroleum |
||||||||
|
|
Dry cleaning in kerosene, pure alcohol, and R113 |
|
Dry cleaning not allowed |
||||||||
|
Ironing |
|||||||||||
|
|
Hot ironing, max. HIGH temperature |
|
Hot ironing, max. LOW temperature |
||||||||
|
|
Hot ironing, max. MEDIUM temperature |
|
Ironing not allowed |
||||||||
|
Drying |
|||||||||||
|
|
Drying on a flat surface |
|
Drying at high temperatures |
||||||||
|
|
Drying without prior spinning |
|
Drying at low temperatures |
||||||||
|
|
Drying on a clothes line or a hanger |
|
Tumble drying not allowed |
||||||||


Laundry types
Dyed cotton
Laundry made of dyed cotton which is to be washed at 104 °F (40 °C) should be first washed at a temperature of 140 °F (60 °C) to remove the excess dye. If this is not done, there is danger of dye being washed out of such items. To maintain the colour of the fabric, use bleach-free detergent.
Unbleached linen
Unbleached linen fabrics should be washed at 140 °F (60 °C) with a detergent free of bleach or optical bleaching agents. Heavily soiled linen laundry may be occasionally washed at higher temperatures, but do not do this too often as heat could ruin the shine and strength of linen laundry.
Wool
These fabrics are intended for either machine or hand wash. The Wool/Hand Wash program is equally gentle or even gentler than an actual hand wash.
Wool in particular is sensitive to washing and similar procedures.
When selecting the Wool/Hand wash program use wool detergent and avoid using fabric softener.
If you do not wish to spin your clothes, select a setting without spinning (see chapter ). However, most clothes are able to withstand a short spinning period. Top spinning speed available is 800 rpm.
Viscose and synthetic fibres
Materials made of viscose and some synthetic fibers are highly sensitive, and require a lot of space in order not to crease. When washing fill the recommended load for the program and choose a program with spinning speed of no more than 1200 rpm.
Viscose and acetates are fragile when wet.
Saving time and energy
Save time by using Speed mode and save power with the Eco (ecological) washing mode (Green mode).
Economy and efficiency
You can save a lot of energy by not using the programs operating at higher temperatures.
Select the Quick program if you wish to only refresh the laundry or use the Time program (Time program). This will save water and power.
Selecting the maximum spinning speed will reduce power consumption if you dry the clothes in a dryer or a drying cabinet.
Detergents
Detergents carrying the environment protection label are less harmful to the environment.
Only use detergents for machine washing.
When using thick liquid laundry care products, we recommend diluting them with water
to prevent clogging the dispenser tray drain.
Liquid detergents are intended for washing programes without a prewash cycle.
Only add the detergents in compliance with the recommendations by detergent manufacturers. Recommended amount of washing detergent at certain loads and water hardness levels are specified on the detergent packaging.
Dosing accessories
To correctly dose detergents, especially liquid ones, use the accessories provided by the detergent manufacturer.
Stains
If your clothes are soiled with stubborn stains (blood, eggs, coffee, grass etc.), they should be appropriately treated before the wash. Then, wash your laundry using the special programs (if your washing machine has them).
Before using special-purpose stain removers, try using the natural methods that do not harm the environment on less stubborn stains.
However, prompt action is required! Soak the stain with an absorbent sponge or a paper towel; then, rinse with cold (lukewarm) water – but never with hot water!
When using bleaches or stain removal agents, there is danger of rust (corrosion) and discoloration.
To protect the environment, we advise against using powerful chemicals.
Do not use any chemical substances or agents; only use the stain removing detergents.
Dyeing fabrics
If you want to dye fabrics in the machine, choose the Cotton program with the option to select the Super rinse function. Choose the temperature according to the dye manufacturer's recommendations. If you dye mixed fabrics, such as polyester/cotton, choose a low spinning speed.
After dyeing use the Drum Cleaning program. Use the usual amount of detergent.
When using bleaches or stain removal agents, there is danger of rust (corrosion) and discoloration.
To protect the environment, we advise against using powerful chemicals.
If you wash at low temperatures and/or with liquid detergents, there is a risk of developing microorganisms and an unpleasant odor in the washing machine. Leave the washing machine door open after each wash to allow the appliance to dry. If you detect an unpleasant odor, run the Drum Cleaning programe.
To prevent and remove limescale deposits only use agents with added anti-corrosion protection. Observe the cleaning agent manufacturer's instructions. To remove limescale deposits, we recommend starting the Drum Cleaning programe. Add spirit vinegar (6.7 fl oz. (2 dl)).
We recommend avoiding washing very small amounts of laundry as this will lead to excessive
use of energy and less optimal washing machine performance.
You can save energy and water by filling up the washing machine to the capacity specified
by the manufacturer for each programe.
Operating instructions - Washing step by step (1 – 8)
STEP 1: Sort the laundry
STEP 2: Turn on the main switch
On/Off
Press the  on/off button.
STEP 3: Open the washing machine door and insert the laundry
Open the washing machine door by pulling the handle towards you.
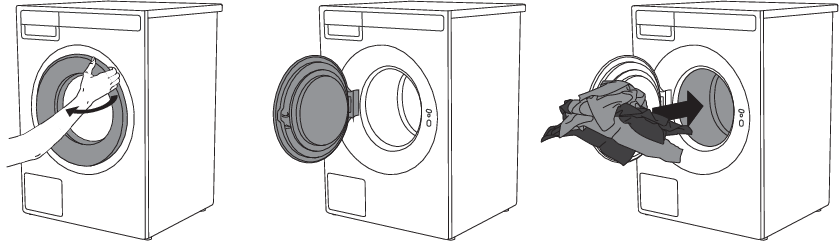
Place the laundry into the washing machine drum.
Before doing so, make sure the drum is empty.
Do not overload the drum!
If the washing machine drum is too full, the laundry will not be washed as thoroughly.
STEP 4: Add the detergent and the softener
Recommended amount of detergent is usually specified on the detergent packaging. When washing a smaller amount of laundry, the amount of detergent used can be decreased.
Observe manufacturers' recommendations regarding the type of detergent suitable for certain temperatures, load size, and water hardness.
When using ADS, the appliance will automatically add the liquid detergent and the softener depending on the amount of laundry and the other settings.
Powder detergent
Only dispense the powder detergent into the front main wash/hand wash compartment »MainWash«. Do not put any powder detergent in the container for ADS.
We recommend adding the powder detergent immediately before the washing cycle. Otherwise, make sure the detergent compartment is completely dry before adding the powder detergent, as otherwise, the powder detergent may cake before the start of the washing process.
Liquid detergent
When using liquid detergent and softeners, follow the detergent manufacturer's recommendations. When using thick detergents, we always recommend using the laundry balls. In the detergent compartment, use the separator (3); see figure in the chapter Description of the washing machine .
Add the liquid detergent to the Main wash dispenser (1) or into the tank A or B for ADS.
Liquid detergent in ADS
The washing machine will automatically add the amount of liquid detergent and softener depending on the amount of your laundry and how heavily soiled it is.
Compartment (A) for liquid detergent for: colored, white, black, delicate or other laundry.
Compartment (B) for liquid detergent for different types of laundry, softener or other rinse aids.
In case of excessive foaming, check the water hardness settings (see chapter/«), how heavily soiled the laundry is and the setting for the amount of liquid detergent according to the manufacturer's recommendations (see chapter ).
Use of other non-homogenised or homemade liquid detergents can cause malfunction of
the ADS. Any servicing required due to such problems shall not be covered by the warranty.
The ADS function is tested with liquid detergents from the world's leading manufacturers.
Do not mix different liquid detergents. When changing the liquid detergent, the tanks
need to be cleaned.
Laundry capsules, ball, or washing net
If you use laundry capsules, a ball, or a washing net, place it directly in the drum and select a program without prewash.
An excessive amount of detergent will not improve washing results. Rather, it will lead to foaming and increase the environmental impact. We recommend using less detergent. Only increase the dosage if you are not satisfied with the washing results.
Softener
Pour the softener into the detergent compartment, into the compartment with the symbol . Observe the recommendation on the softener packaging.
Do not fill the softener compartment over the max. indication (maximum indicated level). Otherwise, the softener will be added to the washing machine drum too soon, leading to a less optimal washing effect.
STEP 5: Choose the program
Choose the program by rotating the Program selector knob in either direction.
Choose the program depending on the type and soil level of laundry (see chapter ).
Estimated program duration will appear on the display.
With the selected program, you can press key 5 and then key 3 Information to display a brief description of the program and the maximum load.
Extra program settings can also be selected for each program. See .
Program table
|
Program |
Capacity |
Spin Speed (rpm) |
Description |
|---|---|---|---|
|
Normal Cotton Cold – Extra hot |
Full load |
MAX |
Program for normal, regular, or typical use for washing up to a full load of normally soiled cotton clothing. Testing Method for US DOE Requirements/Ontario Requirements/NRCan Requirements Test Result from 10CFR Part 430 Subpart B Appendix J2 / CSA C360-13 |
|
White laundry Cold – Extra hot |
1/2 load |
MED |
This program is used for washing white laundry. Select lower temperature for less soiled and higher temperature for heavily soiled garment. |
|
Colored laundry Cold – Hot |
1/2 load |
MED |
This program is used for washing colored laundry using special purpose detergents for colored laundry. We recommend turning dark garments inside out. |
|
Mix/Synthetics Cold – Hot |
1/2 load |
MED |
The MIX/Synthetic program is adapted for clothing made of synthetic and mixed fibers or viscose and for easy care of cotton laundry. |
|
Delicates Cold – Warm |
1/2 load |
MED |
Program for delicate clothing made of synthetic and mixed fibres, and for simple care of cotton or viscose. It may also be used for pillows, quilted jackets and similar items, as it uses a lot of water. Carefully read the washing instructions. If the outer layer has a membrane, do not use a conditioner. Washing temperature can be set up to 104°F (40 °C), and spinning speed can be set up to 1000 rpm. |
|
Wool/Hand wash Cold – Warm |
1/4 load |
MIN |
Gentle washing program for washing wool, silk, and clothes that require manual washing. Maximum temperature is 104°F (40 °C). This program has a short spinning cycle. Top spinning speed available is 1200 rpm. Do not use fabric softener with this program! |
|
Universal wash Cold – Extra hot |
Full load |
MAX |
Use the Universal wash program to wash towels, sheets, underwear, bed linen, etc. Select a lower temperature for less soiled laundry and a higher temperature for heavily soiled clothes. |
|
Sportswear Warm - Hot |
1/2 load |
MED |
This program is suitable for washing clothing with a membrane, waterproof clothing, and breathable clothing that requires simple care. It is suitable for sportswear made of mixed materials. It combines low temperature with gentle tumbling. Do not use fabric softener with this program! |
|
Outerwear Cold – Warm |
1/2 load |
MIN |
The program is suitable for washing winter jackets, coats and all outerwear that is heavily soiled. |
|
Time program Cold – Hot |
1/4 load |
MED |
Use the Time program to set the program time, from 20 minutes to 2 hours. Be sure to choose the time and temperature appropriate to the degree of soiling of the laundry. |
|
Jeans Cold – Warm |
1/2 load |
MED |
Program for washing jeans. Due to a higher water level and an extra rinse, there will be no traces of detergent on the jeans. It uses low temperature and 1200 rpm. |
|
Shirts/Blouses Cold – Hot |
1/2 load |
MED |
This program washes the collars and cuffs without wrinkling them. The wash takes place at a low temperature, with a greater amount of water and gentle tumbling. |
|
Bedding/Towels Warm - Extra hot |
1/2 load |
MED |
This program is used to wash bedding, pillows, and larger items. Weekly wash of your bedding will remove skin residue and mites. |
|
Down Cold – warm |
1/2 load |
MED |
Use this program to wash blankets, coats, vest or jackets. Insert garments into the machine so that they do not touch the rubber seal or the glass. |
|
Steam Refresh |
1/4 load |
/ |
The program allows clothes to be softened and disinfected. Steam refresh reduces or eliminates the need for ironing. After steam refresh the laundry may be slightly damp or contain minor traces of water. |
|
Quick PRO Warm - Hot |
1/2 load |
MAX |
A quick program with high efficiency for smaller amounts of lightly soiled laundry. The program washes with intensive tumbling and MAX rpm. |
|
Waterproofing |
1/2 load |
MIN |
For impregnating garments with special agents that increase water resistance. |
|
Rinse |
Full load |
MAX |
The program is suitable for laundry that only needs rinsing, and for cleaning cloths or mops. |
|
Spinning |
Full load |
MAX |
Use the program when you only wish to spin the laundry. |
|
Drain |
/ |
If you only wish to pump out the water from the washing machine, choose the Drain program. |
|
|
Drum Cleaning |
/ |
This programe is used for cleaning the drum and removing the residue of detergent and bacteria. To select the programe, rotate the program selector knob to the left or to the right to the Drum clean (Cleaning programe) position. Other extra functions cannot be selected. The drum must be empty.Do not add detergent or softener! You can add some spirit vinegar (approx. 2 dl) or sodium bicarbonate (1 tablespoon or 15 g) for effective descaling. We recommend that you use the program at least once a month. |
In terms of energy and water consumption, programes that operate at lower temperatures and last longer are generally the most efficient.
Noise and residual moisture content are affected by the spinning rate: the higher the spinning rate in the spin cycle, the higher the noise and the lower the residual moisture content.
Recommendations for detergents under Regulation (EU) No. 1015/2010
|
Program |
Detergent |
||||
|---|---|---|---|---|---|
|
Universal |
For colored laundry |
For delicate laundry and wool |
Special |
||
|
Normal Cotton |
|
|
|||
|
White laundry |
|
|
|||
|
Colored laundry |
|
|
|||
|
Mix/Synthetics |
|
|
|||
|
Delicates |
|
|
|||
|
Wool/Hand wash |
|
|
|||
|
Universal wash |
|
|
|||
|
Sportswear |
|
|
|
||
|
Outerwear |
|
|
|
||
|
Time program |
|
|
|||
|
Jeans |
|
|
|||
|
Shirts/Blouses |
|
|
|||
|
Bedding/Towels |
|
|
|||
|
Down |
|
|
|||
|
Steam Refresh |
|||||
|
Quick PRO |
|
|
|||
|
Waterproofing |
|
|
|
||
|
Rinse |
|||||
|
Spinning |
|||||
|
Drain |
|||||
|
Drum Cleaning |
|||||
|
|
Choice of options |
STEP 6: Choosing the program settings
Using the program settings, the washing programs can be further adjusted to your wishes.
Some programme settings that were selected remain saved after the wash has finished, and you can change them afterwards.
Selected program settings will remain stored after the end of the washing cycle and may be changed subsequently (except for delayed start which is not stored after the wash is complete).
-
Washing mode (Mode)
-
Temperature
-
Spin
-
Dose
-
Extra functions
Choose the program settings before pressing the Start/Pause button.
When a washing program is in progress, program settings cannot be changed.
Press and hold the button below the program setting to display information about that program setting.
Some settings may not be available on washing programs.
Following are the program settings that may be selected using the buttons 1 to 4:
Washing mode (Mode)
The following washing modes are available:
-
Default mode
(Basic setting)
-
(Eco) Green mode
(Wash that saves energy; lower water consumption).
-
Speed mode
(Time-saving wash; shorter washing times, higher water and energy consumption).
In the Cotton program, we recommend a half-load.
Temperature
The actual available temperature options, will depend on the selected program.
The following temperatures are available for the selected program:
Cold / Warm / Hot / Extra hot
|
|
WASH |
TEMPERATURE |
WASH / RINSE |
||
|---|---|---|---|---|---|
|
|
Cold |
/ |
No heating |
||
|
|
Warm |
105 °F / 40 °C |
Warm / Cold |
||
|
|
Hot |
140 °F / 60 °C |
Hot / Cold |
||
|
|
Extra hot |
194 °F / 90 °C |
Extra hot / Cold |
Spin
The following spinning rates are available for the selected program: max. (rpm) /... / no Drain (max. rpm = depends on the model).
Default setting is Max rpm; it depends on the selected program (spin rate can be changed – reduced or increased (only in some models)).
The actual available spin speed will depend on the selected washing program.
With the No drain option, the program will not include a spin cycle, and the water from the last rinse will remain in the washing machine. The laundry will stay in the water from the last rinse, which will prevent creasing. If you have selected the No Drain option, you have to select the Drain or Spinning program after the end of the washing program to pump the water out from the machine before you open the washing machine door.
Dose
For more program settings, press the button (5) and then confirm the selection with the (1) More options button. Turn the knob to select the desired setting. Press the button (3) to confirm the setting.
The following program settings are available:
Small load
The small load function adjusts the use of water and energy to ensure thorough washing while reducing waste. The small laundry load can be activated to show the correct time if you add up to 2,5 kg of laundry.
Confirm the selection by pressing (3).
Steam desinfection
Steam disinfection is a low temperature disinfection cycle.
Before the start of the main wash, steam is supplied to the washing machine to disinfect your clothes.
Confirm the selection by pressing 3.
Prewash
To use prewash before the main wash, choose the Prewash option. Use of this setting is recommended for heavily soiled laundry or for laundry with stubborn surface stains.
You can select prewash by pressing 3. Confirm the selection by pressing 4 OK.
In the event that the ADS is switched off, the prewash setting cannot be selected, also the prewash is not implemented with the programs where it is preset.
Prewash cannot be selected on some programs. When choosing Speed mode the prewash is automatically switched off.
High water level
The High Water Level option increases the amount of water used during the main wash and rinsing phases and is available with certain programs.
This setting enables more thorough washing and rinsing for heavily soiled laundry, better care of larger or delicate fabrics, and more effective removal of stains and detergent residues.
Confirm the selection by pressing 3. Confirm the selection by pressing 4 OK.
Super rinse
Choose between turning on or turning off the Super rinse.
The setting helps to ensure that the clothes are rinsed thoroughly without leaving behind any detergent residue or dirt. This is recommended for persons with highly sensitive skin and/or in areas with very soft water. The setting allows for double extra rinsing.
Confirm the selection by pressing 3. Confirm the selection by pressing 4 OK.
Rinse and hold
The setting does not include a final spin cycle. If enabled (On), the laundry remains in the final rinse water after the wash is completed, awaiting your next selected step.
You can resume in the following ways:
Unlock the door: the machine drains the water and stops the program.
Spin and finish: spinning is carried out and the wash is completed.
The purpose of the setting is to prevent the garments from developing a bad smell, as it allows you to complete the program after several hours when the user determines how to resume and complete the spin cycle.
Confirm the selection by pressing 3. Confirm the selection by pressing 4 OK.
Anti crease
To prevent creasing, select the Anti-crease function (gentle tumbling). This function is recommended for delicate laundry.
Confirm the selection by pressing 3. Confirm the selection by pressing 4 OK.
It will be carried out after the washing cycle.
Delay start
Choose the delayed start setting when you wish the washing program to start after a certain period of time.
You can choose a start delay time from 30 minutes to 6 hours in 30-minute steps, and then from 6 hours to 24 hours in 1-hour steps.
Press the Start/Pause button to start. When the countdown reaches zero, the selected washing program will start automatically.
If you do not take any action for 5 minutes, the display will turn off.
By pressing the On/Off button you can reactivate it. The display will show the countdown
to the start of the washing cycle.
The display will activate 1 minute before the start of the washing cycle.
After the countdown, washing time will be indicated on the display.
If you want to cancel the delayed start and initiate the washing process immediately, press Skip (Skip). When the Delayed start is already set, it can be cancelled by pressing the Start/Pause button for 3 seconds to return to initial selection.
If you have set the delayed start function and you are using liquid detergent, we do not recommend choosing a program with a pre-wash cycle.
Add to favorite
To add the selected program to your favorites, confirm your selection by pressing 3.
Next to the selected program, the following icon will light up . The program will be stored.
You can store up to 6 favorite programs.
-
Removing a favorite program
When all 6 slots are taken, it is not possible to set a new program.
To add a new favorite program, you need to delete an existing one beforehand.
To remove a favorite program, select the program you want to remove. Select the setting Add to favorite and confirm the removal of the favorite program by pressing 3 Remove. The program will be removed.
To select System settings, turn the program selector knob all the way to the right and confirm the selection by pressing 4 Enter.
If no action is taken for 5 minutes, the display will switch to standby mode (Stand by).
To activate the display, press the On/Off button or open the washing machine door.
STEP 7: Start the wash
Close the washing machine door and press the Start/Pause button.
 Start (pressed briefly – start/resume)
 Pause (short press of the button - pause)
Cancel (press and hold the button for 3 seconds)
Time remaining
Depending on the selected program, the anticipated washing time will be displayed in hours and minutes.
The actual washing time will depend on the selected program, load, type of laundry, spin speed etc.
The actual washing time may be longer or shorter than initially displayed.
The remaining time will be updated during the program duration, depending on the actual amount of laundry and amount of water pumped into the machine. The last remaining time update takes place before the final spinning cycle.
In case of uneven distribution of laundry, the time on the display will flash and it will not count down. Once the laundry is evenly redistributed, the washing time will continue and it will stop flashing.
Adding or removing laundry after the start of the program
To add or remove laundry during the progress of a washing program, use the Start/Pause button to stop the program and then select Add clothes.
The door may be opened when the water is pumped from the machine (but not completely pumped out). Then, add or remove the laundry. Close the door and resume the program. Press Start/Pause.
The program will resume from the point at which it was interrupted.
If the door cannot be opened, it is possible that the temperature in the machine is too high, and you won't be able to add the laundry.
Also, if the door cannot be opened, it is possible that the program has been running for too long and any laundry added at that point would not be efficiently washed.
Pausing, stopping or changing the program
To pause the program, briefly press the Start/Pause button.
To resume the program, press the Start/Pause button again.
To stop the washing program, press the Start/Pause button and hold it for 3 seconds.
Select Stop program. The program is cancelled and the water is pumped out of the machine if necessary. Only then can you open the washing machine door. Use the program selector knob to select a new program, add detergent if necessary, and press Start/Pause.
If the temperature in the drum is very high, then cooling procedure starts before program is canceled.
By pressing On/Off the Washing program can be interrupted.
The washing machine will switch off.
After the appliance is switched back on, press the Start/Pause button to resume the program.
Do not open the detergent compartment while the appliance is operating.
In some cases the door may be locked although no program is in progress (e.g. in case of an error). To unlock the door, press the Start/Pause button and hold it for a while.
Cycle counter
Display of the number of cycles performed. Press and hold key 5 inside the program for 3 seconds.
STEP 8: End of program
After the end of the washing program the display will indicate that the program has been successfully finished.
You can open the door.
If you have additionally selected the Anti crease function, gentle tumbling will continue after the end of the washing program in order to prevent creasing.
Open the door towards you and remove the laundry from the washing machine.
Make sure the washing machine drum is empty.
If you do not take any action within 5 minutes after the end of the program, the display will switch off to standby mode in order to save power.
The display will light up again if you press any of the buttons or rotate the program selector knob.
After the washing cycle, close the water tap and pull out the washing machine plug from the power socket.
Appliance settings
System settings
Enter the by rotating the program selector knob in the main menu all the way to the right.
Confirm your selection by pressing 4 Enter.
Press the 1 Exit in any setting to return to the main menu.
Certain settings allow a short description to be displayed by pressing 4 Information.
Then, use the program selector knob to scroll through the list of settings that can be changed.
Choose Language
By pressing 2 or 3 you can navigate the list of languages.
Confirm your selection by pressing 4 Save.
Lock
This setting disables the on-screen buttons to prevent children from accidentally starting or changing the cycle.
You can Lock the appliance by pressing 2 or 3. For further information, press 4 Information.
Choose between turning on or turning off the lock.
By pressing 4 Information brief information about the setting will appear on the display unit.
When this option is on, you can activate and deactivate it by pressing 2 and 4 and hold them for 3 seconds.
When the lock is activated, no other function can be selected.
After 1 minute of inactivity on the appliance, the lock will activate automatically.
Water hardness
Choose water hardness between the following settings: soft / normal / hard.
Confirm the selection by pressing 2 or 3.
Water hardness can be measured with the measuring strip. Check the information on water hardness with your local water supply company or authority.
Water hardness is determined using the following scales: the German water hardness scale (°dH) and the French water hardness scale (°fH).
|
Water hardness |
Hardness levels |
|||
|---|---|---|---|---|
|
°dH (°N) |
m mol/l |
°fH(°F) |
p.p.m. |
|
|
1 – soft |
< 8.4 |
< 1.5 |
< 15 |
< 150 |
|
2 – normal |
8.4 - 14 |
1.5 - 2-5 |
15 - 25 |
150 - 250 |
|
3 – hard |
> 14 |
> 2.5 |
> 25 |
> 250 |
If the water hardness exceeds 50 °dH (89 °fH), we recommend the connection of an external water softener.
Contact the local water utility, or measure the water hardness using the supplied test strip, to check the water hardness in your area.
Unit settings
Temperature unit (Temperature unit)
By pressing 1 set the unit of measurement for temperature:
-
Celsius °C or
-
Fahrenheit °F.
Liquid unit
By pressing 2 set the unit of measurement for liquids:
-
Millilitres ml or
-
Tablespoons tbsp.
Weight unit
By pressing 3 set the unit of measurement for weight:
-
Kilograms kg or
-
Pounds lbs.
Confirm your selection by pressing 4 Save .
Program management
The Main menu includes the entire set of programs that you can choose using the Program selector knob.
This setting allows only the selected programs to be displayed in the main menu.
Press 4 Enter to display a set of programs.
Use the program selector knob to choose between programs. Confirm your selection by pressing 3. This defines whether the program will be displayed in the main menu.
Symbol will appear next to the selected program.
When you have selected a set of programs, confirm the change by pressing 4 Save.
If you have not made any changes, press 4 Exit.
Only programs marked with will appear on the display unit.
Display brightness
You can set the Brightness of the display.
By pressing 2 or 3 you can adjust the display brightness from 1 to 5.
Confirm your selection by pressing 4 Save.
Sound volume
By pressing 2 or 3 you may choose the acoustic signal volume.
During selection, the acoustic signal will be played with the currently highlighted volume.
Confirm your selection by pressing 4 Save.
Display logotype
By pressing 2 or 3 or you can choose between switching the logo On/Off.
On = display the logo at switch-on
Off = do not display the logo at switch-on
Wi-Fi settings
Shop mode
The machine simulates the display and operation of a standard cycle for demonstration purposes. This setting can only be activated in retail stores.
By pressing 2 or 3 you can choose between turning on or turning off.
For further information, press 4 Information.
The setting allows you to inspect the washing simulation without the machine running.
Errors (Failure read-out)
Reset program list
By pressing 4 Enter you will access the Reset program list, which means that all favorite programs will be deleted. Other settings will not be affected.
Confirm the reset by pressing 4 OK.
Factory default settings
By pressing 4 Enter you access Factory settings, which means the settings will return to their original values (your personal settings and all favorite programs will be deleted).
Confirm the reset by pressing 4 OK.
Cleaning and Maintenance
Cleaning the dispenser tray
Always disconnect the washing machine from the power mains before cleaning.
Cleaning the ADS system is very important for the correct operation of the appliance! Clean the empty container of the ADS system regularly, at least once a month or with every other filling.
1On the right side of the lower part of the dosing container, press on the release mechanism and completely remove the dosing container from its housing.
2On the underside of the dosing container, push into the opening of the left and right compartment of the ADS to remove the tank from the dosing container.
3Remove the tank cover using the tab on the rear side.
Rinse the tank under water and clean thoroughly. You can help yourself with a brush.
4
Also open the tank cap and clean it.
5
Clean the dosing container interior.
6
Reinstall the tank into the housing of the dosing container.
7Use a brush to clean the nozzles on the upper side of the detergent compartment housing.
Use a brush to clean the lower part of the detergent compartment housing.
8Put the dosing container back into its housing and close it.
When cleaning the dosing container, always remove the concentrated detergent and softener residues. Also clean the bottom of the dosing container housing.
The dosing container can be washed in the dishwasher; before that you must remove any residues of detergent or softener. The maximum allowed washing temperature in the dishwasher is 131°F (55°C).
Cleaning the filter
The washing machine has a filter that will retain smaller objects such as coins, buttons, hair etc.
1Before cleaning, drain the water from the washing machine using the Drain program, and disconnect the washing machine from the power mains.
Open the pump filter cover using appropriate tools (the door opening tool is located on the front right side of the dosing container).
2Release the water drain hose from the holder.
3Before cleaning the filter, drain the water from the washing machine by placing the end of the water drain hose over a large shallow container and opening the cap on the water drain hose.
4Gradually rotate the filter in the counter-clockwise direction and pull it out.
5Clean the filter thoroughly under running water.
6Remove all objects and impurities from the filter housing and the impeller.
7Replace the filter as shown in the figure and fasten it by rotating in the clockwise direction. For a good seal, the filter seal surface should be clean.
Reattach the drain hose and close the lid.
We recommend regular cleaning of the pump filter once a month. When washing very fleecy, very dirty or old laundry, do it more often.
Cleaning the exterior of the appliance
Clean the exterior of the appliance and the display using a soft, damp cotton cloth and water. Do not use solvents or abrasive cleaners, as they may damage the appliance. (Please follow the recommendations and warnings provided by the cleaning product manufacturers.)
Do not clean the machine with a jet of water!
After every wash, wipe the rubber door gasket and remove any objects that may have become stuck in the gasket to extend its useful life.
Preventing odors
Modern detergents often allow washing clothes at low temperatures. This means that residue may accumulate in the washing machine, which in turn could cause odors.
To avoid bad odors, we recommend running the Drum Cleaning program once per month . Use a small amount of powder detergent, without any laundry.
If you have hard water
If you are washing with hard water (high limescale content), a greyish-white coating may appear on the washing machine drum. Remove this coating by pouring alcohol vinegar (pickling vinegar) into the washing machine drum (approx. 2 dl) or sodium bicarbonate (1 tablespoon or 15 g) and select any program in which the temperature reaches 90 °C or the Drum cleaning program. See chapter STEP 5: .
Repeat the process as necessary.
Errors: what to do?
Disturbances from the environment (e.g. the power grid) may result in various error reports (see table below: Fault/Error). In such case:
-
Switch off the appliance, wait for at least 1 minute, switch on the appliance again and repeat the washing program.
-
If the error persists, call an authorized service center.
-
Most interferences during operation can be resolved by the user (see table below: Fault/Error).
-
Repairs may only be carried out by an adequately trained person.
-
Repair or any warranty claim resulting from incorrect connection or use of the washing machine shall not be covered by the warranty. In such cases, the costs of repair shall be charged to the user.
The warranty does not cover the errors or failures resulting from disturbances from the environment (lightning strike, power grid failures, natural disasters etc.).
The following lists all the errors that the user can see on the user interface.
|
Problem/error |
Cause |
What to do? |
|---|---|---|
|
Washing machine door does not open. |
Water level too high. |
|
|
Water temperature in the washing machine is too high. |
||
|
The machine will not start. |
Power supply failure. |
Press the OK button to resume the program. |
|
Washing program is not in progress. |
Washing machine door is not properly closed. |
Firmly press on the washing machine door until you hear two clicks when it is closed. |
|
There is no voltage in the power outlet. |
Check if the plug is connected to the power outlet and whether there is electric current (or voltage) in the outlet. |
|
|
Delayed start function has been selected. |
To cancel the delayed start function, press the OK button for three seconds. |
|
|
Washing time is longer than anticipated (the time is regularly updated on the display unit). |
Low inlet water temperature. |
Program duration can be up to 60% longer than initially anticipated in the normal progress. |
|
UKS* (*unbalance system) stability system engaged due to unevenly distributed laundry. |
Program time is extended due to the need to redistribute the laundry in the drum. |
|
|
Low mains voltage. |
Washing machine needs more time because the power mains voltage is too low. |
|
|
Power supply failure. |
Program time is extended by the duration of the power supply failure. |
|
|
Display does not light up. |
There is no voltage in the appliance. |
Check if the plug is connected to the power outlet and whether there is electric current (or voltage) in the outlet. |
|
The wording on the display unit is not in your language. |
You have not selected your preferred language yet. |
|
|
Wet laundry ("unbalance" will appear on display) |
A small amount of laundry will often be unevenly distributed. |
|
|
There are traces of grease (or grease rolls) on the clothes. |
The laundry was very greasy. |
Wash the laundry again. When your laundry is this heavily soiled, add more washing powder or use a liquid detergent in combination with a more powerful (longer) program. |
|
There are still stains on the laundry. |
You used bleach-free liquid detergent or powder detergent for colored laundry. |
Use a detergent that contains non chlorine bleach. |
|
You selected an unsuitable program. |
Use special stain removers. |
|
|
There are white residues of washing powder on the laundry. |
This is not due to poor rinsing by your washing machine, but rather due to phosphate-free detergents which contain ingredients (zeolites) for water softening. These ingredients may be deposited on the laundry. |
Immediately rinse the laundry again. Use liquid detergents that do not contain zeolites. Try removing any residues with a brush. |
|
There is powder detergent left in the main wash compartment of the detergent compartment. |
Water pressure not high enough. |
Clean the filter on the water supply hose. |
|
Some washing powders may stick strongly to the detergent compartment if it is empty. |
||
|
There is fabric softener left in the fabric softener compartment of the detergent compartment. |
The plug cap is not positioned correctly or it is clogged. |
|
|
Odor in the washing machine drum. |
Residues of fabric, washing detergent, and fabric softener in the filter. |
Check if the filter is clean. |
|
Development of germs and bacteria. |
||
|
Machine is moving during operation. |
Feet not adjusted correctly. |
|
|
Transport bolts not removed. |
||
|
Machine is moving during spinning. |
Unevenly distributed laundry or not enough laundry. |
|
|
Noisy (loud) drain pump |
The drain pump filter is clogged. Filter housing and drain pump impeller are clogged. |
Manual opening of washing machine door
The washing machine door may be opened manually if the appliance is not connected to the power mains and if the water has been pumped out of the machine.
-
Choose the program Spinning or Drain to drain the water from the machine. If this does not work, water has to be drained from the washing machine drum manually. See chapter /.
-
Make sure the main switch is off and that the plug is disconnected from the power outlet.
-
You will need to use a flat-blade screwdriver (1) (the screwdriver is not included). Insert the flat-blade screwdriver into the emergency door opening hole on the right side of the washing machine door lock to push the "wheel" inwards and turn it clockwise until the washing machine door opens. Do not use too much force to open the door with a screwdriver.
If the washing machine door still cannot be opened, call a service technician.
The door lock is motorised, which may cause noise during locking and unlocking. This is a normal condition and no cause for concern.
Failure display
Press and hold the INFO (4) button to view the error description on the display. Switch off the washing machine and turn it back on.
The following errors may appear on the display (depending on the model):
** UI = (User Interface)
Unevenly distributed laundry or lumps of laundry in the washing machine drum can cause
problems such as vibration and noisy operation. The washing machine detects such problems
and the UKS* (*stability control system) will be activated.
Smaller loads (e.g. one towel, one sweater, one bathrobe etc.) or clothes made of
materials with special geometrical properties are virtually impossible to distribute
evenly across the washing machine drum (slippers, large items etc.). This results
in several attempts to redistribute the laundry, which in turn leads to longer program
duration. In extreme cases of unfavorable conditions, the program can be completed
without the spinning cycle.
The UKS* (*stability control system) allows stable operation and a longer washing
machine useful life.
If the problems persist despite observing the advice above, call an authorized service technician.
Noise and vibration – make sure the appliance is levelled using the adjustable legs and that the jam nuts are securely tightened.
The warranty does not cover consumables, minor deviations in color, increased noise that results from appliance age and which does not affect the functionality of the appliance, and aesthetic defects on components, which do not affect the functionality and safety of the appliance.
The warranty does not cover the errors or failures resulting from disturbances from the environment (lightning strike, power grid failures, natural disasters etc.).
Service and warranty
Limited Warranty – Residential and Professional Appliances
This Limited Warranty covers parts and labor, except as set forth in this Limited Warranty. Service must be provided by an authorized ASKO service company. YOUR SOLE AND EXCLUSIVE REMEDY UNDER THIS LIMITED WARRANTY SHALL BE PRODUCT REPAIR AS PROVIDED HEREIN. This Limited Warranty is valid only when the ASKO Product is used in the country in which it was purchased. Proof of original purchase date is required to obtain service under this Limited Warranty. This warranty only applies to the original purchaser and is non-transferable.
Residential ASKO Products Used Exclusively for Household/Personal Purposes:
Two (2) Years limited Warranty – Any warranty service claims for residential ASKO Products must be filed with ASKO within two (2) years from date of purchase. Service will be provided during normal business hours. ASKO Dishwashers eligible under 2024-2025 5-Year Warranty Promotion must be registered via us.asko.com website within ninety (90) days of the date of purchase.
Residential ASKO Products Not Used Exclusively for Household/Personal Purposes or used Commercially or used in Marine, Mobile or Aeronautical Applications:
One (1) Year limited Warranty – Any warranty service claims for ASKO Products not used exclusively for household and personal use, or used commercially or used in marine, mobile, or aeronautical applications must be filed with ASKO within one (1) year from date of purchase. Service will be provided during normal business hours.
Professional ASKO Products Used In Residential or Commercial Applications:
Two (2) Years limited Warranty – Any warranty service claims for residential ASKO Products must be filed with ASKO within two (2) years from date of purchase. Service will be provided during normal business hours.
Items excluded from warranty
This limited warranty does not cover:
-
Replacement parts or repair labor if the ASKO Product is used in a manner that is inconsistent with published user or operator instructions and/or installation instructions.
-
Service calls to correct the installation of the ASKO Product, to instruct you on how to use the ASKO Product, to replace or repair house fuses, or to correct house wiring or plumbing.
-
Consumable items and parts, such as filters.
-
Damage resulting from accident, alteration, misuse, abuse, negligence, fire, flood, natural disasters, improper use, improper installation, installation not in accordance with electrical or plumbing codes, or use of products not approved by ASKO, as well as any attempted repair by other than authorized ASKO service companies.
-
Cosmetic damage, including scratches, dents, chips or other damage to the finish of the ASKO Product, unless such damage results from defects in materials or workmanship and is reported to ASKO within 5 days from date of purchase.
-
Pickup and delivery. The ASKO Product is intended to be repaired in your home.
-
Repairs to parts or systems resulting from unauthorized modifications made to the ASKO Product.
-
Expenses for travel and transportation for product service if the ASKO Product is located in a remote area where service by an authorized ASKO service company is not available.
-
The removal and reinstallation of the ASKO Product if it is installed in an inaccessible location or is not installed in accordance with ASKO’s published installation instructions.
-
Replacement parts or repair labor on ASKO Products with original model/serial numbers that have been removed, altered or cannot be easily determined.
Disclaimer
YOUR SOLE AND EXCLUSIVE REMEDY UNDER THIS LIMITED WARRANTY SHALL BE PRODUCT REPAIR AS PROVIDED HEREIN. EXPRESSLY DISCLAIMED ARE ALL OTHER EXPRESS AND IMPLIED WARRANTIES, INCLUDING ANY IMPLIED WARRANTIES OF MERCHANTABILITY AND FITNESS FOR A PARTICULAR PURPOSE. Some jurisdictions do not allow exclusion or limitations regarding warranty rights. This Limited Warranty gives you specific legal rights and you may have other rights that vary from jurisdiction to jurisdiction. Attempted repair by any person other than an authorized ASKO service company will void this Limited Warranty.
Limitation of liability
IN NO EVENT SHALL ASKO OR THE MANUFACTURER AND THEIR RESPECTIVE PARENTS, SUBSIDIARIES AND AFFILIATES BE LIABLE FOR CONSEQUENTIAL, INCIDENTAL, EXEMPLARY, PUNITIVE OR SPECIAL DAMAGES. IN NO EVENT SHALL ASKO OR THE MANUFACTURER AND THEIR RESPECTIVE PARENTS, SUBSIDIARIES AND AFFILIATES BE LIABLE FOR DAMAGES OTHER THAN ACTUAL DAMAGES AND IN NO EVENT FOR DAMAGES IN EXCESS OF THE PRICE PAID FOR THE ASKO PRODUCT AS TO WHICH A CLAIM IS MADE. Some jurisdictions do not allow the exclusion or limitation of incidental, consequential or other damages, so these limitations and exclusions may not apply to you. This Limited Warranty gives you specific legal rights. You also may have other rights that vary from jurisdiction to jurisdiction.
ASKO Customer Care
Read the chapter before contacting the service department. If you have encountered a problem that you cannot resolve, please contact your nearest dealer.
|
Address ASKO: |
Service/support: |
||
|
5995 Windward Pkwy, Alpharetta, GA 30005, USA, +1-800-898-1879 |
USA |
us.asko.com, +1-800-898-1879 |
|
|
CANADA |
ca.asko.com, +1-800-561-7265, service@distinctive-online.com |
||
|
MEXICO |
asko.com/mx, +52-800-400-4372, atencionalcliente@sub-zeromx.com |
Service after expiration of limited warranty
For information about obtaining parts and labor after expiration of this Limited Warranty or arising outside the scope of this Limited Warranty, please contact ASKO Customer Care.
Service
Before calling customer service
See chapters , and and see if you can resolve the problem yourself.
When you contact the service center, please state your model number (2) and type (1) and the serial number (3) of the washing machine.
The model, type, and serial number are indicated on the rating (type) plate located on the interior side of the washing machine door.
The QR and AUID codes are located on the inside of the washing machine door as well.
1 - Model type
2 - Model
3 - Serial number
4 - Article number
5 - QR code
6 - AUID code
Report any malfunction to your local call center; all information can be found in the enclosed warranty statement. Contact details of your authorized service center are available in the warranty statement supplied with the appliance and on the website by scanning the QR code on the rating plate (see chapter ).
In case of a failure, only use approved spare parts by authorized manufacturers.
Repair or any warranty claim resulting from incorrect connection or use of the washing machine shall not be covered by the warranty. In such cases, the costs of repair shall be charged to the user.
Functional spare parts for the ASKO washing machine you purchased will be available for 15 years. During this time, original spare parts will be available to ensure the correct operation of your appliance.
A list of spare parts and repair tips in accordance with the current Ecodesign Directive can be found by scanning the QR code located on the inside of the door of the washing machine.
Or on the following link: https://auid.connectlife.io
Technical information
|
Technical data |
|
|---|---|
|
Height |
33 1/2" - 850 mm |
|
Width |
23 1/2" - 595 mm |
|
Depth |
24 2/3" - 626 mm |
|
Drum capacity |
2.40 cu.ft. (68 L) |
|
Rated power |
See the rating plate |
|
Heater power |
See the rating plate |
|
Water pressure |
14.5–145 PSI (0,1–1 MPa) 14–142 PSI (1–10 kp/cm2) 14.5–145 PSI (10–100 N/cm2) |
|
Washing drum and tub material |
Stainless steel |
|
Housing material |
Hot-dip galvanized and powder coated sheet metal, or stainless steel sheet (depending on model) |
|
Water connection |
59 1/16" (1,5 m), reinforced rubber hose |
|
Drain hose |
63" (1,6 m), polypropylene hose |
Typeface License Notice
This product includes the Noto Sans font, which is licensed under the SIL Open Font License, Version 1.1.
The full text of the license is available at: https://openfontlicense.org
Noto Sans is an open-source typeface developed by Google, and it may be used, modified, and redistributed under the terms of the SIL Open Font License.
|
Radio equipment type |
|
|---|---|
|
(depending on the model) |
HL3215STG, HLW3215-TG, HLW3215-TG01 |
|
Wi-Fi |
|
|
Operating frequency range |
2.4000 GHz - 2.4835 GHz |
|
Maximum output power |
≤10 dBm/MHz (EIRP) (Antenna gain <10 dBi) |
|
Maximum antenna gain |
Gain: 0 dBi |
|
Bluetooth |
|
|
Operating frequency range |
2.400 GHz - 2.4835 GHz |
|
Carrier output |
6 dBm (≤ 10 dBm) |
|
Emission type |
F1D |
Declaration of conformity
The company declares that the device with the ConnectLife function complies with the essential requirements and other relevant provisions of Directive 2014/53/EU. The detailed Declaration of Conformity can be found at the web address https://auid.connectlife.io on your device page under additional documents.
Wi-Fi Network Requirements and Recommendations
1. Access Point and Coverage
-
Standard 2,4 GHz Band Wi-Fi network IEEE 802.11b/g/n required,
-
use a stable router or access point with adequate signal strength (minimum −60 dBm) at the appliance installation location,
-
avoid excessive channel overlap; use non-overlapping 2,4 GHz channels (1, 6, or 11) and 20 MHz channel width,
-
Wi-Fi network capacity must be dimensioned appropriately in multi-appliance installations.
2. Security and Encryption
-
Network must use WPA2-PSK (AES) or WPA/WPA2 encryption,
-
open (unencrypted) networks are not supported,
-
appliance and mobile device must be connected to the same SSID during initial setup,
-
continuous internet connection is required for operation of remote features.
3. Unsupported Network Types
-
Networks with captive portals (browser-based login pages) or public Wi-Fi networks (hotel, guest hotspot with login, etc.),
-
networks requiring proxy servers or VPN tunnels,
-
networks with strict MAC filtering (unless appliance MAC is manually whitelisted),
-
networks enforcing client-based default-deny access control (unless appliance is manually granted access).
Table of consumption values
|
Program |
Temperature |
Capacity |
Program duration (h:min)1 |
Energy consumption (kWh/cycle)1 |
Water consumption (US gal/l cycle)1 |
Residual moisture content (%)1 |
Spin speed - default LCD (rpm)1 |
|
|---|---|---|---|---|---|---|---|---|
|
ii |
Normal Cotton |
cold |
Full load |
00:31 |
0.09 |
6,34/24 |
32 |
MAX |
|
Normal Cotton |
warm |
Full load |
00:38 |
0.08 |
6,60/25 |
32 |
MAX |
|
|
iii |
Normal Cotton |
hot |
Full load |
00:59 |
0.29 |
6,87/26 |
32 |
MAX |
|
iv |
Mix/Synthetics |
warm |
1/2 load |
02:34 |
0.52 |
15,07/57 |
38 |
MED |
|
v |
Time program |
warm |
1/4 load |
00:45 |
0.22 |
6,60/25 |
60 |
MED |
|
vi |
Normal Cotton |
extra hot |
Full load |
01:24 |
0.87 |
7,67/29 |
32 |
MAX |
|
ii |
The cold program at the rated capacity for this program |
|
iii |
One cotton program at the nominal temperature of hot or higher, at the nominal capacity for this program |
|
iv |
One program for textiles other than cotton or a textile blend, at the nominal capacity for this program |
|
v |
One program for quick washing of lightly soiled laundry, at the nominal capacity for this program |
|
vi |
One program for heavily soiled textiles, at the nominal capacity for this program |
|
1 |
Due to the influence of water pressure, hardness, and inlet temperature, the type, quantity, and soiling of the laundry, the detergent used, power supply, and selected functions, the actual values may differ from the specified values. |
The above table includes several examples of the use of energy, water, and time for several different program settings. Actual consumption or duration may vary depending on the water pressure, water hardness, water inlet temperature, room temperature, weight and type of load, changes in power supply, and selected options or settings. In the examples specified here, the draining is set to Normal and no additional options are selected.
Maximum or nominal load applies to laundry prepared pursuant to the IEC 60456 standard.
Adjustment of the displayed washing time
Advanced technology allows the appliance to sense the amount of laundry and add the required amount of water during the washing process. Depending on the washing load, washing time can be longer or shorter and the time displayed will be adjusted accordingly.
Moreover, displayed washing time may change due to differences in inlet water temperature. At low inlet water temperatures, washing time can be longer; at higher temperatures, it can be shorter.
Unevenly distributed laundry or lumps of laundry in the washing machine drum can cause problems such as vibration and noisy operation. The appliance can sense such lumps and will try to redistribute the laundry. Smaller loads (e.g. one towel, one sweater, one bathrobe etc.) or clothes made of materials with special geometrical properties are virtually impossible to distribute evenly across the washing machine drum (slippers, large items etc.). This results in several attempts to redistribute the laundry, which in turn leads to longer program duration.
Table options
|
Program |
Washing mode |
Options |
|||||||||||
|---|---|---|---|---|---|---|---|---|---|---|---|---|---|
|
Temperature |
Default - Normal |
(Eco) Green mode |
Speed mode |
Small load |
Prewash |
Super rinse |
High water level |
Rinse and hold |
Anti-crease |
Start delay |
|||
|
Normal Cotton |
cold |
|
|
|
|||||||||
|
White laundry |
warm |
|
|
|
|
|
|
|
|
|
|
||
|
Colored laundry |
warm |
|
|
|
|
|
|
|
|
|
|
||
|
Mix/Synthetics |
warm |
|
|
|
|
|
|
|
|
|
|
||
|
Delicates |
warm |
|
|
|
|
|
|
||||||
|
Wool/Hand wash |
warm |
|
|
|
|
|
|
|
|||||
|
Universal wash |
cold |
|
|
|
|
|
|
|
|
|
|
||
|
Sportswear |
warm |
|
|
|
|
|
|
|
|
|
|||
|
Outerwear |
warm |
|
|
|
|
|
|
|
|
|
|||
|
Time program |
warm |
|
|
|
|
||||||||
|
Jeans |
warm |
|
|
|
|
|
|
|
|
|
|
||
|
Shirts/Blouses |
warm |
|
|
|
|
|
|
|
|
|
|
||
|
Bedding/Towels |
warm |
|
|
|
|
|
|
|
|
|
|
||
|
Down |
warm |
|
|
|
|
|
|
|
|
|
|||
|
Steam Refresh |
|
|
|||||||||||
|
Quick PRO |
warm |
|
|
|
|
|
|||||||
|
Waterproofing |
|
|
|
||||||||||
|
Rinse |
|
|
|
|
|
||||||||
|
Spinning |
|
|
|
||||||||||
|
Drain |
|
|
|||||||||||
|
Drum Cleaning |
|
|
|||||||||||
|
|
Choice of options |
|
cold |
Cold wash |
DISPOSAL
|
Packaging is made of environmentally friendly materials that can be recycled, disposed of, or destroyed without any hazard to the environment. To this end, packaging materials are labelled appropriately. |
|
|
|
The symbol on the product or its packaging indicates that the product should not be treated as normal household waste. Take the product to an authorized collection center for waste electric and electronic equipment processing. |
|
When disposing of the appliance at the end of its useful life, remove all power cords, and destroy the door latch and switch to prevent the door from locking or latching (child safety). |
|
|
Correct disposal of the product will help prevent any negative effects on the environment and health of people, which could occur in case of incorrect product removal. For detailed information on removal and processing of the product, please contact the relevant municipal body in charge of waste management, your waste disposal service, or the store where you bought the product. |

Notes
We reserve the right to make changes.