Art. No.
INSTALLATION INSTRUCTIONS
Washing machine
WM86L
W7XLW.U
W5114RXLW
W5XLT.U
W5XLG.U
W5XLW.U
Carefully read the instructions for use before using the washing machine.
Introduction
Dear Customer,
Read these instructions carefully and completely before you install the machine. The installation should be carried out by a qualified person who is familiar with all local codes and ordinances for electrical and plumbing connections. See also the general Safety Instructions in the Use & Care Guide.
Cosmetic damage must be reported to the ASKO dealer within five days from the date of purchase. As soon as you unpack the machine, thoroughly check it for cosmetic damage.
The following symbols are used throughout the manual and they have the following meanings:
Information, advice, tip, or recommendation
Warning – general danger
Warning – danger of electric shock
Warning – danger of hot surface
Warning – Risk of Fire
Original instructions
SAVE THESE INSTRUCTIONS FOR FUTURE REFERENCE!
Important safety instructions
 SAVE THESE INSTRUCTIONS FOR FUTURE REFERENCE!
WARNING
To reduce the risk of fire, electric shock, or injury to persons when using your appliance, follow basic precautions, including the following:
Carefully read the instructions for use before using the washing machine.
Install the washing machine according to the manufacturer’s instructions and local codes.
Washing machine installation must be performed by a qualified installer.
The installation should be carried out by a qualified person who is familiar with all local codes and ordinances for electrical and plumbing connections.
Electrical hazard warning during servicing
Certain internal parts are intentionally not grounded and may present a risk of electric shock only during servicing. Service Personnel – Do not contact the following parts while the appliance is energized: motor, pump and control unit.
Before using the appliance for the first time
Packing material
Remove all packaging. When removing the packaging, make sure not to damage the appliance with a sharp object.
Please sort the materials in compliance with local waste management recommendations (see Instructions for use, chapter Disposal).
Transport protection
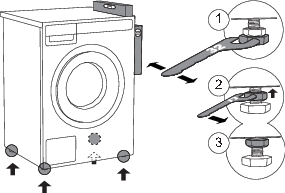
Before using the appliance, remove the three transport bolts and plastic plugs which protect the appliance during transport.
Use a 9/16" (15 mm) or 11/16" (17 mm) (depending on the model) wrench to loosen and remove the bolts as shown in the figures.
To remove the plastic plugs holding the bolts, squeeze them and (1) then pull them out (2).
Remove the caps from the plastic plugs. Push the caps into the holes (1), in which the plastic plugs were located. Save the bolts and plastic plugs (2) in case you have to move your washing machine again.
|
|
ID: |
|---|---|
|
270698 |
Bolt |
|
551188 |
Plastic cap (transport lock) |
|
Please order three pieces of each item! |
|
If you wish to transport the washing machine, reinstall the bolts and plastic caps to lock the machine. This will prevent any damage to the machine due to vibrations during transport. If you have lost the transport bolts or plastic caps, replacements can be ordered at your dealer.
Installation and connection
To reduce the risk of severe injury or death, follow all installation instructions.
Remove all packaging. When removing the packaging, make sure not to damage the appliance with a sharp object.
Cosmetic damage must be reported to your dealer within five days from the date of purchase. After unpacking the washer, thoroughly check the unit for cosmetic damage.
Before connecting the washing machine to the power mains, wait for at least 2 hours until it reaches room temperature.
Save these instructions.
Read these instructions carefully and completely before you install the machine.
The installation should be carried out by a qualified person who is familiar with all local codes and ordinances for electrical and plumbing connections.
Positioning the washing machine
The washing machine can be installed as a built-in or a free-standing unit.
When installing the washing machine, the wall outlet should be freely accessible.
Necessary clearance around the washing machine for best performance
The washing machine may not be in contact with a wall or adjacent structures. For optimum washing machine operation, we recommend observing the clearances from the walls as indicated in the figure. In case of failure to observe the minimum required clearances, safe and correct washing machine operation cannot be ensured. Moreover overheating can also occur.
For safety reasons, maintain a minimum clearance of 1" (25 mm) between the back of the appliance and the wall, and at least 1 5/8" (40 mm) between the top of the appliance and any overhead structure.
Opening the washing machine door (bird's-eye view)
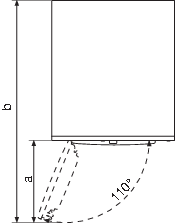
The washing machine door width (a) is 17 3/4" (450 mm).
The washing machine depth with the door open (b) is 43 7/8" (1115 mm).
The washing machine door can be opened up to the angle of 110°.
Adjusting the washing machine feet
Place the washing machine so that it is stable. It is important that the machine is level to prevent excessive vibrations during spin cycles. Each foot of the washer is adjustable, so you can level the washer on any surface. Once it is level, securely tighten the lock nuts on the feet to prevent excessive vibration during spin cycles.
1Level the washing machine in all directions and traverse direction by rotating the adjustable feet (using a spanner no.1 1/4" (32mm)).
The feet allow levelling by +/- 3/8" (1 cm).
2When the appropriate height of feet is set, use a wrench no.11/16" (17mm) to firmly tighten the lock nuts (counter nuts) towards the bottom of the machine
 .
.
3Tighten the jam nuts (counter nuts) to the end position.
Freestanding appliance
The washer can be placed next to the dryer. It is essential that the machine is leveled and the locknuts are tightened to prevent excessive vibration during spin cycles. Also be sure to leave a minimum of 1/2" (25mm) of space between the washer and the dryer.
The surface on which the appliance is placed should be clean and level.
The washing machine and the dryer can be placed next to each other.
To stack a dryer on top of a washing machine, use the front feet attachments and the tipping guard. See the next section below.
Stacking an ASKO dryer on top of an ASKO washing machine
At least two people are required to install the tumble dryer on top of a washing machine.
ASKO washers should never be stacked on a counter or a dryer. You can, however, stack an ASKO dryer on an ASKO washer. Refer to your Dryer Use and Care Guide for instructions on how to do this.
To stack a dryer on top of a washing machine, use the front feet attachments (plastic footrests (C)) and the tipping guard (A+B), supplied in the dryer drum.
If the washing machine and dryer are not the same dimensions, you can purchase a connecting plate designed for the WM86–TD76 combination from your dealer.
For detailed instructions on how to install the ASKO tumble dryer on the ASKO washing machine, refer to the instructions provided with your ASKO tumble dryer.
The tipping guard (A+B) corresponds to ASKO washing machines and cannot be installed on washing machines of other brands.
The washing machine on which you wish to install the dryer must be able to bear the weight of the dryer (see washing machine’s rating plate or technical information).
All ASKO washing machines can bear the weight of the dryer.
Built-in
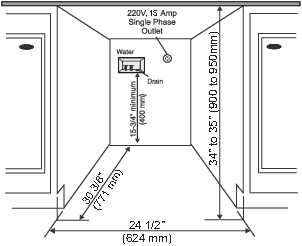
Installation under the counter
ASKO washers can be installed beneath a cabinet or worktop with a height of 35 1/2" to 37 1/2" (900 to 950 mm) or in a closet. There must be a gap of about 1/2" (12 mm) all around the machine including between the rear edge of the machine’s top panel and the back wall. The opening width must be at least 24 1/2" (624 mm). Space must also be available for the fill and drain hoses. See the illustration for measurements and positions.
If the drain outlet is higher than 24" (610 mm), the connections will need to be recessed.
Closet Install- Ventilation Requirements
ASKO's front panel controls make it possible to install the washers and dryers in a cabinet or closet.
Make sure that there is a minimum distance of 1/2" (12 mm) between the appliance and the cabinet or wall, and a minimum distance of 1" (25 mm) between the rear edge of the top panel of the appliance and the cabinet or wall. To provide adequate ventilation, we recommend doors with grilles. Otherwise, doors must have ventilation openings. See the figure for the minimum ventilation openings.
Ventilation Requirements of ASKO laundry concept (when installing the appliance in a closet)
Make sure there is clearance between appliances and cabinet or wall and 1" (25 mm) minimum clearance between the rear edge of the appliance top panel and the cabinet or wall.
When the closet or cabinet is closed with a door, we recommend using louvered doors to ensure proper ventilation.
Otherwise, the door must have ventilation gaps. See the figure for the dimensions of the ventilation openings.
Ensure that the washing machine door can be opened without hindrance after installation.
Failure to follow these instructions can negatively impact the appliance performance and may also result in failure of the appliance.
Connection to water supply
The water inlet hose is included inside the drum of the washing machine. Before use, it must be connected to the appliance and the water supply.
The machine has to be connected to water supply by an adequately trained person.
AQUA - STOP
If an internal tube or hose is damaged, a shut-off system is activated that cuts the water supply to the washing machine. In such case, the control glass (a) will turn red. Replace the water supply hose.
Use the water supply hose to connect the appliance. Water pressure has to be between 15–145 psi (approximately 0,1–1 MPa, 1–10 kp/cm2, 1–10 bar, 10–100 N/cm2).
If the hoses are newly installed, we recommend rinsing them to remove any impurities. Otherwise, these impurities could clog the filter in the water connection on the washing machine and thus cut off the water supply.
The water intake hose has to be fastened firmly enough for the hose to have a good seal. After connecting the hose, the seal must be checked for any leaks.
The washing machine has a sensor that detects water leakage. If there is water on the bottom of the washing machine, the sensor is activated and trigger a shut-off system to cut the water supply to the washing machine; washing process is stopped, water supply is shut off, the appliance engages the pump, and signals an error.
Only use the water supply hose supplied with the appliance. Do not attempt to install any used hoses or hoses not supplied by ASKO.
If the connection on the supply hose is of different dimensions than the water tap (e.g. 3/4” (1,9 cm) → 1/2” (1,22 cm), use an adapter.
When connecting the water supply hose, make sure to connect it in a way that allows adequate and unobstructed water supply.
If the unit is installed on a second story, follow local building codes. We recommend installing a drip pan.
Connecting to hot/cold water supply
(depending on the model)
A few seconds after you start a program, the washing machine will begin to fi ll with water from the hot and cold supplies. If for some reason no hot water is available, the machine waits for one minute and then fi lls with cold water only. The wash drum does not start to rotate until it begins to fi ll with water. However, if you choose to connect your ECOmachine to cold water only, it is important that you shut off the hot water connection.
Your washing machine has a hot and cold water connection. Connect one hose to the
cold water connection and the other hose to the hot water connection, as indicated
on the back of the appliance:
COLD = cold and
HOT = hot.
Hot water is supplied for programs operating at 104 °F (40 °C) or more.
Hot water connection
The hot water temperature must not exceed 158 °F (70 °C) ((140 °F (60 °C) in the UK (United Kingdom)).
If your washing machine model has connections for both hot and cold water, and you only wish to connect cold water, the protective cap must remain in place on the hot water inlet. The appliance will function normally in any configuration – no additional settings are required.
Installing the drain hose
Upon delivery, the washing machine has a drain hose attached to the back wall (Figure 1), which must be connected to the drain.
If the drain hose is not correctly attached, safe and correct washing machine operation cannot be ensured.
The drain hose can be installed in three ways (see Figure 2):
1Into a wall drain with a siphon (A), which must be properly installed so that it can be cleaned;
2Into a sink or bathtub (B). Use a string to attach the hose through the opening in the elbow so that it does not slip to the floor;
3Directly into the sink drain (C). The diameter of the drain hose must be at least 1 5/8" (4 cm). The internal hose diameter should be at least 3/4" (18 mm) (D).
The end of the drain hose can be no more than 35 7/16" (900 mm) and at least 23 5/8" (600 mm) mm from the ground. The lower position (23 5/8" (60 cm)) is always recommended. Make sure the drain hose is not bent.
If the hose is extended, the internal diameter of the coupling must not be less than 1/2" (12.2 mm).
Do not extend the drain hose higher than 35 7/16" (900 mm) from the bottom of the unit.
Connecting to the household power
After installation, the washing machine should stand still for two hours before it is connected to the power mains.
Connect the appliance to a grounded power outlet. After installation, the wall outlet should be freely accessible. The outlet should be fitted with a ground contact (in compliance with the relevant regulations).
Electrical connections
The machine is delivered ready-fitted with a plug and is intended for connection to an ASKO Dryer, which is equipped with a matching receptacle. The plug supplied with the washer can only be used with an ASKO Dryer. If the washer is used separately or with another dryer, it must be on a separate 208-240 V single-phase circuit.
If the machine is to be used in a wet area, the supply must be protected by a residual current device.
As supplied: 208–240 V, 60 Hz, 2000 W heating element, 15 A fuse required.
Connection to a permanently wired supply point must be made only by a qualified electrician.
Grounding instructions
This appliance must be grounded. In the event of malfunction or breakdown, grounding will reduce the risk of electric shock by providing a path of least resistance for electric current.
This appliance is equipped with a cord having an equipment grounding conductor and a grounding plug. The plug must be plugged into an appropriate outlet that is properly installed and grounded in accordance with all local codes and ordinances.
Do not modify the plug provided with the appliance. If it will not fit the outlet, have a proper outlet installed by a qualified electrician.
Improper connection of the equipment grounding conductor can result in a risk of electric shock.
Check with a qualified electrician or serviceman if you are in doubt as to whether the appliance is properly grounded. Do not modify the plug provided with the appliance. If it will not fit the outlet, have a proper outlet installed by a qualified electrician.
Notes
We reserve the right to make changes.