Setting
Instructions for useUser Manual
Induction hob
HI86471FV
HI87471FV
HI88471F
HI88471FV
HI88571FV
HI89571FV
This user manual provides information about the installation and safe use of the appliance.
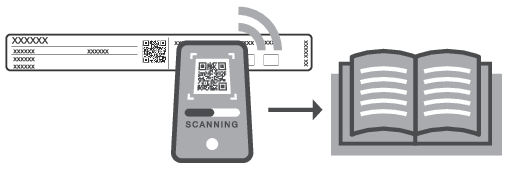
For more detailed instructions and tips, please visit https://atag.nl or scan the QR code. This QR code can be found on the bottom of the appliance, with the documents provided, or (if available) on the quick guide.
Pictograms used
The following symbols are used throughout the manual, and they have the following meanings:
Information, advice, tip or recommendation
Warning – general danger
Warning – danger of electric shock
Warning – danger of hot surface
Warning – danger of fire
It is important that you carefully read the instructions.
Safety instructions
IMPORTANT SAFETY INSTRUCTIONS
READ CAREFULLY AND KEEP IT FOR FUTURE REFERENCE!
General
The manufacturer cannot be held liable for any damage resulting from failure to follow the safety instructions and warnings.
Damage caused by incorrect connection, incorrect fitting, or incorrect use is not covered by the warranty.
-
This appliance can be used by children aged from 8 years and above and persons with reduced physical, sensory or mental capabilities or lack of experience and knowledge if they have been given supervision or instruction concerning use of the appliance in a safe way and understand the hazards involved.
-
This appliance and the accessible parts will become hot during use. Do not touch hot parts. Keep children younger than 8 away from the appliance unless they are under continuous supervision.
Children shall not play with the appliance. Cleaning and user maintenance shall not be made by children without supervision.
-
WARNING: Danger of fire: do not store items on the cooking surfaces.
-
WARNING: Cooking with fat or oil on a hob without supervision can be dangerous and can lead to a fire.
-
CAUTION! The cooking process has to be supervised. A short-term cooking process has to be supervised continuously.
NEVER try to extinguish a fire with water. Instead, switch the appliance off and then cover the flames with, for example, a lid or a fire blanket.
If a drawer underneath the appliance is permitted (see the installation instructions), without an intermediate bottom, this should not be used to store highly flammable objects/materials. Ensure that there is adequate clearance of a few centimetres between the bottom of the hob and the contents of any drawers.
Always provide adequate ventilation!
The hob is only to be used for the preparation of food.
This appliance is only designed for household use.
The appliance is not designed for heating rooms.
Never cover the appliance with a cloth or something similar. If the appliance is still hot or is switched on, there is a risk of fire.
Do not use the appliance as a worktop. The appliance may accidentally be switched on or still be hot, which means objects could melt, become hot or catch fire.
The appliance is not intended to be operated by means of an external timer or separate remote control system.
Never use a steam cleaner for cleaning the appliance. Only clean the appliance when switched off. The steam of a steam cleaner could reach the conducting parts and cause an electrical short.
The ceramic top is extremely strong but not unbreakable. For example, a spice jar or sharp utensil falling on it could cause it to break.
If you decide to discontinue using the appliance because of a fault, we recommend you cut off the cable after removing the plug from the plug socket. Take the appliance to your municipality’s waste disposal site.
WARNING: If the surface is cracked, switch off the appliance to avoid the possibility of electric shock.
Ceramic glass plate broken
-
Switch off the hob immediately and disconnect the appliance from the power supply.
-
Do not touch the appliance surface.
-
Do not use the appliance.
The cooking zones heat up during use and stay hot for a while afterwards. Keep young children away from the hob during and immediately after cooking.
Induction use
-
Metal objects or objects containing metal, such as knives, forks, spoons, and lids, should not be placed on the hob surface, as they can get hot.
-
When the induction hob is in use, keep objects that are sensitive to magnetic fields (credit cards, bank cards, discs, watches and similar items) away from the hob. We advise anyone with a pacemaker to consult their cardiologist first.
-
Never use aluminium foil for cooking, and never place products packaged in aluminium on the hob. The aluminium would melt and irreparably damage your device.
Safe use
-
Do not keep objects that children might find interesting in cupboards above or behind the appliance.
-
Do not warm closed tins on the hob. There will be a build-up of pressure that will cause tins to explode. You might get injured or scalded.
-
Do not use the appliance in temperatures below 5 °C.
-
The appliance should not be placed or used outdoors.
-
When you use the hob for the first time, you will notice a “new smell”. Don’t worry, this is normal. If the kitchen is well ventilated, the smell will soon disappear.
-
Never open the casing of the appliance.
-
As soon as you remove the pan from the hob, the cooking process will stop automatically. Get into the habit of switching off the cooking zone or hob manually to avoid unintentionally switching on the appliance.
-
After use, switch off the hob element using the controls and don’t rely only on the pan detector.
-
Remember that if the hob is used in a high setting, the heating time will be very short. Do not leave the hob unattended if you are using a zone in a high setting.
Temperature safety induction zones
-
The hob is fitted with a cooling fan which cools the electronic components during cooking. The fan may operate for a while, even after the end of the cooking process.
-
The induction cooking hob is also fitted with an overheating protector which protects the electronic components from damage. The protector operates in several ways. When the cooking zone temperature gets very high, the cooking power is automatically reduced. If this does not suffice, the cooking zone power continues to decrease, until the safety mechanisms switch off the cooking zone completely. When the cooking hob is cooled down, its total power will be available again.
Cooking time limiter
If a cooking zone is switched on for an unusually long time, it will be switched off automatically.
Depending on the setting you have chosen, the cooking time will be limited as follows:
|
|
The cooking zone switches off automatically after: |
|---|---|
|
1 and 2 |
9 hours |
|
3, 4 and 5 |
5 hours |
|
6, 7 and 8 |
4 hours |
|
9 |
3 hours |
|
10 |
2 hours |
|
11 and 12 |
1 hour |
The cooking-time limiter switches the cooking zones off if the time in the table has elapsed.
|
Setting |
The cooking zone switches to setting 12 automatically after: |
|---|---|
|
Boost |
10 minutes |
Cooking zone related timers take priority over the cooking-time limiter.
Use
Operation of the touch keys and sliders
-
The touch sensors only react to the light pressure of a fingertip. Do not operate the controls with any other objects.
-
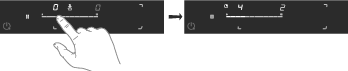
The cooking hob is operated by a slider. You can either touch the selected part of the slider or move over the slider to increase or decrease the power.
-
To set the cooking zone power level, touch the desired spot on the slider. As you touch the slider, the selected power level will appear on the cooking zone display unit.
-
Do not use any objects to operate the slider.
Induction cooking

Induction cooking is fast
To start with, you will be surprised by the speed of induction cooking. Especially at higher settings, foods and liquids will come to a boil very rapidly. It is best not to leave pans unattended to avoid them boiling over or boiling dry. With induction cooking, there is no heat loss, and the handles stay cool.
The power level adjusts itself
In induction cooking, only the zone on which the pan is placed is used. If you use a small pan on a large zone, the zone will adjust the power to the pan's diameter. The power will thus be lower, and it will take longer before the food comes to a boil.
-
Grains of sand, salt, or sugar may cause scratches that are impossible to remove. Therefore, only put pans with a clean base on the cooking surface, and always pick pans up to move them.
-
Do not use the hob as a worktop.
-
Always keep the lid on the pan when cooking, in order to avoid energy loss.
Easy
The electronic controls are accurate and easy to set. On the lowest setting, you can melt chocolate directly in the pan, for example, or cook ingredients that you would normally heat in au bain-marie.
Fast
Thanks to the induction hob high power levels, bringing food to a boil is very quick.
Clean
The hob is easy to clean. Because the cooking zones do not get any hotter than the pans themselves, food spills are unlikely to burn into the glass.
Safe
The heat is generated in the pan itself. The glass top does not get any hotter than the pan. This means that the cooking zone is considerably cooler than a ceramic hob, for example.
Once a pan has been removed, the cooking zone cools down quickly.
Capacity distribution of cooking zones
Depending on the hob model, the cooking zones can affect each other. When several cooking zones are switched on simultaneously, the available capacity is shared automatically between them.
When the maximum capacity of the combination of cooking levels is reached during setting, one or more zones are automatically reduced to the highest possible setting at that moment. This is indicated by the flashing of the relevant control element.
Pans for induction cooking
Induction cooking requires a particular type of pan in terms of quality.
Pans that have already been used for cooking on a gas hob are no longer suitable for use on an induction hob.
Only use pans that are suitable for electric and induction cooking with:
-
a thick base of a minimum of 2.25 mm;
-
a flat base.
You can check for yourself whether your pans are suitable using a magnet. A pan is suitable if the base of the pan is sufficiently attracted by the magnet.
|
Suitable |
Unsuitable |
|---|---|
|
Special stainless steel pans |
Earthenware |
|
Class Induction |
Stainless steel |
|
Solid enamelled pans |
Porcelain |
|
Enamelled cast-iron pans |
Copper |
|
Plastic |
|
|
Aluminium |
Please note!
Be careful with enamelled sheet-steel pans:
-
the enamel may chip (the enamel comes loose from the steel) if you switch the hob on at a high setting when the pan is too dry;
-
the base of the pan may warp, for example as a result of overheating;
-
heat enamelled pans slowly.
Never use pans with a misshapen base. A hollow or rounded base can interfere with the operation of the overheating protection, causing the appliance to become too hot. This may lead to the glass top cracking and the pan base melting. Damage caused by using unsuitable pans or boiling dry is excluded from the guarantee.
The diameter of the pan
The diameter of the bottom of the pan must be at least the value prescribed in below table.
|
Cooking zone |
Minimum pan bottom diameter |
|---|---|
|
ø 180 mm |
ø 110 mm |
|
ø 210 mm |
ø 145 mm |
|
190 x 210 mm |
ø 145 mm |
|
ø 260 mm |
ø 145 mm |
You will achieve the best results by using a pan with the same diameter as the zone. If a pan is too small, the zone will not work.
Pressure cookers
Induction cooking is very suitable for pressure cookers. The fast-reacting cooking zone brings the pressure cooker to pressure quickly. As soon as you switch off a cooking zone, the dish stops cooking immediately.
Pan detection
The hob automatically detects whether there is a suitable pan on a cooking zone.
Integrated pan recognition
If a certain power level is set for a cooking zone and there is no (suitable) pan on the cooking zone, the cooking zone will not deliver any power. After a certain period, the cooking zone will switch off automatically.
Induction sounds
-
Ticking sound
This sound can be caused at lower power level settings or by the automatic pot detection.
-
Pan makes sounds
Pans can make some noise during cooking. This is caused by the energy flowing from the hob to the pan. At high settings, this is perfectly normal for some pans. It will not damage either the pans or the hob.
-
Ventilator makes sounds
To increase the lifespan and performance of the electronics, the appliance is equipped with fans. During intense appliance use, the fan is activated to cool down the appliance, and you will hear a buzzing sound. The fan still runs for several minutes after the hob has been switched off.
Cooking levels
Because the settings depend on the quantity and composition of the pan and its contents, the table below is intended as a guideline only.
|
Level |
Purpose |
|---|---|
|
Use settings 1 - 5 to: |
|
|
Use settings 6 - 9 to: |
|
|
Use settings 10 - 11 to: |
|
|
Use setting 12 to: |
|
|
Use setting boost to: |
|
Operation
Start cooking
Two cooking modes are available:
-
Standard cooking with power levels.
-
Cooking with the PLUS menu
Standard cooking
-
Place a pan on a cooking zone.
-
Make sure the bottom of the pan and the surface of the cooking zone are clean and dry.
-
-
Touch the on/off key to switch on the hob.
-
The hob automatically selects the first pan placed on it. The display of the cooking zone lights up.
-
-
Touch the desired cooking zone key if the pan is not automatically selected.
-
A single audio signal sounds.
-
The slider lights up.
-
-
Set a higher or lower setting by sliding over the slide control with your finger or by tapping on the slide control.
-
The cooking zones have 12 settings. There is also a ‘boost’ setting.
-
-
Set the power level to ‘0’ to switch off the cooking zone.
When no cooking zone is active for 60 seconds, the cooking hob will power off.
Boost
You can use the ‘boost’ function for cooking at the highest power level during a short time (max. 10 minutes). After the maximum boost time has passed, the power will be reduced to setting 12.
-
Place a pan on a cooking zone.
-
Touch level 12 on the slider or slide along level 12 to set the boost level.Touch level 12 twice if Auto Boost is switched off (see chapter Settings).
-
1x scrolling text "booSt" and then "12b" appear in the display.
-
-
To deactivate the boost for the selected cooking zone, again touch level 12 on the slider.
To avoid overheating, the electronic control system may automatically deactivate boost prematurely and decrease the power level to 12.
Bridge Induction zone
The Bridge Induction zones (the front and rear) can be linked together. This creates one large zone that can be used, for example, for a large fish pan or various pans at the same power.
-
If the Bridge Induction zones are linked, the grill temperature (from the PLUS menu function ‘Grilling’) can be used.
-
Use a (fish) pan covering at least the middle of the Bridge Induction zones.
Connecting Bridge Induction zones
-
Place a large pan on both cooking zones so that both zones are well covered.
-
The zones are linked automatically if the brd (auto-connecting) function is active (consult chapter ‘Settings’).
-
-
Touch simultaneously the cooking zone keys of the front and rear cooking zones.
-
The power level or temperature (when using the PLUS menu) is displayed simultaneously on both linked cooking zones.
-
-
Use the slider of the front cooking zone to set the desired cooking setting for the linked cooking zones.
-
Touch both cooking zone keys again to unlink the cooking zones.
Cooking with the PLUS menu
The PLUS menu allows cooking with semi-automatic programmes, enabling temperature cooking for all kinds of cookware that fit the programme's purpose.
The automatic cooking programmes, up to 100-degree programme, operate based on temperature measurements, which means heating times may vary depending on the amount in your pan. For optimal performance, choose a cooking zone equal to or slightly smaller than the diameter of your pan base. The following quantities per pan base diameter are recommended for the best performance: 160 mm (1 litre), 200 mm (2 litres), and 240 mm (3 litres). You can also use other quantities, but remember that this may affect performance.
-
Touch the PLUS programmes key to select the programme: keeping warm/heating up and grill.
-
Use the slider to select a plus programme temperature (see table).
-
Heating up/keeping warm indicator lights up.
-
At a selected temperature above 100 °C, the 'frying' indication comes on.
-
When the programme or temperature selection does not change for 3 seconds, the programme is activated. To deactivate a PLUS programme, press the active cooking zone key for about three seconds.
For certain programmes, such as Heating up/keeping warm and Frying, confirmation is required after the heating phase ends and the food has been added. When the set temperature and the PLUS programme icon are flashing and an audible signal sounds, add the food to the pan. Then confirm by pressing the temperature indicator within 2 minutes. From that point on, the programme will maintain a constant temperature.
The hob is equipped with a power limiter. If the total power of operating cooking zones exceeds the maximum available amount of power, the power is automatically reduced. The display of the cooking zone that is being reduced in its power is first flashing; the level is then automatically reduced to the highest available power.
Always add water, a little oil or butter before starting a programme; never use an empty pan or pot.
Keeping warm and Heating up
|
Temperature (°C) |
Use |
|---|---|
|
45 |
melt chocolate |
|
70 |
heating up/keeping warm |
|
94 |
simmer vegetables |
|
100 |
bring food or liquid to the boil quickly |
If the cooking zone is hot, 'keep warm' and 'heating up' programs are unavailable.
Frying
|
Temperature (°C) |
Use |
|---|---|
|
140 / 160 |
fish, bacon, fried egg, vegetables in butter |
|
180 / 200 |
schnitzel, sausages, jacket potatoes |
|
220 |
wok |
Grilling (Bridge Induction zones are connected)
|
Temperature (°C) |
Use |
|---|---|
|
160 |
fish, bacon, fried egg, vegetables in butter |
|
180 / 200 |
schnitzel, sausages, jacket potatoes |
|
220 |
wok |
The correct operation of the automatic programmes depends heavily on the quantity, type of pan, starting temperature, and other factors.
Pause
The pause function can be used to pause the operation of the entire cooking hob for up to 10 minutes. Thus, you can walk away from the appliance or safely clean the cooking hob, within a short period, without losing your settings.
Switching on the pause
At least one cooking zone must be active.
-
Touch the pause/start key.
-
You will hear a short beep.
-
The settings on all active cooking zones are reduced to setting 1 to keep food warm.
-
All timer functions are paused.
-
The pause key flashes.
-
All keys are inactive except the pause and on/off-key.
-
If no key is touched within 10 minutes, all active cooking zones automatically turn off.
Switching off the pause
-
Touch the pause/start key again within 10 minutes.
-
The hob continues to operate with the same settings.
-
Child lock
The cooking zones can be locked to prevent them from being switched on inadvertently.
-
Touch the on/off key to switch on the hob.
-
Touch the power key again for 2 seconds.
-
The ‘Loc’ indication appears on the display and the hob controls are locked.
-
-
Proceed in the same way to unlock the controls.
-
The ‘Loc’ indication disappears from the display, and the hob controls are unlocked.
-
Time functions
Cooking zone timer
Every cooking zone has a cooking zone timer.
The cooking zone timer can be used in two different ways: as a stopwatch timer or a switch-off timer that switches off the corresponding zone. The timers cannot be used at the same time.
-
The stopwatch timer can be used to check how long cooking has been done on a cooking zone.
-
Touch the cooking zone timer key to select the stopwatch timer. After a short delay, it starts counting.
-
If ‘Auto-Stopwatch Timer’ is on, the stopwatch timer will start counting immediately when a power level is set. The current value will not be visible until the stopwatch timer is selected.
-
If ‘Auto-Stopwatch Timer’ is off, the stopwatch timer will start counting after selecting it.
-
Switch off the ‘Auto-Stopwatch timer’ by touching the cooking zone timer key and then touching the key again for a long time. Touching the cooking zone timer key for a long time afterwards sets the stopwatch timer to 0.00.
-
-
The switch-off timer can be used to automatically switch off a cooking zone.
-
When the time set on the timer expires, the cooking zone will automatically switch off and emit an audible signal.
-
Touch the timer to turn off the audible signal; otherwise, it will turn off automatically after a while. The timer can be set separately for all cooking zones.
-
Setting the switch-off timer
-
Touch the timer key of the desired active cooking zone.
-
The timer key and '0.00' will flash on the cooking zone display unit.
-
-
Set the desired cooking time with the slider (see chapter 'Dynamic Slider').
-
If desired, repeat the same steps to set the timer for another active cooking zone.
-
After the set time has elapsed, the alarm sounds, the key for the relevant cooking zone flashes and ‘0.00’ flashes on the timer display.
-
The cooking zone is switched off.
-
To stop the alarm, touch the timer key, or remove the pan from the cooking zone.
-
If you move the pan from the cooking zone, all timer functions set for that cooking zone will be paused.
Deactivating the cooking zone timer
-
Long touch the cooking zone timer key of the desired active cooking zone.
-
The timer is switched off.
-
 Kitchen timer
The kitchen timer is not connected to a cooking zone. The kitchen timer does not switch off the cooking zone.
-
Touch the kitchen timer key.
-
Set a kitchen time using the slider.
-
The kitchen timer can be reset by touching the kitchen timer key for 3 seconds.
-
Control panel

-
On/Off and Child lock touch key
-
Pause/Start touch key
-
Wi-Fi/connectivity touch key
-
Kitchen timer touch key
-
Controls for front left cooking zone
a. Cooking zone timer touch key + indication
b. Cooking zone key + display
c. PLUS programs touch key
-
Controls for rear left cooking zone
-
Extraction hood (linked) extraction touch key
-
Controls for middle cooking zone
-
Extraction hood (linked) lighting touch key
-
Controls for front right cooking
-
Controls for rear right cooking zone
-
Slide control
WiFi connection
Connecting your appliance to ConnectLife 
ConnectLife is a smart home platform that connects people, devices, and services. The ConnectLife application includes advanced digital services and carefree solutions that allow users to monitor and control appliances, receive notifications from a smartphone, and update software (supported features vary depending on your appliance and your region/country).
To connect your smart device, you need a home Wi-Fi network (only 2.4 GHz networks are supported) and a smartphone with the application ConnectLife.
To download the ConnectLife application, scan the QR code or search for ConnectLife in your favorite app store.
Your smart device's Bluetooth is turned on.

-
Install the ConnectLife application and create an account.
-
In the ConnectLife application, go to the "Add device" menu and select the appropriate type of device. Then scan the QR code (it can be found on the rating plate of the appliance; you can also enter the AUID/SN code manually).
-
The application then guides you through the entire process of connecting the appliance to your smartphone.
-
After a successful connection, the appliance can be operated remotely via the mobile application.
Do you have more questions? Visit us at www.connectlife.io or contact us at hello@connectlife.io.
Cleaning
Energy labelling
Information for consumer and test institute
Information about your product can be found at www.asko.com, where you will also find a link to the European Product Database for Energy Labelling, EPREL. Or else visit https://eprel.ec.europa.eu directly.
Declaration of conformity
We hereby declare that our products satisfy the applicable European directives, orders and regulations, as well as the requirements stated in the referenced standards.
ConnectLife
Connecting the appliance to the ConnectLife-app.
ConnectLife is a smart home platform that connects people, devices and services. The ConnectLife application includes advanced digital services and carefree solutions that allow users to monitor and control appliances, receive notifications from a smartphone, and update software (supported features may vary depending on your appliance and the region/country in which you are located).
To connect your smart device, you need a home Wi-Fi network (only 2.4 GHz networks are supported) and a smartphone equipped with the application ConnectLife.
|
|
To download the ConnectLife application, scan the QR code or search for ConnectLife in your favourite app store. |
-
Install the ConnectLife application and create an account.
-
In the ConnectLife application, go to the "Add device" menu and select the appropriate type of device. Then scan the QR code on the appliance's nameplate or on the additional sticker in the manual. You can also enter the AUID/SN code manually.
-
The application then guides you through the entire process of connecting the appliance to your smartphone.
-
Once a successful connection has been established, the appliance can be operated and monitored remotely via the mobile application.
Wi-Fi
Switching Wi-Fi on and off
The hob is equipped with a Wi-Fi module that allows the appliance to connect to the internet via your home network.
You will first connect your mobile device directly to the appliance via Bluetooth, and then use this connection to share the data of your Wi-Fi home network. The hob can then connect to the home network.
For safety reasons, it is not possible to remotely control, turn on or turn off the hob.
Preparation
-
Make sure you know the name/SSID of your router’s Wi-Fi network and its password
NOTE: only 2,4 Ghz networks are supported
.NOTE: only 2,4 Ghz networks are supported
-
Your smart device's Bluetooth is turned on.
Wi-Fi menu
Activate Wi-Fi to enable the Wi-Fi menu. The hob must be switched on.
-
Touch the Wi-Fi key for 5 seconds to open the Wi-Fi menu.
-
Depending on the Wi-Fi state, there are 1 to 3 options available in the menu: 'Con' to set up a connection, 'PAl' to pair an additional user, and 'UnP' to unpair all users.
-
-
Use the slider to choose an option (if more than one option is available).
-
Touch the Wi-Fi key to confirm the selected option.
-
Touch the on/off key or touch the slider to close the menu.
-
If no key is pressed within 60 seconds, the menu will be switched off automatically.
-
Connection setup
-
Select option ‘Con’ in the Wi-Fi menu.
-
The appliance is in “Connection Setup Mode” for 5 minutes.
-
The Wi-Fi key flashes.
-
-
On the mobile app, start the process to ‘Add appliances’ and follow the instructions to set up the network.
Pairing additional user
This option requires that the connection setup has been performed successfully and the hob is connected to the cloud (Wi-Fi key is constantly fully lit).
-
Select option ‘PAl’ in the Wi-Fi menu.
-
The appliance is in “Pairing Mode” for 3 minutes.
-
The Wi-Fi key flashes.
-
-
On the mobile app, start the process to ‘Add appliances’ and follow the instructions to pair the appliance.
Already connected users can add additional users in the ConnectLife application by sharing the device.
Unpair all users
This option requires that the connection setup has been performed successfully and the hob is connected to the cloud (Wi-Fi key is constantly fully lit).
-
Touch the Wi-Fi key for 3 seconds.
-
Select option ‘UnP’ in the Wi-Fi menu to unpair all users and disconnect from the cloud.
-
The Wi-Fi key will flash 3 times.
-
The hob will delete all paired users ('Unpair').
-
Switching off Wi-Fi
-
Enter the Wi-Fi menu as explained in ‘Wi-Fi menu’.
-
Touch the Wi-Fi key for 2 seconds to deactivate Wi-Fi.
-
A short beep will be emitted. The Wi-Fi key will be off.
-
Reactivating Wi-Fi after switching off
-
Switch off the hob.
-
Touch the on/off key for 5 seconds.
-
A short beep will be emitted. The Wi-Fi key will appear.
-
Firmware Update
Equipped with a Wi-Fi module, the hob can receive updates (e.g. enhanced features or safety-related updates) from the appliance's firmware.
During the update process, you cannot use the hob. The hob will restart several times and will not respond for periods. Make sure that the power supply and the Wi-Fi connection are not interrupted during the update.
If the update fails, the hob will remain on the previous firmware version and operate as usual. Try again after a short period of time. If the update continues to fail, please get in touch with the service department for further assistance.
If the hob is not responding after updating, it may not have completed the update. Wait for the update process to complete. If the hob still does not respond after a while, please contact the service department for further assistance.
Maintenance
Cleaning glass top
After each use, wait for the glass-ceramic surface to cool down and clean it. Otherwise, all remaining impurities will burn onto the hot surface the next time you use the hob.
For regular maintenance of the glass ceramic hob, use special care products that create a protective film on the surface to prevent the dirt from sticking onto it.
Before each use of the glass-ceramic surface, wipe off the dust or any other impurities that could scratch the surface, from both the hob and the pan bottom.
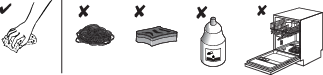
|
Steel wool, coarse cleaning sponges, and abrasive powders may scratch the surface. The surface may also be damaged by aggressive spray cleaners and unsuitable liquid cleaners. |
The use of abrasive materials, as well as damaged pan bottoms, can cause the marking on the appliance to wear away.
Use a damp soft cloth to remove minor impurities. Then, wipe the surface dry.
Remove water stains with a mild solution of vinegar. However, do not use this solution to wipe the frame (only with some models) as it may lose its sheen. Do not use aggressive spray cleaners or descaling agents.
Use special glass-ceramic cleaners for stubborn dirt. Observe the manufacturer's instructions. Be sure to thoroughly remove any cleaner residues after the cleaning process as they may damage the glass-ceramic surface when the cooking zones heat up.
Remove stubborn and burnt residues with a scraper. Be careful when handling the scraper to prevent injury.
Immediately remove any sugar or sugar-laden food from the glass ceramic hob using a scraper, even if the hob is still hot, as sugar may permanently damage the glass-ceramic surface.
|
The scraper is not included in appliance equipment. |
Only use the scraper when dirt cannot be removed with a wet cloth or special cleaners for glass ceramic surfaces.
Hold the scraper at an angle (45° to 60°). Apply gentle pressure and slide it across the glass, over the markings, to remove the dirt. Ensure that the plastic handle (on some models) does not come into contact with the hot cooking surface.
Tip!
Activate the child lock before cleaning the hob.
Daily cleaning
-
Although food spills cannot burn into the glass, we nevertheless recommend you clean the hob immediately after use.
-
For daily cleaning, a damp cloth with a mild cleaning agent is best.
-
Dry off with kitchen paper or a dry tea towel.
Stubborn stains
-
Stubborn stains can also be removed with a mild cleaning agent, washing-up liquid, for example.
-
Remove water circles and limescale with cleaning vinegar.
-
Traces of metals (caused by sliding pans) can be difficult to remove. Special products are available for this.
-
Use a glass scraper to remove food spills. Melted plastic and sugar are also best removed with a glass scraper.
Please note!
-
Never use abrasives. These leave scratches in which dirt and limescale can accumulate.
-
Never use anything sharp such as steel wool or scourers.
Cleaning a matt glass hob
In case of persistent specific marks and stains (food residues, dark and metallic marks):
-
Use a ceramic hob cleaner.
-
Let it sit 5 to 10 min.
-
Clean with a clean microfiber cloth (in a circular movement with moderate pressure).
-
Rinse with water.
-
Wipe with a microfiber cloth.
Please note!
Consult the website for additional maintenance and cleaning instructions!
Troubleshooting
General
If you see a crack or tear (however small) in the glass plate, immediately switch off the hob and disconnect it from the power supply (unplug it from the socket-if any).
Then contact the Service Department.
Troubleshooting table
If your hob does not work properly, it does not always mean that it is defective. Make sure to check the points mentioned below in the table, or visit our website for more information.
Induction zones
|
Symptom |
Possible cause |
Solution |
|---|---|---|
|
Characters appear in the displays when the appliance is connected for the first time. |
This is the standard set-up routine. |
Normal operation. |
|
The fan runs on for several minutes after the hob has been switched off. |
The hob is cooling down. |
Normal operation. |
|
A slight smell is noticeable the first few times the hob is used. |
The new appliance is heating up. |
This is normal and disappears after the hob has been used a few times. Ventilate the kitchen. |
|
You can hear a ticking sound in your hob. |
This is caused by the capacity limiter on the front and back zones. A soft ticking sound can also occur at lower settings. |
Normal operation. |
|
Circle of pan bottom remains visible after cleaning. |
Contaminated pan bottom used on the cooking zone. |
Clean the induction hob with a ceramic hob cleaner and remove the dirt / grease from the pan bottom. |
|
The pans make noise while cooking. |
This is caused by the energy flowing from the hob to the saucepan. |
This is normal for certain pans, particularly at high settings. This is not harmful to the pans or the hob. |
|
You have switched a cooking zone on, but the display keeps flashing. |
The pan you are using is not suitable for induction cooking or has a diameter of less than 12 cm. |
Use a suitable pan (see chapter 'Pans for induction cooking'). |
|
A cooking zone suddenly stops working and you hear a signal. |
The preset time has ended. |
Switch off the signal by pressing the cooking zone key on the timer. |
|
The hob is not working and nothing appears in the display. |
There is no power supply due to a defective cable or a faulty connection. |
Check the fuses or the electric switch (if there is no plug). |
|
Zone stops unintentionally and residual heat indicator is shown. |
Zone is overheated. |
After the hob has cooled down, cooking can be continued. |
|
A fuse blows when the hob is connected to the electrical power mains. |
The appliance is incorrectly connected. |
Check the electrical connections. |
|
The ceramic glass plate broken. |
Disconnect the device from the power supply. Contact your installer. |
|
|
Please note! Do not throw a broken ceramic glass plate in the glass recycling bin but take this to the Municipality's waste recycling centre. |
Error codes
|
Symptom |
Possible cause |
Solution |
|---|---|---|
|
Error codes F0 to F7 and FC. |
Defective generator. |
Disconnect the device from the mains, wait 10 seconds and reconnect. Contact the technician if the error code does not disappear. |
|
Error codes Fc |
Appliance overheated. |
Let the appliance cool down and start cooking again. |
|
Error code FC02 |
The appliance has been connected incorrectly and/or the mains voltage is too high. |
Have your connection changed. |
|
Error codes Fc01, FC04, FC08 , FC10 and FH |
Control panel error |
Disconnect the device from the mains, wait 10 seconds and reconnect. Contact the technician if the error code does not disappear. |
|
Error codes FJ |
Mains voltage is too low. |
Contact your energy supplier. |
|
Error codes F9 |
Air circulation not good. |
Make sure the venting holes under the cooking plate are open. |
|
The AirDry symbol (without the ‘Dry’ indication) is flashing. |
The extraction is being operated, but the window switch detects that the window is not open. Mandatory use of a window switch applies only in some countries. |
Open the window that is equipped with a window switch. |
|
Other error codes. |
Contact the service department. |
In case of other error codes: please write down the error code and contact the service department.
Troubleshooting Wi-Fi
|
Symptom |
Possible cause |
Solution |
|---|---|---|
|
E7 appears on display after setting up the Wi-Fi connection. |
Failed to connect to Wi-Fi network. |
Try to connect the device to your network again. Make sure that new devices can connect to the network (e.g. MAC address filtering is disabled). |
|
Wi-Fi icon not shown. |
Wi-Fi turned off. |
The hob must be switched off, then touch the on/off key and hold it for 5 seconds. |
|
Wi-Fi setup failed. |
Home network issues. |
Check that your home network signal is strong and internet connection is working. |
|
Home network is not displayed during the connection setup process. |
The home network is not on 2.4 GHz, the network is hidden, or the signal strength is too weak. |
Please check the network settings. Ensure a 2.4 GHz and visible network. If the signal is too weak, try to move the network router closer to the appliance. |
|
Cooking hob is shown disconnected on the mobile app |
Wi-Fi is disabled or home network issues. |
Ensure that Wi-Fi is enabled, and the internet connection of your home network is working. Repeat the connection setup if necessary. |
|
Other Wi-Fi problem. |
Different causes. |
First disable the Wi-Fi and enable it again. Check that the internet connection in your home network is working. Repeat the connection setup if necessary. Further troubleshooting available on www.connectlife.io or contact the service department. |
|
Firmware update process failed. |
Internet connection lost or power supply terminated. |
Ensure the power supply is not terminated and a stable internet connection before retrying again. If failed again, contact the service department. |
Technical data
Compliance information
|
Radio equipment type |
HL3215STG HLW3215-TG HLW3215-TG01 |
|
Wi-Fi |
|
|
Operating frequency range |
2.412GHz - 2.472GHz |
|
Maximum output power |
≤10 dBm/MHz ( EIRP) (Antenna gain 10 dBi) |
|
Maximum antenna gain |
Gain: 0 dBi |
|
Bluetooth |
|
|
Operating frequency range |
2.402 GHz - 2.4800 GHz |
|
Carrier Output |
6 dBm (≤10 dBm) |
|
Emission type |
F1D |
The company declares that the device with the function Connectlife complies with the essential requirements and other relevant provisions of Directive 2014/53/EU. The detailed Declaration of Conformity can be found at the web address https://auid.connectlife.io on the page of your device among the additional documents.
Environmental aspects
Disposal of the appliance and packaging
Sustainable materials have been used during the manufacture of this appliance. This appliance must be disposed of responsibly at the end of its service life. Ask your local authorities for more information about how to do this.
The appliance packaging is recyclable. The following may have been used:
-
cardboard;
-
polyethylene film (PE);
Dispose of these materials in a responsible manner and in accordance with government regulations.
Never allow children to play with packaging material due to the danger of injury or suffocation. Store the packaging material safely or dispose of it in an environmentally-friendly way.
The product has been marked with a crossed-out dustbin symbol to remind you of the obligation to dispose of electrical household appliances separately. This means that the appliance may not be included with normal domestic refuse at the end of its service life. The appliance must be taken to a special municipal centre for separated waste collection or to a dealer providing this service.
A separate collection of household appliances helps to prevent any potential negative impact on the environment and on human health caused by improper disposal. It ensures that the materials of which the appliance is composed can be recovered to obtain significant savings in energy and raw materials.
Please note!
Please note! Do not throw a broken ceramic glass plate in the glass recycling bin but take this to the Municipality's waste recycling centre.
Declaration of conformity
We hereby declare that our products satisfy the applicable European directives, orders and regulations, as well as the requirements stated in the referenced standards.
Your notes
We reserve the right to make changes.
The appliance identification card is located on the bottom of the appliance.
Stick the appliance identification card here.