Setting
Instructions for useUser Manual
Induction hob with extractor
We thank you for your trust and the purchase of our appliance.
This detailed instruction manual is supplied to make the use of this product easier. The instructions should allow you to learn about your new appliance as quickly as possible.
You can find the most recent version of the instructions for use on our website.
www.gorenje.com
Information, advice, tip or recommendation
Warning – general danger
GEH8433BSCWF
GEH8433BSRWF
For more detailed instructions and tips, please visit http://www.gorenje.com or scan the QR code on the rating plate.
Carefully read the instructions for use before connecting the appliance. Repair or any warranty claim resulting from incorrect connection or use of the appliance shall not be covered by the warranty.
Safety instructions
IMPORTANT SAFETY INSTRUCTIONS
READ CAREFULLY AND KEEP IT FOR FUTURE REFERENCE!
This appliance can be used by children aged from 8 years and above and persons with reduced physical, sensory or mental capabilities or lack of experience and knowledge if they have been given supervision or instruction concerning use of the appliance in a safe way and understand the hazards involved. Children shall not play with the appliance. Cleaning and user maintenance shall not be made by children without supervision.
WARNING: The appliance and its accessible parts become hot during use. Care should be taken to avoid touching heating elements.
Children less than 8 years of age shall be kept away unless continuously supervised.
Do not use steam cleaners or high-pressure cleaners to clean the appliance, as this may result in an electric shock.
The appliance is not intended to be controlled by external timers or a separate remote control system.
WARNING: If the surface is cracked, switch off the appliance to avoid the possibility of electric shock. Switch off all cooking zones using their respective controls and remove the fuse or trip the main circuit breaker so that the appliance is fully isolated from the power mains.
WARNING: Unattended cooking on a hob with fat or oil can be dangerous and may result in fire. NEVER try to extinguish a fire with water, but switch off the appliance and then cover the flame with a lid or a fireproof blanket.
WARNING: Danger of fire: do not store items on the cooking surfaces.
CAUTION: The cooking process has to be supervised. A short term cooking process has to be supervised continuously.
CAUTION: This appliance is for cooking purposes only. It must not be used for other purposes, such as room heating.
WARNING: Use only hob guards designed by the manufacturer of the cooking appliance or indicated by the manufacturer of the appliance in the instructions for use as suitable or hob guards incorporated in the appliance. The use of inappropriate guards can cause accidents.
Metal objects or objects containing metal, such as knives, forks, spoons, and lids, should not be placed on the hob surface, as they can get hot.
Never place appliances (such as an Airfryer) on the hob. The appliance could catch fire if the hob is accidentally switched on.
After use, switch off the hob element by its control and do not rely on the pan detector.
The appliance may only be connected to the power mains by an authorized service technician or expert. Tampering with the appliance or nonprofessional repair thereof may result in risk of severe injury or damage to the product.
Extraction use
Local regulations concerning the discharge of air have to be fulfilled.
Avoid the risk of electric shock; make sure the appliance is switched off before cleaning the appliance.
Do not use the extraction unit if the grease filter has not been fitted properly!
To prevent hot fat from catching fire, you should only deep-fry under continuous supervision.
Follow the instructions in the manual for cleaning or replacing the grease filters and/or carbon filters!
There is a risk of fire if the instructions for cleaning or replacing grease filters and/or carbon filters are not followed.
Grease deposits in the metal grease filters can cause a fire. Never flambé on a cooking zone with the extractor switched on. The high flames can cause a fire. Always use the appliance with the metal grease filter. Clean the grease filter regularly.
Overheated fat or oil can start a fire. Always supervise the heating of fat and oil. Never extinguish a fire with water; always use a fire blanket, lid or plate.
Other important safety warnings
The appliance is intended for household use. Do not use it for any other purpose, such as room heating, drying of pets or other animals, paper, fabrics, herbs etc. As this may lead to injury or fire hazard.
Using the glass-ceramic hob as a storage area may result in scratches or other damage to it. Never heat food in aluminium foil or in plastic containers on the cooking hob. Such foil or containers may melt which can result in a fire or damage to the cooking hob.
Do not store temperature-sensitive items underneath the appliance, such as cleaners or detergents, spray cans etc.
Cooking time limiter
The cooking-time limiter is a safety function of your cooking appliance. It will operate if you forget to switch off your hob.
Depending on the setting you have chosen, the cooking time will be limited as follows:
|
|
The cooking zone switches off automatically after (hours): |
|---|---|
|
Cooking assist |
8 |
|
1 - 2 |
8 |
|
3 - 4 |
6 |
|
5 - 6 |
4 |
|
7 - 8 |
2 |
|
9 |
1.5 |
The Cooking-time limiter for the specific cooking zone is reset after the user has changed the cooking level of the specific cooking zone.
Cooking zone related timers take priority over the cooking-time limiter.
‘Open window’ function
If it is prescribed that an extraction unit, which is located in a room where a fireplace is present, may only be used when a (kitchen) window is open, then a window sensor must be installed. The ‘open window’ function is automatically activated as soon as an ‘open window’ sensor is connected to the appliance. See chapter 'Connecting an ‘open window’ sensor'.
Installation
Safety
Faulty parts may only be replaced by original parts. The manufacturer can only guarantee that original parts meet safety requirements.
If the power cord is damaged, it should be replaced by the manufacturer or an authorised service technician, in order to avoid hazard.
Disconnect the appliance from the mains supply before starting any repair work.
If the safety instructions and warnings are not followed, the manufacturer cannot be held responsible for any resulting damage.
The appliance may only be connected to the power mains by an authorized service technician or expert. Tampering with the appliance or nonprofessional repair thereof may result in risk of severe injury or damage to the product.
If another electrical appliance is plugged into a socket near the appliance, make sure that its power cord does not come into contact with hot cooking zones.
Before connecting the appliance
|
Carefully read the instructions for use before connecting the appliance. Repair or any warranty claim resulting from incorrect connection or use of the appliance shall not be covered by the warranty. |
|
Life-threatening, the danger of poisoning through back-drafting of combustion gasses! |
Check the appliance for transport damage. Do not connect a damaged appliance.
The air must not be discharged into a flue that is used for exhausting fumes from appliances burning gas or other fuels (not applicable to appliances that only discharge the air back into the room).
Extraction hoods and other appliances that extract cooking vapours can affect the safe operation of appliances that burn gas or other fuel (including those in other rooms) by backflowing combustion gases. These gases can potentially lead to carbon monoxide poisoning. After installing an extraction hood or other vapour extractor, the operation of appliances with flue gas extraction must be tested by a competent person to ensure that the combustion gases do not flow back.
Always provide adequate ventilation!
When the extraction unit and appliances supplied with energy other than electricity are simultaneously in operation, the negative pressure in the room must not exceed 4 Pa (4 × 10⁻⁵ bar).
Local regulations concerning the discharge of air have to be fulfilled.
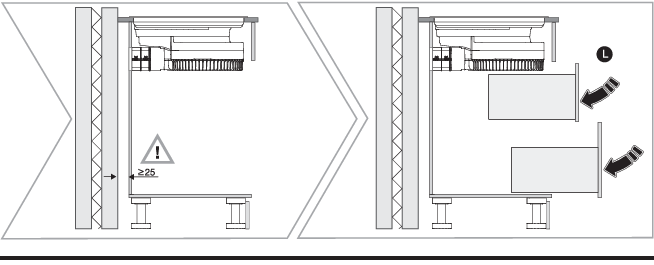
Preparations for installation
Free space around the appliance
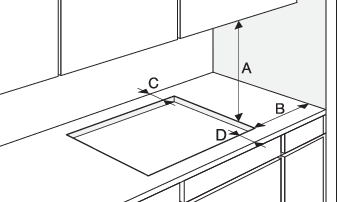
|
A |
≥ 500 mm |
|
B |
≥ 40 mm |
|
C |
≥ 40 mm |
|
D |
≥ 50 mm |
Appliances without a pre-installed power cord
Appliances with a pre-installed power cord
Installation options
*Flush-mount
|
If the recirculation option through the rear wall of the kitchen cabinet is used, the exterior walls should be properly insulated to reduce condensation from cooking vapours as much as possible. |
*Flush-mount
-
The walls and the worktop surrounding the appliance must be heat resistant up to at least 105 °C.
-
The worktop into which the hob is fitted should be flat.
|
Normal operation of the induction cooking hob electronic components requires sufficient air circulation. |
|
For additional ducting and accessories visit maintainlife.com or call local service support.
|
Dimensions
|
Hob Width |
A |
B |
C |
D |
E |
F |
G1 |
G |
H |
I1 |
I |
J |
X1 |
|---|---|---|---|---|---|---|---|---|---|---|---|---|---|
|
83 cm |
830 |
520 |
557 |
46 |
42 |
230 |
524 |
490 |
≥ 600 |
834 |
750 |
≥ 10 |
42 |
|
The countertop must be strong enough to ensure the safe use of the hob. If in doubt, consult the countertop manufacturer. |
Flush-mount
The appliance may only be installed into a temperature- and water-resistant countertop, such as a countertop made of (natural) stone (marble, granite), or solid wood (the edges along the cut-out have to be sealed). When installing into a countertop made of ceramics, wood, or glass, a wooden sub-frame should be used. The frame is not supplied with the appliance. The appliance may only be installed into a countertop made of other materials after you have consulted the countertop manufacturer and obtained his express approval. Internal dimension of the basic unit should be at least equal to the internal cutout for the appliance. This will allow simple removal of the appliance from the countertop.
|
Pay particular attention to built-in dimensions with (natural) stone countertops. When choosing the silicone sealant, observe the countertop material and consult the countertop manufacturer. Use of inappropriate silicone sealants can result in permanent discolouration of some parts. |
Stone countertop
-
Countertop
-
Appliance
-
Slot
Ceramic, wooden, or glass countertop
-
Countertop
-
Appliance
-
Slot
-
Wooden frame, thickness 16 mm
Given the margin of error (tolerance) for the glass-ceramic plate of the appliance, and the cutout in the countertop, the slot is adjustable (min. 2 mm).
|
The service department shall only be responsible for repairing and servicing the cooking hob. Consult your specialized kitchen equipment dealer regarding re-installing the flush-mount cooking hob. |
Sealing strip
Electrical connection
-
This appliance must be earthed.
-
The electrical connection must comply with national and local regulations.
-
The cooking hob has to be hard-wired directly to the power mains.
-
Prior to installation, ensure that the local distribution conditions (voltage and frequency) and the adjustment of the appliance are compatible.
-
The voltage, frequency, power and the country for which the appliance has been designed are shown on the appliance rating plate.
-
For class I appliances, check that your home’s electrical system provides proper earthing.
-
If a stationary appliance is not fitted with a supply cord and a plug, or with other means for disconnection from the supply mains having a contact separation in all poles that provide full disconnection under overvoltage category III conditions, the means for disconnection must be incorporated in the fixed wiring in accordance with the wiring rules. This is also applicable for appliances with a supply cord and plug when the plug is not accessible after installing the appliance. Using an omnipolar switch with a contact separation of at least 3 mm fitted in the fixed wiring will fulfil this requirement.
-
The power cord must hang freely and should not be fed through a drawer.
-
Before connecting the appliance, make sure the voltage indicated on the rating plate conforms to the voltage in your power mains.
-
The connection should be adjusted to the current and fuses.
-
The appliance should not be connected to the mains via a multi-plug adapter or extension cable, as the safe use of the equipment cannot be guaranteed.
-
After installation, the parts carrying electrical current and insulated parts shall be protected against contact.
Do not test correct operation when the appliance is on its underside. The appliance must be fully installed when the extractor is tested.
Determining the electrical connection available in the house
|
Check the voltage. Before connecting the appliance, make sure the voltage specified on the rating plate conforms to the voltage of your power mains. The voltage of your power mains (220–240 V between L and N) should be checked by an expert using an appropriate measuring device. Check the voltages present as indicated in the diagrams below. |
|
3 phases - 1 neutral |
2 phases - 1 neutral |
1 phase - 1 neutral |
|---|---|---|
|
|
|
|
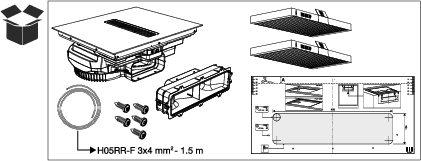
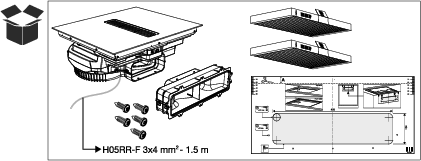
Appliances without a pre-installed power cord
Use an approved cable with the correct cable diameters appropriate for the connection. The cable casing should be able to withstand at least 65 °C and therefore preferably be of type H05VV-F.
Attaching the power cord to the appliance
|
Refer to the wiring diagrams located at the bottom of the appliance. |
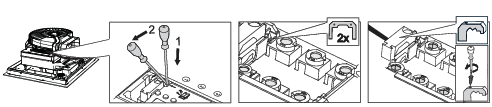
-
Open the cover of the connection terminal box.
-
Run the power cord through a cord strain relief (clamp) which protects the cable from being pulled out.
-
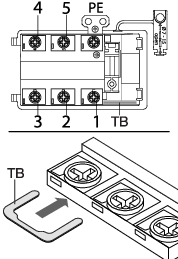
Connect the wires according to your type of appliance.
-
Make the necessary connections between the terminals using the supplied terminal bridges. The terminal bridges are located in the connection box.
Appliances with a pre-installed power cord
This appliance is supplied with a three-core connection cable, suitable for single-phase installation.
Connecting the appliance to the mains electricity supply
This appliance is equipped with a fixed three-core connection cable and is set up for a single-phase, single-neutral connection. Refer to the wiring diagrams on the underside of the appliance if connection to a different power supply is required. See also the section ‘Determining the existing electrical connection in the home’ for further information.
Connecting an ‘open window’ sensor
The use of sensor type ‘FDS 100’ is recommended if a window sensor must be installed. The sensor must be of the potential-free NO (normally open) contact type. It must be connected to the designated port on the motor control unit (MCU) in the enclosure at the front of the appliance. A cord of type H05VV-F 2x0,5 mm2 (or similar) is recommended for connecting a window sensor. Without a window sensor, a jumper closes the electrical circuit.
Disconnect the appliance from the power supply before carrying out any work on it!
-
Unscrew the cover of the MCU housing and flip it open.
-
Remove the jumper of the sensor connection.
-
Connect the wires of the cord to the sensor connection.
-
Secure the cord at the cable outlet of the MCU housing with a tie wrap.
-
Connect the wires of the cord to the window sensor in such a way the contact is open when the window is closed (consult the instructions included with the window sensor).
-
Close the lid and screw it tight.
Installation settings
|
Settings cannot be changed once the device has been connected to the mains for more than 2 minutes. |
Current limiter
|
A registered and qualified installer must set the current limiter to match your connection and circuit breakers. Please read the safety regulations and the installation instructions carefully. |
|
Setting a lower value of the current limiter will cause the appliance to perform at a reduced level. |

-
Immediately after connecting the appliance to the mains, touch keyto switch on the appliance. Then touch keyfor 3 seconds.
-
Menuappears and immediately followed by menu.
-
-
Touch thekey to open theMenu.
-
Use theandkeys to select maximum appliance power.
-
The first number of the value shown is the number of phases connected, and the second and third numbers indicate the current per phase.
-
-
Touch keyfor 3 seconds to save the settings, or keyif changes are not to be saved.
|
Settings |
Connection |
Current |
Power |
Power cord |
Number and cross section of Power cord wires |
|---|---|---|---|---|---|
|
132 |
1 phase - 1 neutral |
1x32 A |
7360 W |
H05VV-F |
3 x 4.0 mm² |
|
116 |
1 phase - 1 neutral |
1x16 A |
3680 W |
H05VV-F |
3 x 1.5 mm² |
|
113 |
1 phase - 1 neutral |
1x13 A |
2990 W |
H05VV-F |
3 x 1.5 mm² |
|
112 |
1 phase - 1 neutral |
1x12 A |
2760 W |
H05VV-F |
3 x 1.5 mm² |
|
110 |
1 phase - 1 neutral |
1x10 A |
2300 W |
H05VV-F |
3 x 1.5 mm² |
|
216* (default) |
2 phases - 1 neutral |
2x16 A |
7360 W |
H05VV-F |
4 x 1.5 mm² |
|
2 phases - 2 neutral (only for NL) |
2x16 A |
7360 W |
H05VV-F |
5 x 1.5 mm² |
|
|
2 phases (BE) |
2x16 A |
7360 W |
H05VV-F |
3 x 1.5 mm² |
|
|
213* |
2 phases - 1 neutral |
2x13 A |
5980 W |
H05VV-F |
4 x 1.5 mm² |
|
212* |
2 phases - 1 neutral |
2x12 A |
5520 W |
H05VV-F |
4 x 1.5 mm² |
|
210* |
2 phases - 1 neutral |
2x10 A |
4600 W |
H05VV-F |
4 x 1.5 mm² |
* Can also be used for a 3-phase connection where the 3rd phase is connected to (the unloaded) terminal 3. For this connection, the supply cable must have 5 x 1.5 mm² cores.
Use Recirculation
The hob is set to exhaust to outside as standard. Set (if necessary) the hob to use with a recirculation filter.

-
Immediately after connecting the appliance to the mains, touch keyto switch on the appliance. Then touch keyfor 3 seconds.
-
Menuappears and immediately followed by menu.
-
-
Useandto scroll through the menu and select.
-
Select another setting with the slider.
-
0 - Exhaust to outside (standard)
-
1 - Recirculation filter installed
-
-
Touch keyfor 3 seconds to save the settings, or keyif changes are not to be saved.
Built-in
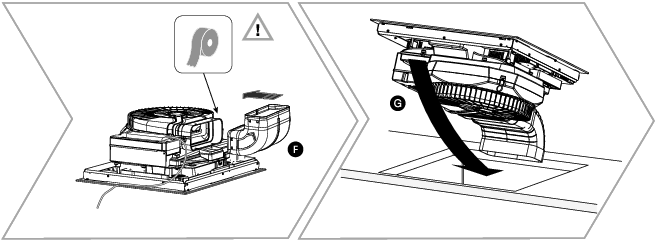
-
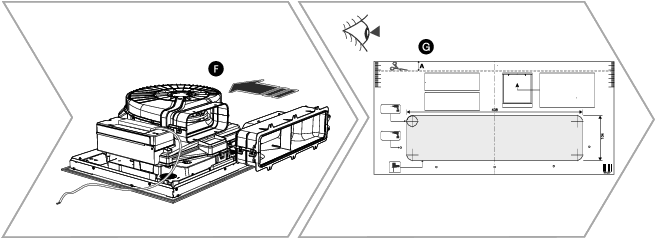
Cut the recess in the countertop (see 'Installation dimensions').
-
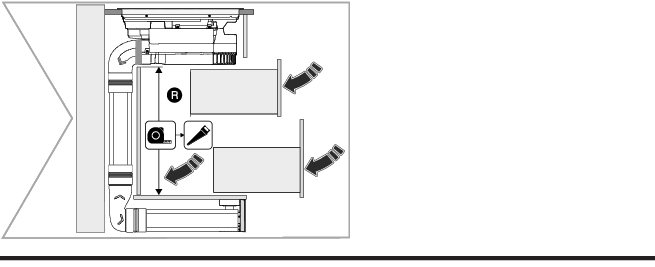
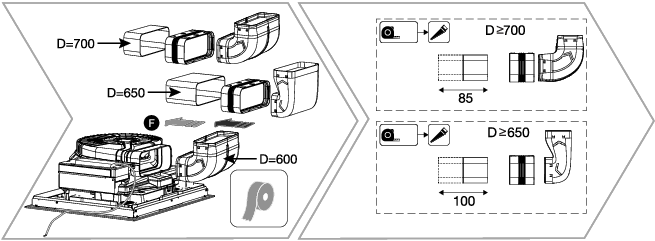
Fit the ducts to the appliance according to the extraction choice (see ‘Installation options’). Tape the ducts airtight where necessary.
-
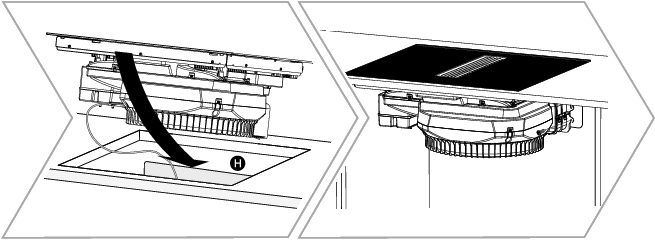
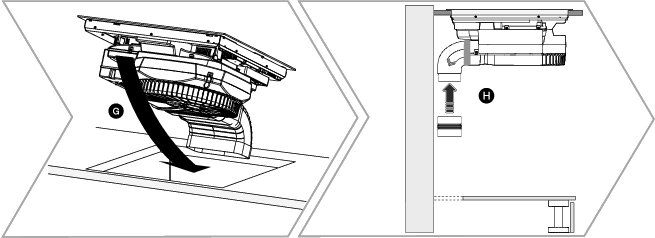
Place the induction hob into the cut aperture.
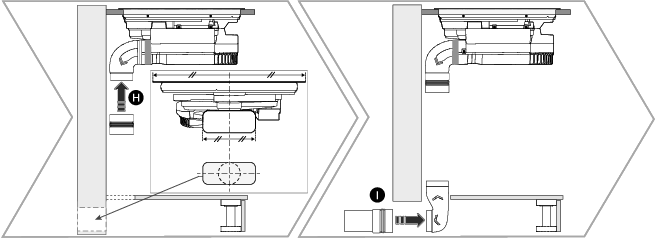
Please note for flush mounting:
-
Test the appliance for proper operation before sealing the glass top into the countertop.
-
If the appliance is working correctly, follow the sealing instructions in the ‘Flush mounting’ section.
-
-
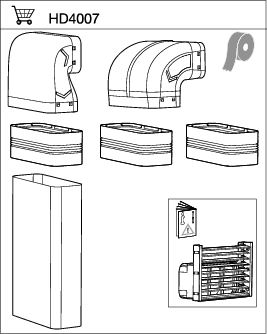
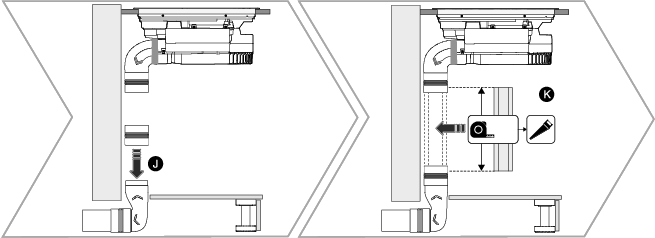
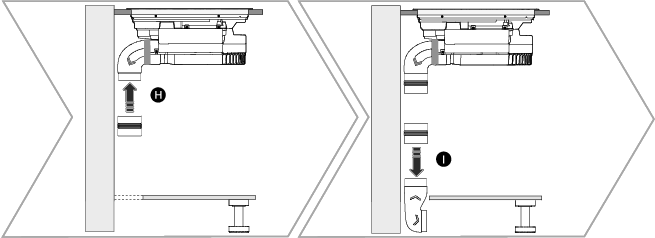
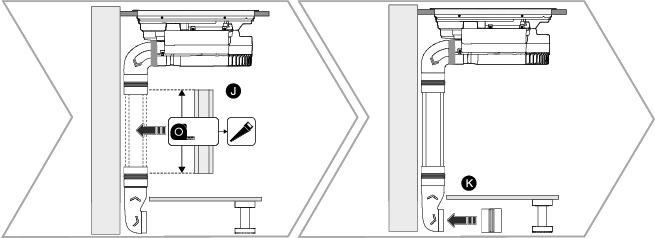
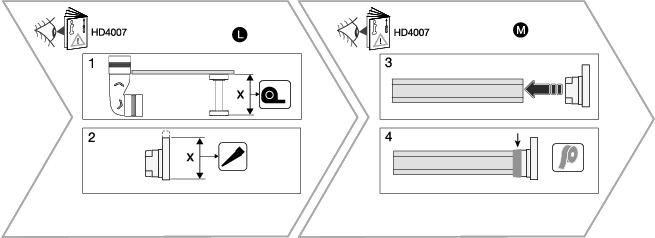
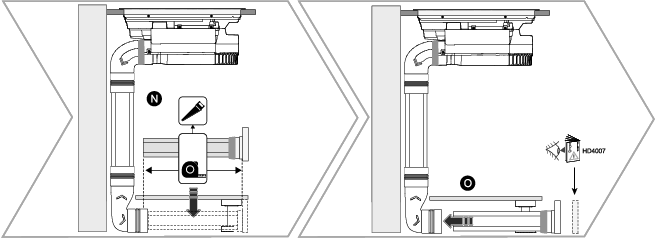
Install the exhaust ducts according to the selected outlet (see 'Installation options'). For recirculation with exhaust through the rear wall, use the template provided.
-
Connect the hob to the mains power supply (see 'Electrical connection').
-
If necessary, set the appliance to the correct connection power and the selected outlet (see 'Installation settings').
-
When using recirculation: ensure a sufficiently large return opening in the plinth.
Flush mounting
The gap between the appliance's glass plate and the worktop should be sealed with silicone sealant.
-
Apply the sealant evenly into the groove and smooth it out with a suitable tool (e.g. sealant spatula).
-
Caution! Avoid using excessive silicone sealant; if any seeps under the glass, it will make disassembling the cooktop more difficult.
-
It is recommended to use foam tape to prevent sealant from getting under the glass plate.
Suitable foam tape can be ordered from maintainlife.com (part 288509).

Properties of silicone sealant
-
The sealant must be temperature resistant (minimum 160 °C).
-
Always follow the manufacturer's instructions for processing.
Do not switch on the appliance until the silicone sealant has completely hardened.
|
Operating the cooking hob
Control panel

|
Key/display |
Description |
|
|---|---|---|
|
|
Switching the hob on/off |
|
|
Lock/child lock |
||
|
|
Time functions Kitchen timer; for the entire cooking hob; does not power off the cooking zone. |
|
|
|
Cooking zone timers for each cooking zone; when the time has elapsed, the cooking zone is switched off. |
|
|
|
Timer related to the cooking zone |
|
|
|
Increase time settings Touch the key to increase the timer settings by 1 minute. Touch and hold the key to quickly increase the timer settings to the desired value. |
|
|
|
Decrease time settings Touch the key to decrease the timer settings by 1 minute. Touch and hold the key to quickly decrease the timer settings to the desired value. |
|
|
|
Fast |
|
|
|
Canceling or resetting settings |
|
|
|
User settings On the appliance, you can easily set certain parameters such as: volume of acoustic signals, brightness of indicators, automatic detection of cookware, automatic locking, duration of acoustic alarm and various extraction settings. The hob can also be reset to factory settings. Within 7 seconds after the appliance is turned on, touch keyand hold for 3 seconds to open the user settings menu. |
|
|
|
Pause |
|
|
|
Additional functions with automatic programs Touch the key to activate additional hob settings: Melting/defrosting, Reheating, Keeping warm just below boiling point, grilling, frying and Boiling. |
|
|
|
The key located next to the extraction slider allows you to switch from manual to automatic extraction, regardless of the setting in user settings. The extraction is automatically adjusted when you operate a cooking zone (the higher the power of the cooking zone, the higher the extraction rate). |
|
|
|
Connection setup (Wi-Fi) (function available depending on the model) |
|
|
|
Melting |
|
|
|
Reheating/keeping warm |
|
|
|
Keeping warm just below boiling point/cooking with water |
|
|
|
Grilling |
1 = 120 °C 2 = 160 °C 3 = 180 °C 4 = 220 °C |
|
|
Frying |
1 = 160 °C 2 = 180 °C 3 = 200 °C |
|
|
Boiling/cooking with water |
|
|
|
Bridge (function available depending on the model) |
|
|
|
Timer settings display |
|
|
|
Slider When ‘Automatic pan detection’ is enabled, the ‘0’ on the corresponding slider lights up fully when a pan is placed on the cooking zone. |
|
|
|
Hot zone indicator |
|
|
|
Dry Air-related components and areas are automatically dried by the appliance. |
|
|
|
Cleaning Warning to clean the internal grease filter. |
|
|
|
Replace Warning to replace the internal recirculation filter. |
|
|
|
Clean Air function Selecting the Clean Air function, extraction is switched on (after switching off the induction hob) every hour for 10 minutes to refresh the air in the kitchen. |
|


Switching the hob on/off
|
1. Touch key1 second to switch on the hob. |
|
2. On the slider indicating the cooking zones, level 0 is partially illuminated. If the pan is already on the hob, 0 is fully illuminated and the rest of the slider is partially illuminated. |
|
3. Place the cookware onto the selected cooking zone, and '0' on the corresponding slider will light up fully. |
|
4. Set the cooking power by touching the desired power level. A short beep will be emitted. The selected level is fully illuminated. |
|
5. Switch off the hob by touching key. |
|
If no cooking zone is switched on in 20 seconds, the induction hob will power off. |
Automatic pan detection
The hob has a preset automatic detection of the presence of cookware on the cooking zone.
|
1. Touch keyto switch on the hob. |
|
2. Place the cookware onto the selected cooking zone, and the hob will automatically detect the presence of cookware. The corresponding slider is partially illuminated. When the value is selected, it will light up fully. |
|
3. Set any cooking level. |
|
'Automatic pan detection' can be turned off in the 'User settings' menu. |
The appliance automatically detects a missing pan on an active cooking zone. In case of a missing pan, the entire slider with the set power will flash. During this time, the corresponding timers are temporarily paused on the cooking zone where no pans are present.
|
If you do not put the cookware back on the cooking zone within 2 minutes, an acoustic signal will be emitted and the cooking zone will be switched off. |
Pan movement detection
The hob automatically detects the movement of the cookware from one cooking zone to another or the removal of the cookware from the hob if the function is enabled.
|
Detection of pan movement is only possible if automatic pan detection is enabled in the ‘User settings’ menu. |
|
1. Transfer (within 3 sec.) the cookware from one active cooking zone to another free cooking zone. The preset power level and the preset timer will start flashing on the new cooking zone. |
|
2. Within 5 seconds, confirm the transfer of settings by touching the slider. |
|
3. If the settings transfer is not confirmed within this time or level 0 of a new cooking zone is touched, the settings will not be transferred. |
|
Pan movement is not detected on the cooking zones when automatic programmes such as WARM, MELT or other additional functions are active. |
|
Moving a large pan placed on paired Bridge induction cooking zones to other Bridge induction cooking zones is also possible. |
|
When an additional function (see chapter 'Extra functions') is active, it will not be transferred if a pan is moved to another zone. |
Switching the cooking zone on/off
|
1. Touch or swipe the selected slider to select the desired power level. |
|
2. A short beep sounds, the selected power is fully illuminated. |
|
3. Switch off the cooking zone by touching 0 on the slider. |
High heating setting - 'Power boost'
For rapid cooking, activate the boost power level on the cooking zones. This enables larger quantities of water to heat up quickly using additional power. After activation, the extra power automatically drops to level 9. If the hob isn’t too hot, boost can be reactivated after automatic shutdown.
|
1. Place the cookware onto the selected cooking zone. |
|
2. Select boost level P with the slider. |
|
3. To switch off the 'Power boost' function, reduce the cooking zone power. |
|
After 10 minutes, the power boost setting is automatically reduced to setting 9. |
Automatic heating
Use Automatic heating to quickly heat a pan. When Automatic heating is actuated, the power temporarily goes to setting 9. Depending on the preselected power level, the pan will be heated for the related heating time (see table). Then, the power automatically returns to the set power level.
|
Power level |
1 |
2 |
3 |
4 |
5 |
6 |
7 |
8 |
|
Heat-up time (in seconds) |
40 |
70 |
120 |
180 |
260 |
430 |
120 |
195 |
During Automatic Heating, reducing the power level will deactivate the programme. If the power level is increased during operation, the new timer will incorporate the time already elapsed at the previously set level. Should this elapsed time exceed the newly selected duration, Automatic Heating will end automatically.
|
1. Place the cookware onto the selected cooking zone. |
|
2. Touch a power setting on the slider for 3 sec. The set power level lights up, and level 9 starts flashing. |
|
3. The pan heats up quickly at setting 9 and returns to the selected setting after the heating time has elapsed. An acoustic signal sounds when the heating time has elapsed. |
|
Do not use Automatic Heating with a preheated pan. |
|
Automatic heating is suitable for dishes that need to be heated at maximum power initially, followed by slow cooking at a lower power level — without requiring constant supervision. However, Automatic heating is not suitable for braising, frying, or sautéing; for food that requires frequent turning, basting, or stirring; or for boiling food in a pressure cooker over an extended period. |
Bridge Induction zone
(function available depending on the model)
The 'Bridge Induction' cooking zones on the left or right side of the hob can be combined into one large connected zone. You can place an oval baking dish or grill plate on this zone.
|
The pan must be large enough to cover the centres of the upper and lower cooking zones. |
-
The maximum size of the baking tray is 40 x 25 cm.
-
For an even heat distribution, we recommend a baking tray with a thicker bottom.
-
The baking tray gets very hot during cooking, so take care to protect against burns.
-
When placing the baking tray on the hob, be careful not to cover the control module with it.
Cooking zones can be combined under the following conditions:
-
Both zones are inactive.
-
One of the compatible zones is active — the set power level is transferred to the combined zone.
-
Both zones are active — the combined zone adopts the power level from the zone operating at the lowest setting. If both zones are set to the same level before combining, this setting is retained.
|
1. Touch keyto activate the function. A short beep will sound. |
|
2. Set the cooking level with the lower or upper slider. |
|
3. Deactivate the function by touching or by touching level 0 on the slider. A short beep will be emitted. |
|
4. The timer switches off if you switch on 'Bridge Induction'. It will be necessary to set the time again. |
Pause - 'Stop&Go'
With this function, you can pause the operation of the entire hob during cooking.
|
1. Touch and hold keyfor 1 second to activate the function. A short beep sounds, the pause key flashes, and all cooking zones and the automatic pan detection temporarily stop. The cooking zone timers are paused, but the kitchen timer continues to run. |
|
2. All keys are inactive exceptand. |
|
3. Touch for 1 second keywithin 10 minutes to deactivate the function. The hob continues to operate with the same settings as before the function was activated. |
|
If no key is pressed within 10 minutes, the hob will switch off automatically. |
|
If the kitchen timer is set, it remains active even if the hob is paused using the Pause - ‘Stop&Go’ function. |
Memory function - 'Recall function'
In case of switching off the user interface unintended, the function allows you to restore the cooking zone setting when switching on again.
|
1. Switch the hob on again within 9 seconds of switching it off. |
|
2. After power-up, the indicatorflashes for 7 seconds. |
|
3. Within 7 seconds of switching on the appliance, touch key to restore the settings set before switching off the hob. When the settings are restored, an acoustic signal will be emitted. |
|
4. The settings cannot be restored if keyis not touched within 7 seconds or any other key is activated immediately after powering on. |
Child lock
The hob can be locked against unwanted switching on.
|
The hob must be switched off to activate the child lock. |
|
1. Touch and holdfor 3 seconds. |
|
2. 'Loc' appears on the timer function display. A beep sounds, and the hob is now locked. |
|
3. When the hob is locked, touch and hold for 3 seconds. A beep sounds, and the hob is now unlocked. |
|
If 'Loc' is enabled in 'User settings', the control must always be unlocked before using the hob. |
Hot cooking zone indicator
The hob is equipped with a hot cooking zone indicator.
The cooking zone heats up via residual heat emitted by the cookware. When you remove the cookware from the cooktop or turn off the cooking zone, the indicator lightilluminates; during this time, you can use this heat to keep food warm or melt dishes.
|
Whengoes out, the cooking zone may still be hot! Danger! Risk of burns. |
Time functions
Kitchen timer
The kitchen timer operates independently and is not connected to the cooking zone.
|
The kitchen timer can only be set if the appliance is switched on. When the kitchen timer is set, the time will continue to count down even after the hob is switched off or during the active Stop&Go function. |
|
1. Touch keyto activate the kitchen timer. The display flashesand shows the corresponding kitchen timer icon. |
|
2. Touch keyorto set the desired time in the range between 1 minute and 9 hours and 59 minutes. Touch keyto increase the desired time by 10 minutes. |
|
3. The setting can be confirmed manually by touching keyor will be confirmed automatically after 7 seconds from the last change of the desired time. |
|
4. After successfully confirming the setting, a beep sounds, and the corresponding timer function icon is fully illuminated. |
|
5. During the last minute of countdown, remaining time will be displayed in seconds. |
|
After the time has elapsed, a beep sounds, which can be switched off by touching any key. |
Cooking zone timer
The cooking zone timer allows a selected cooking zone to be switched off automatically after a set time has elapsed. A sound signal will sound, which can be switched off by touching any key. The timer can only be set when the cooking zone is active.

|
1. Touch keyto activate the cooking zone timer. The display flashesand shows the corresponding cooking zone timer icon. |
|
2. Touch keyorto set the desired time in the range between 1 minute and 9 hours and 59 minutes. Touch keyto increase the desired time by 10 minutes. |
|
3. The setting can be confirmed manually by touching keyor will be confirmed automatically after 7 seconds from the last change of the desired time. |
|
4. After successfully confirming the setting, a beep sounds, and the corresponding timer function icon is fully illuminated. |
|
5. During the last minute of countdown, remaining time will be displayed in seconds. |
|
When using two or more timer functions, the icon for the currently active timer is fully illuminated and accompanied by an arrow. Other active timer icons remain fully illuminated but do not display an arrow. To switch the display to a different timer function, press the corresponding key. |
Changing the time function
|
1. Make sure that the time function to be adjusted is shown on the display. If it is not, do so by pressing the key belonging to the time function. With the selected function, the triangle is illuminated. |
|
2. Touch keyoragain so the timer display flashes. |
|
3. Change the time by touching key,or. |
|
4. The setting can be confirmed manually by touching keyor, or will be confirmed automatically after 7 seconds from the last change of the desired time. |
Switch off the time function
When the time function is shown on the display, it can be terminated by simultaneously touching keysand. It can also be terminated by touching keywhen it is set to 0:00 and confirmed or shown on the display.
User settings
On the appliance, you can easily set certain parameters such as: volume of acoustic signals, brightness of indicators, automatic detection of cookware, automatic locking, duration of acoustic alarm and various extraction settings. The hob can also be reset to factory settings.

|
The procedure to open the user settings menu requires switching on the device from a powered-off state. The procedure must then be initiated within 7 seconds after the device is turned on. |
|
1. Within 7 seconds after the appliance is turned on, touch keyand hold for 3 seconds to open the user settings menu. |
|
2. The display shows and after 2 seconds is displayed. |
|
3. Useandto navigate the menu between the possible settings. |
|
4. The available settings for the selected parameter are shown as numbers on the front-right slider and can be selected directly. The currently active setting is fully illuminated. |
|
5. Exit user settings by touching keyfor 3 seconds (settings are saved) or key(settings are not saved). |
|
User settings cannot be accessed if the kitchen timer is active. |
|
Key/display |
Description |
|---|---|
|
|
Volume adjustment |
|
|
Brightness setting |
|
|
Automatic pan detection |
|
|
Child lock setting |
|
|
Alarm duration setting |
|
|
Automatic extraction By setting Hod to 'Automatic', the extractor is automatically switched on when the induction hob is switched on. The extraction is automatically controlled when a cooking zone is operated (the higher the power level of the cooking zone, the higher the extraction). The extraction mode (sensitivity level) can be set separately (see setting SEn) depending on the selected power of the cooking zones. 0 - Manually 1 - Automatic (default setting) |
|
|
Clean grease filters indicator In this setting, choose the degree of use of the induction hob (with extractor) to determine when the grease filter needs to be cleaned. Cleaning the grease filter is shown with an indication. There are 3 options available: 1 - No to limited use of cooking oils (P1) [cleaning every 40 hours]. 2 - Moderate use of cooking oils (P2) (default) [cleaning every 20 hours]. 3 - Heavy use of cooking oils (P3) [cleaning every 10 hours]. 4 - Indication switched off (OFF) |
|
|
Extraction sensitivity level Set a sensitivity level for automatic extraction (Hod function enabled) depending on the power level of the cooking zones. There are 3 sensitivity levels adjustable: 1 - Extraction setting (L1) adjustable up to a maximum of level 5 2 - Extraction setting (L2) adjustable up to a maximum of level 7 (default) 3 - Extraction setting (L3) adjustable up to a maximum of level 9 |
|
|
Restoring to factory settings Touch level 1 of the slider from the front right cooking zone for 3 seconds to reset the settings to factory defaults. |
Operating the extraction module
The extraction is set to 'Auto Start extraction' by default (symbol 'A' lights up). The extractor starts automatically when a cooking zone is used. The level of extraction is adapted to the selected power of the cooking zone depending on the set extraction sensitivity level (see chapter 'User settings'). The extraction can also be set to manual use.
Setting the extraction manually:
-
Touch the slider to start extraction. A sound signal confirms the correct operation of the slider.

-
Touch or swipe the slider to set a higher or lower extraction.
-
There are 9 extraction levels and a boost level available.
-
After 10 minutes, the boost level automatically switches back to setting 9.
-
-
Switch off the extraction by setting the extraction to 0 (zero) with the slider.
|
The 'Auto Start extraction' can also be switched on by touching the 'A' key. The extractor display now shows the current automatic extraction mode. Touching the 'A' key again switches the 'Auto Start extraction' off (back to manual operation). |
Clean Air function
With the Clean Air function, after switching off the induction hob, the extractor is switched on every hour for 10 minutes to refresh the air in the kitchen.
-
The Clean Air function can be enabled by touching thekey.
-
The Clean Air function works for a maximum of 24 hours.
-
Symbolindicates Clean Air is switched on.
|
The extraction level, ventilation duration, and total duration of Clean Air are adjustable, but these changes can only be made using the app. |
Indicator 'clean grease filter'
The extractor module has a grease filter indicator 'CLEAN FILTER A'. This indicator flashes when the grease filters need cleaning. Three usage intensities can be set to determine the cleaning runtime of the grease filters. By choosing the right usage intensity depending on cooking behaviour, the filters will not need to be cleaned more than necessary.
-
Touch the ‘0’ position of the slider to reset the filter indication.
Indicator to 'replace recirculation filter'
The extractor has a recirculation filter indicator 'CHANGE FILTER B' that flashes when the filter needs to be replaced.
The recirculation filter has a replacement interval of 300 operating hours. See ‘Replacing the recirculation filter’ in chapter ‘Maintenance’.
|
When the appliance is set to recirculation mode and a plasma filter is installed, you can reset the replacement indicator without needing to replace the filter. Refer to the plasma filter manual for more information. |
-
Touch the ‘0’ position of the slider to reset the filter indication.

AirDry function
The AirDry function ensures that the extraction channels and grease filters are blown dry.
If the hob has been used for over 3 minutes before switching off, AirDry is switched on for 5 minutes (at extraction level 1). If it has been used for more than 10 minutes, AirDry is switched on for 15 minutes (at extraction level 1). During this time, ‘DRY’ is displayed.
-
Touch and hold the slider at level 0 to stop the AirDry function.
|
Interrupting the AirDry function during the cycle is not recommended. |
Additional functions with automatic programs
The appliance offers six additional functions: Melting (MELT), Reheating/Keeping warm (WARM), Keeping warm just below boiling point (SIMMER), Grilling (GRILL), Frying (FRY) and Boiling (BOIL).
The additional functions enable automatic temperature control, eliminating the need to manually adjust the heating level during cooking.
|
1. Touching key |
|
2. The additional function is activated by touching the corresponding key. The additional
menu closes when you touch |
|
3. When an audible signal sounds, the additional function is activated. If you have selected the Grilling or Frying programme, a set of additional temperature levels is displayed: 1, 2, 3, (4). Touching a number selects the desired temperature level. Another audible signal confirms that the function has been activated. |
|
4. All additional functions, except Melting, consist of a preheating phase followed by a temperature maintenance phase. While the ideal temperature is being reached, the icon for the selected function flashes. Once an audible signal sounds, the preheating phase is complete and the function icon remains steadily illuminated. |
|
5. The active function can be deactivated at any time by touching 0 on the corresponding cooking zone slider. |
|
6. After activating the additional function, the programme timer can be set on the corresponding cooking zone. Once the set time has elapsed, the additional function switches off automatically (see “Timer functions” for instructions on setting the timer). |
|
7. If you want to change the additional function after it has already been set, touch
the function key |

|
Key/Display |
Temperature |
Description of the function |
|---|---|---|
|
MELT |
MELTING |
|
|
The function allows you to gently melt foods such as chocolate or butter. It also allows defrosting of frozen food. |
||
|
WARM |
REHEATING |
|
|
This function allows you to keep warm and reheat ready-made dishes. |
||
|
SIMMER |
SIMMER |
|
|
The function allows heating the liquid just below boiling point, where there is no rapid evaporation of water. Recommended for cooking dishes with a large amount of water, e.g. soups and stews. When preheating is complete, the water has reached the temperature to maintain a gentle simmering. Recommended for cooking dishes with a water content of more than 500 ml. |
||
|
GRILL |
GRILLING |
|
|
1 |
120 °C |
Recommended for grilling meat, vegetables, fish and eggs with up to 150 ml of oil. Once preheating is complete, the pan reaches the ideal temperature and is ready for use. The GRILL function is not available on the small Ø145 mm cooking zone. Depending on the model, GRILL may be used on bridging zones. |
|
2 |
160 °C |
|
|
3 |
180 °C |
|
|
4 |
220 °C |
|
|
FRY |
FRYING |
|
|
1 |
160 °C |
Recommended for frying potatoes, meat, fish, dough, and vegetables using more than 150 ml of oil. Once preheating is complete, the oil in the pan will have reached the ideal temperature and is ready for use. The FRY function is not available on the small Ø 145 mm cooking zone. |
|
2 |
180 °C |
|
|
3 |
220 °C |
|
|
BOIL |
BOILING |
|
|
This function automatically brings water to the boil and then keeps it simmering. When preheating is complete, the water has reached temperature and is ready for use. Add food after preheating is complete. Recommended for cooking dishes with a water content of more than 500 ml. |
|
Using the ConnectLife app unlocks access to over 100 guided recipes and allows easy monitoring of the cooking status, in addition to other advanced functions. When an additional function is activated via the app, its display on the user interface may differ from the standard view. The user manual is available within the ConnectLife app. |
|
If the pan is removed from the cooking zone during an active additional function, the active function is paused. The selected additional function will flash together with the A icon. If you replace the pan within 20 seconds, the additional function will be resumed, otherwise it will be switched off. |
|
The additional function remains active if the 'Stop&Go' pause function is used for less than 20 seconds. It can also be restored using the memory function. |
Cleaning

Energy labelling
Information for consumer and test institute
Information about your product can be found at www.asko.com, where you will also find a link to the European Product Database for Energy Labelling, EPREL. Or else visit https://eprel.ec.europa.eu directly.
Declaration of conformity
We hereby declare that our products satisfy the applicable European directives, orders and regulations, as well as the requirements stated in the referenced standards.
Disposal of the appliance and packaging
Sustainable materials have been used during the manufacture of this appliance. This appliance must be disposed of responsibly at the end of its service life. Ask your local authorities for more information about how to do this.
Recycle as electrical waste!
ConnectLife
Connecting the appliance to the ConnectLife-app.
ConnectLife is a smart home platform that connects people, devices and services. The ConnectLife application includes advanced digital services and carefree solutions that allow users to monitor and control appliances, receive notifications from a smartphone, and update software (supported features may vary depending on your appliance and the region/country in which you are located).
To connect your smart device, you need a home Wi-Fi network (only 2.4 GHz networks are supported) and a smartphone equipped with the application ConnectLife.
|
|
To download the ConnectLife application, scan the QR code or search for ConnectLife in your favourite app store. |
-
Install the ConnectLife application and create an account.
-
In the ConnectLife application, go to the "Add device" menu and select the appropriate type of device. Then scan the QR code (it can be found on the nameplate of the appliance; you can also enter the AUID/MV number manually).
-
The application then guides you through the entire process of connecting the appliance to your smartphone.
-
Once a successful connection has been established, the appliance can be operated and monitored remotely via the mobile application.
Wi-Fi management
Switch on the device and keep key pressed to open the Wi-Fi module function setting.
|
1 |
Switching on the Wi-Fi module: |
|
2 |
Connecting the appliance: NOTE: For further settings, follow the instructions in the ConnectLife app. |
|
3 |
Connecting additional users: |
|
4 |
Removing all connected users: When you release the key, the user settings icon starts flashing. Touch this icon to activate the remove function. Upon entering the menu, a 1-minute timer appears, which remains visible until all connected users are removed from the device. Use this setting to disconnect all users from the ConnectLife app. |
|
5 |
Switching off the Wi-Fi module: |
Tips and hints
Cooking hob (conventional or glass-ceramic)
-
The hob is resistant to temperature changes.
-
Using the cooking hob surface as a storage area may result in scratches or other damage to it.
-
Do not use the glass-ceramic hob if it is cracked or broken. If a sharp object falls on the hob, the hob may break. The consequences of such occurrence may be visible immediately or only after a while.
-
If any visible crack appears in the hob, immediately cut off the power supply to the appliance.
-
Make sure the cooking zone and the cookware bottom is clean and dry. This will allow better conduction of heat and prevent any damage to the heating surface.
-
Do not place empty cookware on the cooking zone, as this may result in damage.
|
If sugar or food with high sugar content is spilled over a hot class ceramic hob, immediately wipe the hob or remove the sugar with a scraper, even if the cooking zone is still hot. This will prevent any damage to the class ceramic surface. Do not use detergents and other cleaners to clean a hot glass-ceramic hob as this could damage the surface. |
Induction cooking zone operating principle
Cooking on an induction hob differs from cooking on traditional appliances. Induction hob uses magnetic field for generating heat and cooking. This means that not all types of cookware can be used on an induction hob.
|
|
The cooking hob is fitted with highly efficient induction cooking zones. The heat is generated directly in the bottom of the pan where it is needed the most. This avoids any losses through the glass-ceramic surface. Power consumption is considerably lower than in conventional cooking zones with radiation heaters. |
|
The glass-ceramic cooking zone is not heated directly, but only indirectly with the heat radiated back by the pan. After the cooking zone is switched off, this residual heat is indicated by. |
|
|
In induction cooking zones, heating is made possible by the induction coil installed under the glass-ceramic surface. The coil induces a magnetic field which generates eddy currents in the bottom of a ferromagnetic pan, which in turn heats the pan. |
|
|
The induction will work correctly if you use suitable cookware. |
Induction cookware
|
|
The magnet test: Use a small magnet to check whether the pan or pot bottom is ferromagnetic. If the magnet sticks to the bottom of the pan, then it is suitable for an induction cooker. |
|
|
Make sure the pot or pan is in the middle of the cooking zone |
|
|
For best cooking results, the ferromagnetic area on the cookware bottom should match the size of the cooking zone. If the cooking zone does not recognize the pan, try placing it on a different cooking zone with a smaller diameter. |
|
Suitable cookware |
Unsuitable cookware |
|---|---|
|
steel |
glass |
|
enamel-coated steel |
alloy steel with copper bottom |
|
cast iron |
alloy steel with aluminium bottom |
-
When using a pressure cooker, keep an eye on it until the right pressure is reached. First, set the cooking zone to maximum power; then, following the pressure cooker manufacturer's instructions, decrease the cooking power when appropriate.
-
Make sure there is enough liquid in the pressure cooker, or any other pot or pan. Due to overheating, using an empty pot on the cooking zone may result in damage to both the pot and the cooking zone.
-
Some cookware does not have a fully ferromagnetic bottom. In such case, only the magnetic part will heat up, while the rest of the bottom will remain cool.
-
When using special cookware, observe the manufacturer's instructions.
-
Pan bottom has to be flat.
|
Cooking zone |
Minimum pan bottom diameter |
|---|---|
|
Ø 145 mm |
Ø 90 mm |
|
Ø 180 mm |
Ø 110 mm |
|
Ø 230 mm |
Ø 110 mm |
Energy saving tips
-
Cook with a lid on the pan, preferably; this reduces cooking odours and energy consumption. An odour filter that is too moist due to water vapours also reduces its effectiveness.
-
When purchasing cookware, consider that the diameter indicated on the pan usually pertains to the upper edge or the lid, which is normally larger than the diameter of the pan bottom.
-
If a dish takes a long time to cook, use a pressure cooker. Make sure there is always sufficient liquid in the pressure cooker. If an empty cooker is placed on the cooking hob, it may overheat which in turn may lead to damage to both the pot and the cooking zone.
-
Whenever possible, cover the pot or pan with a suitably sized lid. Use cookware that fits the amount of food you are cooking. Cooking in a large partly full pot will consume much more energy.
-
Even if there is no pot or pan on the cooking zone or if the pan used has a diameter that is smaller than the diameter of the cooking zone, there will be no losses of energy.
-
If the pan is much smaller than the cooking zone, there is a possibility that it will not detected.
-
If a smaller pan or pot is placed on the cooking zone and it is recognized, the hob will only use as much power as necessary given the pan size.
Cleaning and maintenance
After each use, wait for the glass-ceramic surface to cool down and clean it. Otherwise,
all remaining impurities will burn onto the hot surface the next time you use the
hob.
For regular maintenance of the glass-ceramic hob, use special care products that
create a protective film on the surface to prevent the dirt from sticking onto it.
Before each use of the glass-ceramic surface, wipe off the dust or any other impurities
that could scratch the surface, from both the hob and the pan bottom.
|
Steel wool, coarse cleaning sponges, and abrasive powders may scratch the surface. The surface may also be damaged by aggressive spray cleaners and unsuitable liquid cleaners. |
Using harsh or abrasive cleaning agents or using pans with damaged bottoms can wear
off markings on the appliance. Remove minor dirt residue with a soft, damp cloth,
then wipe the surface dry.
Remove water stains with a mild vinegar solution. Do not wipe the frame (specific
models), as this can cause it to lose its shine. Do not use harsh sprays or cleaning
agents to remove limescale.
Remove stubborn dirt with special cleaning agents for glass-ceramic surfaces. Follow
the manufacturer's instructions for the cleaning agent. Thoroughly remove cleaning
agent residue after cleaning, as it can damage the glass-ceramic surface when heated.
Remove stubborn and burnt-on dirt with a scraper. Be careful when doing this to avoid
injury.
Sugar and other food residues can damage the glass ceramic surface. Therefore, sugar
residue should be removed from the glass surface immediately with the scraper, even
while the hob is still hot.
|
The scraper is not included in appliance equipment. |
|
Only use the scraper when dirt cannot be removed with a wet cloth or special cleaners for glass-ceramic surfaces. Hold the scraper at an angle (45° to 60°). Apply gentle pressure and slide it across the glass, over the markings, to remove the dirt. Ensure that the plastic handle (on some models) does not come into contact with the hot cooking surface. |
|
Do not press the scraper perpendicularly against the glass and do not scratch the hob surface with its tip or blade. |
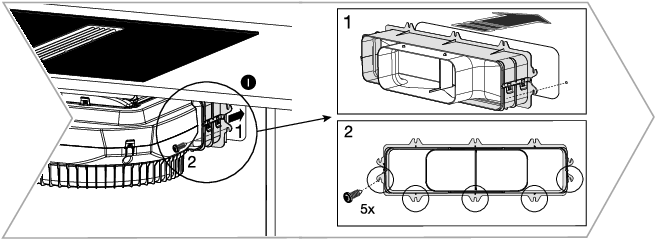
Cleaning the grease filter unit
-
Clean the grease filter unit when the grease filter indicator 'CLEAN FILTER A' is displayed.
-
First remove the inlet grid and then remove the grease filter unit from the extractor module.
-
Clean the grease filter unit and inlet grid with warm water, washing-up liquid, and a non-abrasive brush or sponge. You can also clean them in the dishwasher. To avoid scratches or stains, make sure the parts are positioned so that all liquids drain away and that there is no contact between them.
|
It is important that the grease filter unit is thoroughly dried before it is fitted again. |
Replacing recirculation filters
-
Replace the recirculation filters when the indicator 'CHANGE FILTER B' is displayed. First, remove the inlet grid and grease filter unit.
-
Remove both recirculation filters from the extractor module.
-
Ensure the side indicated by the arrow points upwards when installing new recirculation filters.
|
Buy new recirculation filters HF3015 at Maintainlife.com
|
Problems and errors
During the warranty period, only a service centre authorized by the manufacturer may
carry out any repairs.
Before making any repairs, make sure the appliance is disconnected from the power
mains either by removing the fuse or by disconnecting the power plug from the wall
outlet.
Any unauthorized repairs of the appliance may result in electric shock and short circuit
hazard; therefore, do not perform them. Leave such work to an expert or a service
technician.
In case of minor problems with appliance operation, check this manual to see if you
can fix the problem yourself.
Save the instructions for future reference and pass them on to any subsequent owners
or users of the appliance.
Following are some troubleshooting tips.
|
Problem/error |
Cause |
Solution |
|---|---|---|
|
The fuse in the meter cupboard trips repeatedly. |
The appliance may be incorrectly connected or have an internal fault. |
|
|
Continuous beep and display |
Water has spilt on the control panel, or an object is resting on it. |
|
|
The touch controls are not responding correctly. |
The control panel is dirty. |
|
|
Hot |
The control panel is too hot to operate. |
|
|
Err |
Appliance could not connect to the ConnectLife app or disconnect from it. |
|
|
E18 |
Insufficient cooling of the appliance. |
|
|
E19 |
The temperature of a cooking zone is too high. |
|
|
E20 |
Internal fault in the electronics. |
|
|
E42 |
Fault in the control panel. |
|
|
Other ‘E’ error codes |
A fault has occurred during operation. |
|

If the problems persist despite observing the above advice, call an authorized service technician. Repair or any warranty claim resulting from incorrect connection or use of the appliance shall not be covered by the warranty. In this case, the user will cover the cost of repair.
|
Before the repair, disconnect the appliance from the power mains (by removing the fuse or by removing the plug from the wall outlet). |
|
In case of an unknown fault, disconnect the appliance from the mains for 1 minute (by removing the fuse or unplugging the plug). If the fault is not remedied, contact the service department. |
Noises during induction cooking
|
Noises and sounds |
Cause |
Solution |
|---|---|---|
|
Inductiongenerated operating noise |
Induction technology is based on the properties of some metals under electromagnetic effect. It results in so-called eddy currents that force the molecules to oscillate. These oscillations (vibrations) are transformed into heat. Depending on the type of metal, this could result in quiet noises. |
|
|
Transformer-like buzz |
Occurs when cooking at a high power level. The reason for this is the amount of energy transferred from the cooking hob to the pot or pan. |
|
|
Vibration and crackling of the cookware |
This noise appears in cookware (pots or pans) made of different materials. |
|
|
Fan noise |
Correct operation of induction electronic components requires temperature control. Therefore, the cooking hob is fitted with a fan that cools the electronics depending on the sensed temperature. |
|
Technical data
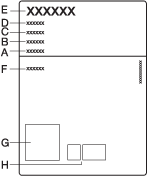
A. Serial number
B. Model
C. Type
D. Code
E. Trademark
F. Technical data
G. QR code
H. Compliance indications / symbols
The rating plate with basic information on the appliance is located on the bottom side of the cooking hob. Information on appliance type and model can be found on the warranty sheet.
Information according to regulation
(EU) 66/2014 - (EU) 65/2014 - (EU) 2023/826
|
Model identification |
GEH8433B GEH8433BSCWF |
|---|---|
|
Trademark |
GEH8433B Gorenje |
|
Type of hob |
GEH8433B Induction hob with integrated extractor |
|
Number of electric cooking zones and/or areas |
GEH8433B 4 |
|
Heating technology |
GEH8433B Induction cooking zones and cooking areas |
|
GEH8433B
|
|
Energy consumption per cooking zone or area calculated per kg (ECelectric cooking) in Wh/kg |
GEH8433B
|
|
Energy consumption of the hob, calculated per kg (ECelectric hob) in Wh/kg |
GEH8433B 177.1 |
|
|
|
|
Annual Energy Consumption (AEChood) [kWh/a] |
GEH8433B 13.2 |
|
Time increase factor (f) |
GEH8433B 0.3 |
|
Fluid Dynamic Efficiency (FDEhood) [%] |
GEH8433B 46.9 |
|
Energy Efficiency Index (EEIhood) |
GEH8433B 16.2 |
|
Measured air flow rate at best efficiency point (QBEP) [m3/h] |
GEH8433B 339.2 |
|
Measured air pressure at best efficiency point (PBEP) |
GEH8433B 599 |
|
Maximum air flow (Qmax) [m3/h] |
GEH8433B 627.1 |
|
Measured electric power input at best efficiency point (WBEP) |
GEH8433B 120.5 |
|
Measured power consumption in standby mode (Ps) [W] |
GEH8433B 0.38 |
|
Measured power consumption off mode (Po) [W] |
GEH8433B - |
|
Measured power consumption in standby mode (WiFi) [W] |
GEH8433B 0.82 |
|
Sound power level (LWA) [dB] |
GEH8433B 68 |
|
|
|
|
Energy efficiency class |
GEH8433B A+++ |
|
Fluid Dynamic Efficiency class |
GEH8433B A |
|
Grease Filtering Efficiency (GFEhood) [%] |
GEH8433B 91.5 |
|
Grease Filtering Efficiency class |
GEH8433B B |
|
Air flow at minimum and maximum speed in normal use [m3/h] |
GEH8433B 156.5 - 471 |
|
Air flow at intensive or boost setting [m3/h] |
GEH8433B 627.1 |
|
Airborne acoustical A-weighted sound power emissions at minimum and maximum speed in normal use [dB(A)] |
GEH8433B 46 - 68 |
|
Airborne acoustical A-weighted sound power emissions at intensive or boost setting [dB(A)] |
GEH8433B 74 |
|
|
|
|
Time needed for the equipment to reach the applicable low power mode or condition [min.] |
GEH8433B < 1 |
Compliance information
|
Radio equipment type |
HSCIM - 1 module |
|
Operating frequency range |
2402.0 - 2480.0 MHz |
|
Maximum output power |
7.63 dBm EIRP average (calculated) |
|
Emission type |
G1D |
|
Radio equipment type |
Wi-Fi module |
|
Operating frequency range |
2412 - 2472 MHz |
|
Maximum output power |
16.8 dBm EIRP average (calculated) |
|
Maximum antenna gain |
0 dBi |
|
Radio equipment type |
BLE module |
|
Operating frequency range |
2402 - 2480 MHz |
|
Maximum output power |
7.63 dBm EIRP average (calculated) |
|
Maximum antenna gain |
0 dBi |
Gorenje declares that the device with the function Connectlife complies with the essential requirements and other relevant provisions of Directive 2014/53/EU. The detailed Declaration of Conformity can be found at the web address https://auid.connectlife.io on the page of your device among the additional documents.
Environmental aspects
Render the appliance unusable to prevent accidents caused by improper use (e.g. through children playing):
-
Disconnect the appliance from the mains. With a fixed appliance, this is to be carried out by a qualified electrician.
-
Then remove the power cord from the appliance by cutting it off at the device.
Disposal of the appliance and packaging
Sustainable materials have been used during the manufacture of this appliance. This appliance must be disposed of responsibly at the end of its service life. Ask your local authorities for more information about how to do this.
The appliance packaging is recyclable. The following may have been used:
-
cardboard;
-
polyethylene film (PE);
-
CFC-free polystyrene (PS rigid foam).
Dispose of these materials in a responsible manner and in accordance with government regulations.
Never allow children to play with packaging material due to the danger of injury or suffocation. Store the packaging material safely or dispose of it in an environmentally-friendly way.
The product has been marked with a crossed-out dustbin symbol to remind you of the obligation to dispose of electrical household appliances separately. This means that the appliance may not be included with normal domestic refuse at the end of its service life. The appliance must be taken to a special municipal centre for separated waste collection or to a dealer providing this service.
A separate collection of household appliances helps to prevent any potential negative impact on the environment and on human health caused by improper disposal. It ensures that the materials of which the appliance is composed can be recovered to obtain significant savings in energy and raw materials.
Declaration of conformity
We hereby declare that our products satisfy the applicable European directives, orders and regulations, as well as the requirements stated in the referenced standards.
Your notes
We reserve the right to make changes.
The appliance identification card is located on the bottom of the appliance.
Stick the appliance identification card here.
When contacting the service department, have the complete type number to hand.
You will find the addresses and phone numbers of the service organisation on the guarantee card.