1
Instructions for use
Tumble Dryer
TD76
T3VW.U
Carefully read the instructions for use before using the dryer.
Introduction
Dear Customer,
We thank you for purchasing this quality ASKO product.
We hope it meets all your expectations. Scandinavian design combines pure lines, everyday functionality, and high quality. These are the key characteristics of all our products, and the reason why they are highly appreciated across the globe.
We kindly recommend that you read these instructions before using the appliance for the first time. The instruction manual also includes information on how you can help protect the environment.
The following symbols are used throughout the manual and they have the following meanings:
Information, advice, tip, or recommendation
Warning – general danger
Warning – danger of electric shock
Warning – danger of hot surface
Warning – Risk of Fire
Original instructions
SAVE THESE INSTRUCTIONS FOR FUTURE REFERENCE!
Important safety instructions
 SAVE THESE INSTRUCTIONS FOR FUTURE REFERENCE!
WARNING
To reduce the risk of fire, electric shock, or injury to persons when using your appliance, follow basic precautions, including the following:
|
|
Read all instructions before using the appliance. |
|
2 |
Risk of Suffocation and Injury from Entrapment: Do not allow children to play on or in the appliance. Close supervision of children is necessary when the appliance is used near children. |
|
3 |
|
|
4 |
|
|
5 |
|
|
6 |
|
|
7 |
Before the appliance is removed from service or discarded, remove the door to the drying compartment. |
|
8 |
Do not reach into the appliance if the drum is moving. |
|
9 |
Do not install or store this appliance where it will be exposed to the weather. |
|
10 |
Do not tamper with controls. |
|
11 |
Do not repair or replace any part of the appliance or attempt any servicing unless specifically recommended in the user-maintenance instructions or in published user-repair instructions that you understand and have the skills to carry out. |
|
12 |
Do not use spare parts that have not been recommended by the manufacturer (e.g. parts made at home using a 3D printer). |
|
13 |
|
|
14 |
Do not use fabric softeners or products to eliminate static unless recommended by the manufacturer of the fabric softener or product. |
|
15 |
Clean lint screen before or after each load. |
|
16 |
Keep area around the exhaust opening and adjacent surrounding areas free from the accumulation of lint, dust, and dirt. |
|
17 |
The interior of the appliance and exhaust duct should be cleaned periodically by qualified service personnel. |
|
18 |
Do not operate appliance while away from the home. |
 WARNING: Risk of Fire – Do not dry articles that have been previously cleaned in, washed in, soaked in,
or spotted with gasoline, dry-cleaning solvents, or other flammable or explosive substances,
as they give off vapours that could ignite or explode.
WARNING: Risk of Fire – Do not dry articles that have been previously cleaned in, washed in, soaked in,
or spotted with gasoline, dry-cleaning solvents, or other flammable or explosive substances,
as they give off vapours that could ignite or explode.GROUNDING INSTRUCTIONS
a) For a grounded, cord-connected appliance:
This appliance must be grounded. In the event of malfunction or breakdown, grounding will reduce the risk of electric shock by providing a path of least resistance for electric current. This appliance is equipped with a cord having an equipment-grounding conductor and a grounding plug. The plug must be plugged into an appropriate outlet that is properly installed and grounded in accordance with all local codes and ordinances.
 WARNING: Improper connection of the equipment-grounding conductor can result in a risk of
electric shock. Check with a qualified electrician or service representative or personnel
if you are in doubt as to whether the appliance is properly grounded.
WARNING: Improper connection of the equipment-grounding conductor can result in a risk of
electric shock. Check with a qualified electrician or service representative or personnel
if you are in doubt as to whether the appliance is properly grounded.
Do not modify the plug provided with the appliance: if it will not fit the outlet, have a proper outlet installed by a qualified electrician.
b) For a grounded, permanently connected appliance:
This appliance must be connected to a grounded metal, permanent wiring system, or an equipment-grounding conductor must be run with the circuit conductors and connected to the equipment-grounding terminal or lead on the appliance.
This manual does not cover every possible condition and situation that may occur. Use common sense and caution when installing, operating, and maintaining any appliance.
General
Carefully read the instructions for use before using the dryer.
Please, do not use the dryer without reading and understanding these instructions for use first.
This appliance is not intended for use by persons (including children) with reduced physical, sensory or mental capabilities, or lack of experience and knowledge, unless they have been given supervision or instruction concerning use of the appliance by a person responsible for their safety.
These instructions for use of a dryer are supplied with different types or models of dryers. Therefore, they may include descriptions of settings or equipment that are not available in your dryer.
Failure to observe the instructions for use or inappropriate use of the dryer may result in damage to the laundry or the appliance, or injury to the user. Keep the instruction manual handy, near the dryer.
Your dryer is intended solely for household use. If the dryer is used for professional, for-profit purpose or purpose exceeding normal use in a household, or if the dryer is used by a person who is not a consumer, the warranty period shall be equal to the shortest warranty period required by relevant legislation.
Follow the instructions for correct installation of the dryer and connection to the power mains (see chapter ).
All and any repairs or maintenance tasks on the dryer should only be done by trained experts. Unprofessional repair may result in an accident or major malfunction.
To avoid danger, a damaged power cord may only be replaced by the manufacturer, a service technician, or an authorized person.
WARNING
The dryer may not be connected to the hosehold power using an extension cord.
Do not connect the dryer to household power using an external switching device such as a program timer, or connect it to power mains that is regularly switched on and off by the power supply provider.
WARNING
In case of a defect, only use approved spare parts by authorized manufacturers.
WARNING
In case of incorrect dryer connection, incorrect use, or servicing by an unauthorized person, the user shall bear the cost of any damage as such damage shall not be covered by warranty.
Always use the ducts or hoses supplied with the dryer.
WARNING
As this is an evacuation dryer, it does not have a condensate tank. The handle has solely a decorative purpose and it is fixed; it is not intended for opening. If excessive force is applied, the handle may break.
Install the dryer in a room with adequate ventilation and a temperature between 50°F (10°C) and 77°F (25°C).
Place the dryer on a level and stable solid (concrete) base.
After installation, the dryer should stand still for two hours before it is connected to the household power.
At least two persons are required to install the tumble dryer on top of a washing machine.
WARNING
Do not place the dryer behind lockable or sliding door, or door with a hinge on the opposite side of the dryer door hinge. Install the dryer in such way that the door can always be freely opened.
Never block the air exhaust (evacuation opening).
WARNING
Do not place the dryer on a carpet with long fibers as this may impede air circulation.
Do not connect the dryer to a chimney or a duct that is also used to extract products of combustion of natural gas or other fuels from other appliances.
Air in the dryer environment should not contain dust particles. The air where the dryer is installed should be thoroughly ventilated to prevent reverse flow of gases released from the gas appliances with open fire (e.g. a fireplace).
Make sure the fibers do not accumulate around the dryer.
Do not evacuate the air from the dryer through channels or ducts used for appliances or devices that use natural gas or other fuels for their operation.
The appliance may not be in contact with a wall or adjacent furniture.
Do not use the dryer to dry any laundry that has not been washed.
Laundry stained with oil, acetone, alcohol, oil derivatives, stain removers, turpentine, wax, and wax removers should be washed in a washing machine with hot water and detergent before it is dried in the dryer.
Clothing that includes latex, rubber parts, shower and bathing caps, and laundry or covers with rubber foam may not be dried in the dryer.
Use laundry conditioners or similar products in compliance with manufacturer's instructions.
Remove all objects such as lighters and matches from the pockets.
If the dryer is connected to an air exhaust system already used for another appliance, a non-return valve must be installed. Return flow into the dryer could damage the appliance and the non-return valve prevents such flow.
Clean the dryer filter after each drying cycle. If you have removed the filter, replace it before the next drying cycle.
WARNING
Do not use any solvents or cleaning agents that could damage the dryer (please observe the recommendations and warnings provided by the manufacturers of the cleaning agents).
After the drying process, unplug the dryer power cord from the power outlet.
The warranty does not cover consumables, minor deviations in color, increased noise that results from appliance age and which does not affect the functionality of the dryer, and aesthetic defects on components, which do not affect the dryer's functionality and safety.
To reduce the risk of severe injury or death, follow all installation instructions.
The maximum amount of laundry in lbs/kg is indicated on the washing machine rating plate.
Child safety
Do not allow children to play with the dryer.
Do not let children younger than three years to come near the tumble dryer, unless they are under constant supervision.
Prevent your children and pets from entering the dryer drum.
Before closing the dryer door and running the program, make sure there is nothing except laundry in the drum (e.g. if a child climbed into the dryer drum and closed the door from the inside).
Activate the Child lock. See chapter .
The dryer is made in compliance with all relevant safety standards.
This dryer may be used by children aged 8 years and above and by persons with reduced physical, sensory or mental capabilities or lack of experience and knowledge, but only if they are supervised during the use of the appliance, if they have been provided relevant instructions regarding safe use of the dryer, and if they understand the hazards of inappropriate use.
Make sure children do not play with the dryer.
Children may not clean the dryer or perform any maintenance tasks without supervision.
Danger of hot surface
At higher drying temperatures, the door glass will heat up. Be careful to avoid burns. Make sure children do not play near the door glass.
The back of the dryer may get very hot during operation. Wait for the dryer to cool down completely before touching its back side.
If you open the dryer door during the drying process, the clothes may be very hot and there is a risk of burning.
Never stop the drying process before it is completed; if you do interrupt the cycle for any reason, be careful when removing the laundry from the drum as it is very hot. Quickly remove the laundry from the drum and spread it to allow it to cool down as quickly as possible.
Safe use
WARNING: Only use the dryer to dry laundry that was washed with water. Do not dry any laundry that was washed or cleaned with flammable cleaners or substances (such as gasoline, trichloroethylene etc.) as this may result in an explosion.
If you have cleaned your clothes with industrial cleaners or chemical substances, do not dry them in the dryer.
The dryer is protected with an automatic switch-off system in case of overheating. This system will switch off the dryer if the temperature is too high.
If the lint filter is clogged, the overheating automatic switch-off system may be activated. Clean the filter, wait for the dryer to cool down, and try running it again. If the dryer still fails to start, call a service technician.
Electrical hazard warning during servicing
Certain internal parts are intentionally not grounded and may present a risk of electric shock only during servicing. Service Personnel – Do not contact the following parts while the appliance is energized: motor, pump and control unit.
REGULATORY NOTICE FCC (Federal Communications Commission)
FCC Declaration of conformity
This device complies with Part 15 of the FCC Rules. Operation is subject to the following two conditions:
-
This device may not cause harmful interference, and
-
this device must accept any interference received, including interference that may cause undesired operation.
Responsible Party - U.S. Contact Information
Hisense USA Corporation
(Distributor of ASKO brand)
5995 Windward Pkwy, Alpharetta, GA 30005, USA
Phone: +1-800-898-1879
FCC Statement:
-
Changes or modifications not expressly approved by the party responsible for compliance could void the user’s authority to operate the equipment.
-
NOTE: This equipment has been tested and found to comply with the limits for a Class B digital device, pursuant to part 15 of the FCC Rules. These limits are designed to provide reasonable protection against harmful interference in a residential installation. This equipment generates, uses and can radi-ate radio frequency energy and, if not in-stalled and used in accordance with the instructions, may cause harmful interference to radio communications. However, there is no guarantee that interference will not occur in a particular installation. If this equipment does cause harmful interference to radio or television reception, which can be determined by turning the equipment off and on, the user is encouraged to try to correct the interference by one or more of the following measures:
-
Reorient or relocate the receiving antenna.
-
Increase the separation between the equipment and receiver.
-
Connect the equipment into an outlet on a circuit different from that to which the receiver is connected.
-
Consult the dealer or an experienced radio/ TV technician for help.
-
-
This equipment should be installed and operated with a minimum distance of 20 cm between the radiator and your body.
Before using the appliance for the first time
When you run the dryer for the first time, or if the dryer has been out of use for a long time, slight rumbling noise may appear. This is normal and it will disappear after a few drying cycles.
Packing material
Transport protection
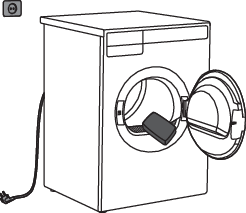
Before using the appliance, remove the transport protection designed to secure the appliance during transport.
The transport protection is placed inside the drum of the dryer and secured at the top in a protective bag.
1Open the dryer door.
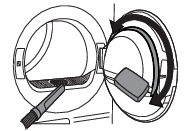
2With one hand hold the transport protection, and with the other hand one of the drum ribs. Turn the rib toward the center of the transport protection where the cutout (alignment recess) is located.
3Firmly hold the transport protection with both hands to avoid damaging it during removal.
4With even pressure, push it straight into the machine to remove it completely.
If you need to transport the appliance, reinstall the transport protection to prevent damage caused by shaking during transit. When reinstalling the transport protection, slightly lift the drum from the inside and press the protection firmly between the drum and the door frame on the inside, ensuring that the drum is properly aligned.
In case the transport protection is lost, the appliance may be damaged during transportation, and such damage will not be covered by the warranty.
Care and maintenance instructions
Unplug the dryer from the outlet and open the door towards you.
Before using the dryer for the first time, clean the dryer drum using a soft damp cotton cloth and water.
Do not use any solvents or cleaning agents that could damage the dryer (please observe the recommendations and warnings provided by the manufacturers of the cleaning agents).
Installation and connection
To reduce the risk of fire, do not dry articles containing foam rubber or similarly textured rubber-like materials.
Install the clothes dryer according to the manufacturer’s instructions and local regulations.
Clothes dryer installation must be performed by a qualified installer.
To reduce the risk of severe injury or death, follow all installation instructions.
The appliance shall not be exhausted into a chimney, a wall, a ceiling, an attic, a crawl space, or a concealed space of a building.
Only rigid or flexible metal duct shall be used for exhausting.
-
Canada: Only foil-type flexible ducts that are specifically identified for use with this appliance by the manufacturer shall be used.
-
United States: Only foil-type flexible ducts that are specifically identified for use with this appliance by the manufacturer and comply with UL 2158A shall be used.
-
Canada: The exhaust duct must have a diameter of 4 inches (102 mm).
-
United States: The exhaust duct diameter must comply with the manufacturer’s specifications and applicable local building codes. These requirements may vary by location and must be followed to ensure compliance and safety.
Maximum duct length shall be 8 feet (2.4 m) and maximum number of bends shall be 4.
The total length of flexible metal duct shall not exceed 8 feet (2.4 m).
The duct shall not be assembled with screws or other fastening means that extend into the duct and catch lint.
Do not install a clothes dryer with flexible plastic venting materials. If flexible metal (foil type) duct is installed, it must be of a specific type identified by the appliance manufacturer as suitable for use with clothes dryers. Flexible venting materials are known to collapse, be easily crushed, and trap lint. These conditions will obstruct clothes dryer airflow and increase the risk of fire.
Save these instructions.
Selecting the room
Do not place the dryer in a room where temperature can drop below 32 °F (0 °C), as the machine may not operate correctly at such low temperatures or may freeze, which can result in damage to the machine.
Install the dryer in a room with adequate ventilation and a temperature between 50 °F (10 °C) and 77 °F (25 °C).
Do not place the dryer behind lockable or sliding doors, or doors with a hinge on the opposite side of the dryer door hinge. Install the dryer in such way that the door can always be freely opened.
Dryer placement
The dryer can be either free standing or installed on top of a washing machine.
The dryer emits heat. Therefore, do not place it in a very small room, as the drying process may be longer due to limited amount of ambient air.
Never block the air exhaust (ventilation opening).
Clearance around the dryer for optimum operation
The dryer must not be in contact with a wall or adjacent furniture. For optimal dryer performance, we recommend maintaining the clearances from the walls as shown in the figure. Failure to observe the required minimum clearance may cause the dryer to overheat.
For safety reasons, maintain a minimum clearance of 1" (25 mm) between the back of the appliance and the wall, and at least 1 5/8" (40 mm) between the top of the appliance and any overhead structure.
For installing the dryer into a cabinet, refer to the special installation requirements in section .
Opening the dryer door (top view)

The dryer door width (a) is 19 13/16" (503 mm).
The dryer depth with door open (b) is 39" (989 mm).
The dryer door can be opened up to the angle of 180°.
Placement on a pedestal
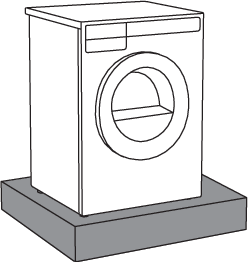
If the appliance is installed on a platform or a similar structure, then the appliance must be fixed to it, to avoid the risk of falling. ASKO original accessories are available for this purpose, complete with mounting instructions.
Freestanding appliance
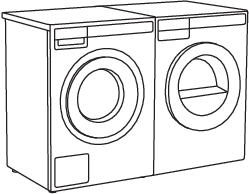
The dryer may be placed adjacent to a washing machine.
If the friction between the dryer feet and the floor is not sufficient, the dryer may move during operation.
To prevent sliding, use anti-slip mat or attach the supplied suction feet to both front legs.
Adjusting the dryer feet
Place the dryer so that it is stable.
Use a spirit level to level the dryer both front-to-back and side-to-side by rotating the adjustable feet with a No. 7/8" (22) wrench (max. 9/16" (15 mm)).
Then, firmly tighten the jam nuts (counter nuts) by rotating them towards the appliance
bottom using a No. 11/16'' (17) wrench  .
.
Incorrect leveling of the dryer with the adjustable legs may cause vibration, appliance sliding across the floor, and loud operation. Incorrect leveling of the dryer is not covered by the warranty.
Sometimes, unusual or louder noises may occur during appliance operation; these are mostly the result of improper installation.
Installation under the counter
ASKO dryers can be installed under a counter or a countertop that is at least 34" (864 mm) high, measured from the floor to the underside of the countertop. There must be a clearance of at least 1/2" (12 mm) on all sides of the appliance. There must be a minimum clearance of 1" (25 mm) between the rear edge of the appliance's top panel and the wall behind it. The width of the opening or niche where the appliance is to be installed must be at least 24 1/2" (624 mm), measured between the side walls of the niche.
The height adjustment for the dryer is between 33 1/2" (850 mm) to 34 1/2" (876 mm). Do not raise the appliance higher than 34 1/2" (876 mm).
It is very important to avoid a buildup of heat.
The warm air which is expelled from the rear of the dryer must be able to dissipate.
Warm air which cannot dissipate could cause a fault.
A buildup of heat can be avoided by:
-
Creating a gap for the dryer in the kitchen cabinet toe space.
-
Creating ventilation gaps in the surroundings.
When built in, drying times may be longer.
The dryer should not be installed next to a refrigeration appliance. The warm air expelled from the back of the dryer can increase the temperature around the refrigeration appliance’s heat exchanger, causing the compressor to run continuously. If it is not possible to install the dryer elsewhere, the refrigeration appliance must be properly sealed off from the dryer.
Stacking on top of a washing machine
At least two people are required to install the tumble dryer on top of a washing machine.
To stack the dryer on top of a washing machine, use the front feet attachments (suction feet (C)) and the tipping guard (A+B) supplied inside the dryer drum.
If the washing machine and dryer are not the same dimensions, you can purchase a connecting plate designed for the WM86–TD76 combination from your dealer.
The tipping guard (B) is designed for ASKO washing machines and cannot be installed on washing machines from other brands
The washing machine on which you wish to install the dryer must be able to bear the weight of the dryer (see washing machine’s rating plate or technical information).
All ASKO washing machines can bear the weight of the ASKO dryer.
How to stack a dryer onto the washing machine (ASKO)
A cardboard box inside the dryer drum contains the tipping guards (A, B), suction feet (C), and screws.
1The tipping guard consists of two metal parts (A + B).
Part (B) can be rotated 180°. Turn it according to the depth of the washing machine and dryer.
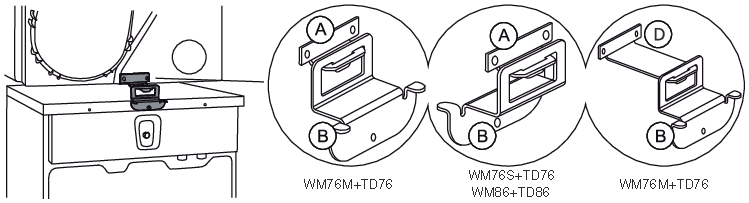
Select the correct combination according to the type of washing machine and dryer, as indicated on the rating plate located on the inner side of each appliance’s door (see chapter ).
If your dryer is shallower than the washing machine, you can purchase a suitable longer guard (D) from your dealer (ART. No.: 924231 OVERTURNING PROTEC.TD-76/WM-86).
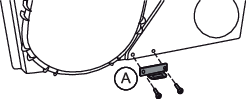
2Attach part (A) to the rear bottom of the dryer using the two screws included in the package.
3Undo the screw on the back side of the washing machine.
4Use the screw to attach the tipping guard (B) to the back of the washing machine.
Turn the part (B) according to the depth of your dryer and washing machine (see point 1).
5Level the washing machine so that it is stable.
-
Level the washing machine by rotating the adjustable feet using a No. 32 (1.26") wrench. The feet allow levelling by +/- 3/8" (1 cm).
-
After adjusting the height of the feet, firmly tighten the jam nuts using a spanner No 17 (11/16"), by turning them towards the bottom of the washing machine
. -
Tighten the jam nuts.
6Set the dryer feet:
-
Tighten the front two feet all the way in.
-
Loosen the rear feet by 3.5 turns or 1/4" (5 mm); then tighten the jam nuts toward the bottom of the appliance
7Place the dryer onto the washing machine.
-
Lift the front part of the dryer by 2"–4" (5–10 cm).
-
Attach the vacuum feet (C) onto the front feet of the dryer.
-
Push the tumble dryer into the tipping guard (part B into part A) and install it on top of the washing machine.
Ensure that both parts of the tipping guard (A + B) are locked. The front of the washing machine and dryer must be aligned!
Built-in
Closet Install- Ventilation Requirements
ASKO's front panel controls make it possible to install the washers and dryers in a cabinet or closet.
The distance between the left or right side of the appliance and the surface of the side of the cabinet or the surface of the wall of the recess in which the appliance is installed must be at least 1/2" (12 mm). The distance between the back of the appliance (note the deepest point of the appliance) and the surface of the back of the cabinet or the wall of the recess must be at least 1" (25 mm). See figure.
Ventilation Requirements of ASKO laundry concept (when installing the appliance in a closet)
Make sure there is space between the appliance and the furniture element or wall, and at least 1" (25) mm of space between the back edge of the top panel of the appliance and the furniture element or wall.
When the closet or cabinet is closed with a door, we recommend using louvered doors to ensure proper ventilation.
Otherwise, the door must have ventilation gaps. See the figure for the dimensions of the ventilation openings.
Ensure the dryer door can be opened without hindrance after installation.
The cool air intake panel at the front of the dryer must not be blocked or covered. Doing so could cause an error.
Failure to follow these instructions can negatively impact the appliance performance and may also result in failure of the appliance.
Changing the door opening direction
Changing the door opening direction should be done by an installer, service provider, or similarly qualified persons in order to avoid any hazards.
To change the direction of door opening, proceed as follows:
1Open the door fully.
2Undo the screws and remove the door.
3Carefully remove the door lock cover with a narrow, blunt object.
Release the latches on the door lock cover in the indicated order.
When removing, make sure not to bend the cover or its latches, as they may get damaged.
4Push the door lock up, slide it to the left and remove it from the appliance in a rotating motion.
5Remove the connector from the lock.
Insert the connector into the rib of the plastic housing to prevent the appliance from rattling when the connector is not plugged in.
6On the opposite side where the door has come off, remove the connector from the rib, pull it out of the appliance and connect it to the door lock.
7Place the door lock in the appliance in the reverse order of its removal from the appliance.
Remount the door lock cover.
8Undo the door hinge assembly (left) and the door latch assembly (right), switch their positions, and replace the screws (door hinge assembly to the right-hand side, door latch assembly to the left-hand side).
Use a screwdriver to remove the plastic part more easily.
9Install the door on the front wall and screw it in.
Install the door in a fully open position and do not lift it while screwing. It is correctly installed only if the door latch is aligned with the center of the door catch or slightly above it!
Opening the Door
The tumble dryer door is designed to open on the left side, with a visual indicator in the form of a sticker placed on the front of the door, clearly marking the spot for gripping and opening.
1In case of changing the door opening direction, you can move the sticker to the opposite side. Carefully remove the sticker and attach it to the right side of the door, ensuring it is positioned at the same height.
Air exhaust
The tumble dryer must only be operated when it is correctly fitted with exhaust duct.
Connecting the exhaust duct to the dryer
You will need to purchase a UL-CSA-approved 4" ridged metal exhaust duct. The dryer is delivered with the stub pipe attached to the rear exhaust outlet.
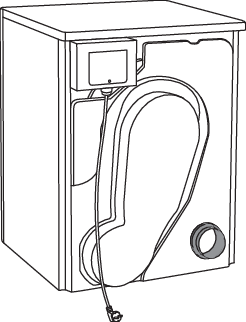
To connect the exhaust duct to the rear outlet, follow the steps below:
-
Using a flat-head screwdriver, remove the exhaust outlet cover from the rear exhaust outlet.
-
Attach the stub pipe to the rear exhaust outlet.
-
Use the exhaust outlet cover you removed to cover any unused openings or areas, if applicable.
The duct must not be assembled with screws or other fasteners that extend into the duct and catch lint.
To connect the exhaust duct to the outlet, follow the steps below:
-
Push the duct onto the stub pipe and secure it with a clamp.
-
After you push the dryer into place, check for kinks in the duct.
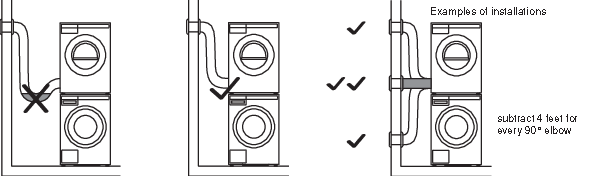
Excessive duct length and too many bends can impede drying performance. We recommend that you cut off any excess exhaust duct and run the duct with as few bends as possible. Make any necessary bends as gentle as possible.
Maximum duct length of 60 feet (18 m). A maximum of 4 elbows may be used, but 4 feet (1,21 m) of duct must subtracted from the total vent length for every 90° elbow used.
To reduce the risk of fire, this appliance must be exhausted OUTDOORS or the equivalent. Never cover the end of the dryer stub or exhaust duct with anything to catch lint, except for UL approved vent basket.
Connecting to a ventilation duct
You will need a UL-CSA-approved, 4-inch (101.6 m) ridged metal exhaust duct. If a flexible duct is used, it must comply with the Outline for Clothes Dryer Transition Duct. Subject 2158A and maximum length of 94 1/2" (2.4 m).
The more bends and the longer the duct, the less air will circulate through the machine, which will impede drying performance. We recommend that you cut off any excess exhaust duct and run the duct with as few bends as possible. And make any necessary bends as gentle as possible.
Maximum duct length of 60 feet (18 m). A maximum of 4 elbows may be used, but 4 feet (1,21 m) of duct must subtracted from the total vent length for every 90° elbow used.
When installing in warm climates (77° F and above) with high humidity levels, do not route the air exhaust duct upwards.
To connect the exhaust duct to a ventilation outlet, follow the steps below:
-
Connect the exhaust duct to a ventilation exhaust fitting or to a discharge through the wall.
-
Secure the duct joint to the outlet stub on the machine.
-
Run the duct with as few bends as possible to the point of discharge.
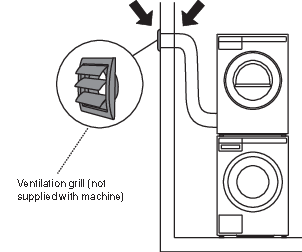
This appliance shall not be exhausted into a chimney, a wall, a ceiling, an attic, a crawl space or a concealed space of a building. Only a rigid or flexible metal duct shall be used for exhausting. Only a metal ventilation grill shall be used. If the duct is taken to a wall outlet, a ventilation grill shall be fitted to prevent reverse flow of cold air. Fit the ventilation grill to the outside of the wall.
Avoid:
-
very long exhausting systems
-
too many corners
-
tight corners
These reduce efficiency and increase time and energy consumption.
A clothes dryer produces combustible lint. The dryer must be connected to an exhaust to the outdoors. Regularly inspect the outdoor exhaust opening and remove any accumulation of lint around the outdoor exhaust opening and in the surrounding area.
Do not install a booster fan in the exhaust duct.
Note: The booster fan warning does not apply to clothes dryers intended to be installed in a multiple clothes dryer system, with an engineered exhaust duct system that is installed per the clothes dryer manufacturer’s guidelines.
Connecting to the household power
This appliance must be properly grounded. Refer to the “Important Safety Instructions” for grounding instructions. The power supply cord must be grounded. If the machine is to be used in a wet area, the supply must be protected by a residual current device. Connection to a permanently wired supply point must be made only by a qualified electrician.
After installation, the dryer should stand still for two hours before it is connected to the household power.
The receptacle on the rear of the machine is designed to accommodate ASKO washers ONLY (rated 208–240 V.) To use this receptacle, you must use the ready-fitted plug supplied with the washing machine or an equivalent. ASKO washers rated 208–240 V have two internal fuses of 15 A each. The machine should only be connected to a grounded wall socket.
Connect the appliance to a grounded power outlet. After installation, the wall outlet should be freely accessible. The outlet should be fitted with a ground contact (in compliance with the relevant regulations).
Connection upon delivery
1 - Model type
2 - Model
3 - Serial number
4 - QR code
5 - AUID code
6 - Article number
7 - FCC ID & IC ID
Information about your dryer is indicated on the rating (type) plate.
Use type A ground fault circuit interrupter
The dryer shall not be connected to the power mains using an extension cord.
Any repair and maintenance pertaining to safety or performance should be done by trained experts.
ASKO Laundry Care - Hidden helpers (Hidden helpers)
The Hidden Helper (single shelf, basket, or ironing board) can be installed between the washing machine and the dryer, or on top of either appliance.
SLIM - Single Shelf
Pull-out shelf. It can be used as an additional surface when folding clothes and sorting socks or for storage. It also makes loading and unloading your laundry much easier. It can be installed between your washer and dryer.
BASKET
A large pull-out basket that is easily accessible via a push-pull door opening. Useful for removing laundry and carrying it to the wardrobe or workbench for ironing and folding.
IRONING BOARD
The ironing board is a clever solution. It is always handy when you need to iron your clothes, and it can be easily, safely and invisibly stored away when not in use.
A PEDESTAL DRAWER
A useful storage drawer with a height of 11 13/16" 30 cm. Ideal for storing your detergent, softener, coat hangers, pegs, user manuals and other useful items in the laundry area.
The pedestal drawer is installed under the washing machine or the dryer.
Availability depending on market
|
DENOMINATION |
White ART. No. |
Titanium ART. No. |
Graphite black ART. No. |
|---|---|---|---|
|
SLIM |
HS60W - 746295 |
HS60T - 746296 |
HS60G - 746297 |
|
BASKET |
HB150W - 746298 |
HB150T - 746299 |
HB150G - 746300 |
|
IRONING BOARD |
HI150W - 746311 |
HI150T - 746312 |
HI150G - 746314 |
|
A PEDESTAL DRAWER |
HP320W - 746315 |
HP320T - 746316 |
HP320G - 746317 |
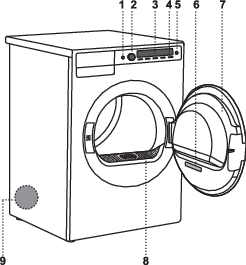
Dryer description
-
Main switch for turning On/Off
-
Program selector knob
-
Display unit
-
Program selector buttons
-
Button (Start/Pause)
-
Rating plate with information about the dryer (on the inside of the dryer door) and QR and AUID code (on the inside of the dryer door)
-
Dryer door
-
Lint filter
-
Air exhaust hose opening
Control unit

-
Main switch for turning On/Off
-
Program selector knob
-
Display unit
-
Program selector buttons
-
Button (Start/Pause)
Initial settings before use
When the appliance is connected and switched on for the first time (see chapter ), first perform the following settings:
1 Choose language (Language)
Use the buttons 2 and 3 to navigate the list of languages and select the desired language.
Confirm your selection by pressing 4 Save.
To save your settings, turn the program selector knob all the way down and press 4 Ok.
Your dryer is now set up and ready to use.
Connecting the appliance to the ConnectLife application
The ConnectLife app is an advanced smart home platform that enables seamless connectivity between people, devices, and services. With the ConnectLife app you can easily monitor and manage your smart devices, receive notifications directly to your smart device and update software (available functions depend on your appliance and region).
To connect your smart device to the ConnectLife platform, you need a home Wi-Fi network (2,4 GHz networks are supported) and a smart device with the ConnectLife app.

STEP 1: Download the ConnectLife app by scanning the included QR code or searching for it in your favorite app store.
STEP 2: Install the ConnectLife app and create an account.
STEP 3: In the ConnectLife app, go to the »Add device« menu and select the appropriate type of device. Then scan the QR code (it can be found on the rating plate of the appliance; you can also enter the AUID/SN number manually).
STEP 4: The application then guides you through the entire process of connecting the appliance to your smart device.
After a successful connection, the appliance can be operated remotely via the application.
Useful tips for your smart device
How to enable Wi-Fi on the device?
Kako omogočiti Wi-Fi na napravi? UI1
-
Turn on the appliance. In the main menu, use the program selector knob to select System settings. Confirm your selection by pressing (4) Enter.
-
Turn the program selector knob to the right and select Wi-Fi settings. Confirm your selection by pressing (4) Enter.
-
If the Wi-Fi system is not switched on, turn it on by pressing (3).
-
Use the program selector knob to select Connection setup, and press (3) Enter. Then press (4) Next.
-
If you do not yet have the ConnectLife app installed on your smartphone (or any other smart device), install it now (scan the QR code on the screen), create your user account and login.
-
In the ConnectLifeapp, open the add device menu.
-
Follow the instructions in ConnectLife.
-
Select the type of appliance.
-
Scan the QR code (it can be found on the rating plate of the appliance).
-
-
On the appliance, press (4) Next.
-
The 5 minute countdown will begin. During this time, connect the app to the appliance.
-
-
In the ConnectLife app, instructions will guide you through the process of entering the appropriate data for your appliance to connect to your home network.
-
How to enable remote start of the appliance?
Kako omogočiti daljinski zagon naprave? UI1
In the main menu, turn the program selector knob to the left to select Remote start . To activate, press the Start/Pause button (the door must be closed). The display will showRemote start/Activated.
The appliance is now ready for remote control through ConnectLife app.
Remote start will remain active for the next 24 hours unless cancelled. During this time, the appliance can enter standby mode and switch off the display. If this happens, the logo will remain lit, which means that Remote start is still active.
How to add another user or multiple users?
Kako dodate drugega ali več uporabnikov? UI1
See chapter How to enable Wi-Fi on the device? and observe points 1 and 2.
Use the program selector knob to select Add device , and press (3) Enter. If you are a new user and do not yet have the ConnectLife app installed, install it on your smart device.
-
In the ConnectLife app, go to the Add device menu and follow the instructions.
-
On the appliance, press (4) Next.
-
The 3 minute countdown will begin. During this time, connect the app to the appliance.
-
-
Complete and confirm the setting in the app.
How to remove the users?
How to remove a user (Remove device)?
See chapter How to enable Wi-Fi on the device? and observe points 1 and 2.
Use the program selector knob to select Remove device, and press (3) Enter. Press (4) Ok. Follow the instructions on the appliance screen.
This step will remove all active users of the appliance. If you want to operate the appliance remotely again you will need to repeat the process of adding a user.
Which Wi-Fi router can be used?
Only 2.4 GHz networks are supported. If the ConnectLife app cannot find your local network during the connection set-up process, check the following:
-
your router is operating at the frequency of 2.4 GHz,
-
your network is not hidden, and
-
your signal is strong enough.
Do you have more questions?
Visit us at www.connectlife.io or contact us at hello@connectlife.io.
Remote software upgrade
When you receive a software update notification, you can choose to update your software from the app menu in your settings. Upon confirmation, the update is performed, the appliance must be in standby mode during this time (more on standby mode in chapter ).
Check the software update options in the ConnectLife app.
Advice before drying
This chapter includes several advice on how to prepare the laundry for drying.
Laundry sorting
Sort the laundry according to the type and thickness of the fabric.
For the most even drying, make sure the laundry is made of a similar material.
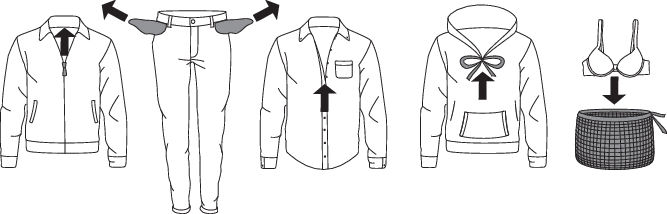
Clothing
-
Sort the laundry by type and thickness of the fabric (see ).
-
Close the buttons and zippers, tie any ribbons, and turn the pockets inside out; remove any metal clips that could damage the laundry and tumble dryer interior.
-
Place very sensitive clothes and small items in a special-purpose laundry washing bag.
Do not insert laundry into the dryer if it has not been wrung or spun (recommended minimum spinning cycle: 800 rpm).
Higher spinning speeds will save energy and cut drying time.
If a mixed load contains a single, particularly large item, we recommend drying it separately from smaller items of laundry.
Turn printed garments inside out before drying. To reduce the risk of heat damage to the prints, use the Delicate drying mode.
Materials (fabrics) suitable for drying in a tumble dryer


 This symbol indicates the material is suitable for tumble drying. Clothes dried in
a tumble dryer will be softer and lighter than air-dried clothes.
This symbol indicates the material is suitable for tumble drying. Clothes dried in
a tumble dryer will be softer and lighter than air-dried clothes.
The dryer does not cause any considerable wear of the fabric. The lint collected in the lint filter consists of dust and fabric fragments collected during the use of the laundry.
Materials (fabrics) that may not be dried in a tumble dryer
 This symbol means that the material is not suitable for drying in a tumble dryer.
Never tumble dry the following:
-
clothing that was chemically cleaned (or drycleaned) at home,
-
foam,
-
glass fibers.
Materials that are not suitable for drying in a tumble dryer
Drying laundry made of particularly delicate fabrics that may be deformed is not recommended. The following types of laundry may not be dried in the dryer as this may cause your garments to deform:
-
leather garments and other leather products,
-
garments that are waxed or treated in any other way,
-
garments with major wooden, plastic, or metal parts,
-
garments with sequins or similar decorations,
-
garments with metal parts subject to rusting.
Laundry symbols
Always follow the garment manufacturer's recommendations before drying in the dryer.
|
Cotton Normal wash; Sensitive laundry; |
|||||||||||
|
|
Max. washing temperature EX. HOT |
|
Max. washing temperature WARM |
|
Do not wash |
||||||
|
|
Max. washing temperature HOT |
|
Hand wash only |
||||||||
|
Bleaching |
|||||||||||
|
|
Bleaching in cool water |
|
Bleaching not allowed |
||||||||
|
Dry cleaning |
|||||||||||
|
|
Dry cleaning with all agents |
|
Perchloroethylene R11, R113, petroleum |
||||||||
|
|
Dry cleaning in kerosene, pure alcohol, and R113 |
|
Dry cleaning not allowed |
||||||||
|
Ironing |
|||||||||||
|
|
Hot ironing, max. HIGH temperature |
|
Hot ironing, max. LOW temperature |
||||||||
|
|
Hot ironing, max. MEDIUM temperature |
|
Ironing not allowed |
||||||||
|
Drying |
|||||||||||
|
|
Drying on a flat surface |
|
Drying at high temperatures |
||||||||
|
|
Drying without prior spinning |
|
Drying at low temperatures |
||||||||
|
|
Drying on a clothes line or a hanger |
|
Tumble drying not allowed |
||||||||


Operating instructions - Drying step by step (1–7)
STEP 1: Sort the fabrics
STEP 2: Turn on the main switch
On / Off
Press  the On/Off button.
STEP 3: Open the dryer door and insert the laundry.
Open the dryer door towards you.

Place the laundry into the empty dryer drum. Make sure there aren't any other objects among the laundry. Such objects could melt and cause damage to the dryer or your laundry.
Do not overload the drum! (See the program table on the rating plate and adjust the load accordingly.) If the dryer drum is overloaded, the laundry will be more wrinkled and not dried as thoroughly.
The lint filter must always be inserted in its designated slot before loading or removing fabrics. This prevents any garment or other fabric from falling into the empty opening.
There is an LED light inside the dryer drum.
The light in the dryer drum is not suitable for any other use.
The light in the dryer drum may only be replaced by the manufacturer, a service technician or an authorized person.
Drying in a basket
Before the first drying cycle, remove the basket and all packaging from the drum.
Laundry may only be dried in the basket when using Time program. The basket is available for purchase as an optional accessory from your dealer (ART. No.: 914908).
The drying basket consists of two connected parts; before installation, it must be unfolded into its final shape.
2Once the drying basket is inside the dryer, first attach it to the designated holder on the upper part of the rim, located inside the dryer, as shown in the figure.
3After securing the basket at the top, position the lower part by pulling the left
and right sides into place until the basket locks into the designated openings near
the lint filter.
If you have removed the lint filter, reinsert it now.
Once the basket is correctly installed, check that it is securely and firmly attached.
4The basket can be used to dry sports shoes, slippers, or items that you do not want to be tumbled inside the dryer drum (max. load: 4 kg).
After the drying process, remove the drying basket and close the dryer door.
Only dry clean sports shoes or slippers that have been sufficiently wrung out after washing to prevent water from dripping. The basket remains stationary while the drum rotates, so ensure that the items being dried do not touch the drum to avoid potential damage to both the items and the dryer.
STEP 4: Choose the drying program.
Choose the program by rotating the Program selector knob in either direction.
With the selected program, you can press key 5 and then key 3 Information to display a brief description of the program.
Select the programe based on the type and remaining moisture of the laundry you wish to dry. The anticipated program duration is shown on the display.
Extra program settings can also be selected for each program. See STEP 5.
Choose between the following programs:
Program table
|
Program |
Max. load |
Description |
|
|---|---|---|---|
|
Normal Cotton |
Full load |
Use this program for thicker multi-layered non-sensitive cotton laundry. After drying, it will be completely dry and ready to be stored in the cupboard. The program is intended for drying wet cotton laundry. It is the most energy-efficient program for drying cotton laundry. The energy usage data is determined using the program cycle setting and medium dryness setting per CAN/CSA-C361-16 Standard and DOE test procedure methods specified at 10 CFR 430, Subpart B, Appendix D2. |
|
|
Storage dry cotton |
Full load |
Use this program for thicker, non-sensitive laundry, which will be completely dry after drying. |
|
|
lron Dry cotton |
Full load |
Use this program for non-sensitive laundry. After drying, it will be ready for ironing. |
|
|
Synthetics |
1/2 load |
The program is used for drying synthetic and blended textiles. |
|
|
Delicates |
1/4 load |
Use this programe to dry delicate laundry, which may be slightly damp after drying. We recommend using a dedicated laundry bag. |
|
|
Wool |
1/4 load |
This programe is used to dry wool and clothing according to the manufacturer's instructions specified on the label. |
|
|
Mixed laundry |
1/2 load |
The program is used for drying cotton and synthetic laundry at the same time. |
|
|
Bedding/ Towels |
1/2 load |
Use this programe for larger items. When the programe is complete, they will be completely dry. Dry fitted sheets separately or together with similar large items. Shake them out before drying. |
|
|
Down/ Bulky Items |
1/4 load |
Use this program to dry textiles stuffed or padded with down (pillows, duvets, jackets etc.). Dry large items separately and use the extra dry function or the time program if necessary. |
|
|
Quick Pro |
1/2 load |
The program is suitable for smaller amounts of laundry that you wish to dry quickly and efficiently. |
|
|
Time program |
1/2 load |
Use this program for non-sensitive laundry that is still slightly damp and has to be thoroughly dried. In the time program, remaining moisture is not detected automatically. If the laundry is still damp after the program is complete, repeat the program; if it is too dry and therefore creased and rough to touch, the drying time you selected was too long. Program duration can be adjusted from 30 minutes to 4 hours (in 15-minute steps). |
|
|
Airing |
1/2 load |
This program does not use a heater. Use it to refresh your clothes. Program duration can be adjusted from 15 minutes to 4 hours (in 15-minute steps). |
|
|
|
You can save energy by filling up the household tumble dryer to the maximum capacity specified for each programe. |
If your laundry is not dried to the desired dryness level, use extra program settings or use a more suitable program.
No program can be started while the door is open.
STEP 5: Choosing the program settings
Using the program settings, the drying programs can be further adjusted to your wishes.
Some program settings may not be available for your selected program.
Selected program settings will remain stored after the end of the drying cycle and may be changed subsequently (except for delayed start which is not stored after the drying is complete).
-
Drying modes (Mode)
-
Dryness level/Extra dry
-
Load
-
Delay start
-
Extra functions
Choose the program settings before pressing the Start/Pause button.
When the drying program is in progress, program settings cannot be changed.
By pressing 5 Information you can display details about the program setting.
Following are the program settings that may be selected using the buttons 1 to 4:
1.Drying modes / Temperature settings
You can choose between additional drying modes: Default or Low temperature (Delicate).
The drying time will change.
2.Dryness level/Extra dry
You can choose between the following laundry dryness levels (+, ++, +++).
The final level of laundry dryness and drying time will be changed.
3.Load
By pressing (3) you can choose between three dryer loads (Full, Medium and Low).
Selection of actual load affects the initially displayed anticipated drying time.
4.Delay start
Select delayed start by pressing (4) when you want the drying program to start after a certain period of time.
Use the programe selector knob or buttons (2) and (3) to move from 30 minutes to 6 hours in 30-minute steps, and then from 6 hours to 24 hours in 1-hour steps.
By pressing (4) Ok you confirm your selection.
Press Start to start the operation. When the countdown reaches zero, the selected drying programe will start automatically.
If you want to cancel the delay and start the drying process immediately, press the button (4). Use the programe selector knob or buttons (2) and (3) to switch to 00:00 and confirm your selection by pressing (4) Ok.
Press the Start button to start drying.
When the Delayed start is already set, it can be cancelled by pressing the Start/Pause
button for 3 seconds to return to initial selection.
If you do not take any action for 5 minutes, the display will switch to standby mode
(Standby).
Press the On/Off button to reactivate it. The display will show the countdown to the start of the drying cycle.
If the dryer is in the standby mode, the display will switch on 1 minute before the start of the drying cycle.
After the countdown, the drying time will appear on the display.
To access additional program settings within the selected program, press button (5), then button (1), labeled (More Options).
Choose between:
Anti crease
To prevent creasing, select the Anti-crease function (gentle tumbling). This function is recommended for delicate laundry.
Confirm the selection by pressing 3. Confirm the selection by pressing 4 OK.
You may choose the duration of the anti-crease program from 0 hours to 4 hours, in 1-hour steps.
Add to favorite
You can add programs to Favorites. Press button (3) to add the program to Favorites. Confirm your selection by pressing button (4) OK.
An icon  will be added to the main menu for the selected program. The program will be saved.
Press button (4) Ok to return to the previous menu.
will be added to the main menu for the selected program. The program will be saved.
Press button (4) Ok to return to the previous menu.
You can store up to 6 favorite programs.
-
Removing a favorite program
When all 6 slots are taken, it is not possible to set a new program.
To add a new favorite program, you need to delete an existing one beforehand.
To remove a favourite programe, select the programe you want to delete. Select the setting Add to favourite and confirm the removal of the favourite program by touching (4)Yes. The programe will be removed.
To select System settings, turn the program selector knob all the way to the right and confirm the selection by pressing 4 Enter.
If no action is taken for 5 minutes, the display will switch to standby mode (Stand by).
You activate it by pressing the On/Off button or by opening the dryer door.
Some settings may not be available on drying programes.
STEP 6: Close the door and start the drying process.
Close the dryer door and press the Start/Pause button.
 Start (pressed briefly – start/resume)
 Pause (short press of the button - pause)
Cancel (press and hold the button for 3 seconds)
Time remaining
Depending on the selected program and load, the anticipated drying time will be displayed in hours and minutes.
Actual drying time will depend on the selected program, load, type of laundry, spinning rate etc.
Actual drying time may be longer or shorter than initially displayed.
Pausing, stopping or changing the program
To pause the programe, briefly press the Start/Pause button.
To resume a programe, press again the Start/Pause.
You can also temporarily interrupt the drying programe be interrupted opening the door.
To resume the programe, simply close the door and press Start/Pause.
If you want to cancel the drying programe, press the Start/Pause button and hold it for 3 seconds. The selected programe will be stopped and the cooling stage will begin. Cooling time will depend on the selected programe and the temperature in the drum.
Only after the cooling is complete, can you select a new programe and press Start/Pause.
The final drying cycle includes a cooling down stage without heater operation. It makes sure the laundry is of suitable temperature at the end of the program and that it can be taken from the dryer without risk of touching hot clothes.
The drying programe can be interrupted by pressing the On/Off button.
The dryer will switch off. After the dryer is switched on, press the Start/Pause button to resume the program.
STEP 7: End of program
After the drying program is complete, the display will indicate that the program finished successfully.
If you have selected the setting Anti-crease , the dryer will continue to operate after the end of the drying cycle for the amount of time specified upon selection of this programe setting.
After the end of the drying cycle, you have the option to save the program as a favorite program (see chapter ).
Open the door towards you and remove the laundry from the dryer.
Clean the lint filter in the door (see chapter ).
Make sure the dryer drum is empty, then close the door.
5 minutes after the end of the program or last activation, the display will switch off to standby mode in order to save power.
The display will light up again if you press the On/Off button or open the dryer door.
If the lint filter is clogged, airflow will be reduced, which will increase drying time. If you notice extended drying time, clean the filter and restart the appliance.
After the drying process, unplug the dryer power cord from the power outlet.
When the door is opened, notification will appear on the display that lint filter needs to be cleaned.
Appliance settings
System settings
Enter the by rotating the program selector knob in the main menu all the way to the right.
Confirm your selection by pressing (4) Enter .
Press the (1) Exit in any setting to return to the main menu.
Certain settings allow a short description to be displayed by pressing (4) Information.
Then, use the program selector knob to scroll through the list of settings that can be changed.
Choose Language
By pressing 2 or 3 you can navigate the list of languages.
Confirm your selection by pressing 4 Save.
Lock
This setting disables the on-screen buttons to prevent children from accidentally starting or changing the cycle.
You can Lock the appliance by pressing 2 or 3. For further information, press 4 Information.
Choose between turning on or turning off the lock.
By pressing 4 Information brief information about the setting will appear on the display unit.
When this option is on, you can activate and deactivate it by pressing 2 and 4 and hold them for 3 seconds.
When the lock is activated, no other function can be selected.
After 1 minute of inactivity on the appliance, the lock will activate automatically.
Program management
The Main menu includes the full list of programs that can be selected using the program selector knob. Press button (3) to select or deselect programs you do not want to appear in the main menu.
This setting allows only the selected programs to be shown in the main menu. Once you have selected all the desired programs, press button (4) to return to the previous menu.
Press (4) Enter to display a set of programs.
Use the program selector knob to choose between programs. Confirm your selection by pressing 3. This defines whether the program will be displayed in the main menu.
Symbol will appear next to the selected program.
When you have selected a set of programs, confirm the change by pressing 4 Save.
If you have not made any changes, press 4 Exit.
Only programs marked with will appear on the display unit.
Display brightness
You can set the Brightness of the display.
By pressing 2 or 3 you can adjust the display brightness from 1 to 5.
Confirm your selection by pressing 4 Save.
Sound volume
By pressing 2 or 3 you may choose the acoustic signal volume.
During selection, the acoustic signal will be played with the currently highlighted volume.
Confirm your selection by pressing 4 Save.
Display logotype
By pressing 2 or 3 or you can choose between switching the logo On/Off.
On = display the logo at switch-on
Off = do not display the logo at switch-on
Wi-Fi settings
For settings, press 4 Enter.
Refer to the setting procedure in the chapter "Initial setting before use": "How to enable Wi-Fi on the device?".
To return to "System settings" press 4 Exit.
Shop mode
The machine simulates the display and operation of a standard cycle for demonstration purposes. This setting can only be activated in retail stores.
By pressing 2 or 3 you can choose between turning on or turning off.
For further information, press 4 Information.
Cleaning reminder
By pressing the button 2 or 3, you can choose between turning On or Off .
For best performance, clean the filters and empty the condensation tray.
The selection must be confirmed by pressing (4) OK.
Error (Failure read out)
The last three errors shown to the user are listed in the failure read-out menu.
Reset program list
By pressing 4 Enter you will access the Reset program list, which means that all favorite programs will be deleted. Other settings will not be affected.
Confirm the reset by pressing 4 OK.
Factory reset
By pressing 4 Enter you access Factory settings, which means the settings will return to their original values (your personal settings and all favorite programs will be deleted).
Confirm the reset by pressing 4 OK.
Cleaning and Maintenance
Cleaning the exterior of the appliance
Wipe all parts of the dryer dry with a soft cloth
Keep the area around the dryer clean and cool; dust, heat, and humidity can extend the drying time.
Before cleaning, make sure to switch off the dryer and disconnect it from the power mains (unplug the power cord from the outlet).
Clean the exterior of the appliance and the display using a soft, damp cotton cloth and water. Do not use solvents or abrasive cleaners, as they may damage the appliance. (Please follow the recommendations and warnings provided by the cleaning product manufacturers.)
Special Notes on Cleaning
|
|
If necessary, the lint filter housing and the opening into which the lint filter is inserted must be cleaned. If necessary, clean the door gasket as well. |
Cleaning the lint filter
|
|
1Pull out the lint filter. |
|
|
2Carefully remove fibers and threads from the lint filter using your hand or a vacuum cleaner. |
|
|
3Reinstall the lint filter. |
Make sure the lint filter is correctly inserted.
Clean the lint filter after each drying cycle.
Never operate the dryer without a lint filter or if the lint filter is damaged.
Errors: what to do?
Disturbances from the environment (e.g. the power grid) may result in various error reports (see Troubleshooting table). In such case:
-
Switch off the appliance, wait for 1 minute, switch the appliance back on, and repeat the drying program.
-
If the error persists, call an authorized service center.
-
You will be able to solve most of the problems in dryer operation by yourself (see troubleshooting table below).
-
Repairs may only be carried out by an adequately trained person.
-
Repair or any warranty claim resulting from incorrect connection or use of the dryer shall not be covered by the warranty. In such cases, the costs of repair shall be charged to the user.
The warranty does not cover the errors or failures resulting from disturbances from the environment (lightning strike, power grid failures, natural disasters etc.).
The following lists all the errors that the user can see on the user interface.
|
Problem/ Error |
Cause |
What to do? |
|---|---|---|
|
The machine will not start. |
The main switch is not switched on. |
Check whether the main switch is on. |
|
There is no voltage in the power outlet. |
Check the breaker. Check if the power cord plug is correctly inserted into the power outlet. |
|
|
There is voltage in the outlet, but the drum does not spin ... The dryer does not work. The dryer does not work. |
Program was not started in accordance with the instructions. |
Re-read the instructions for use again. |
|
Door might be open. |
Check if the door is closed properly. |
|
|
Delayed start might be activated. |
To cancel the Delayed Start option, press 5 the (Skip) button. |
|
|
The machine stops operating completely during a program. |
The lint filter may be clogged. As a result, the temperature in the dryer increases, leading to overheating, which causes the heating element to switch off. |
|
|
A slight rumbling noise appears. |
If the dryer is out of use for a long period of time, the drum can cause temporary dimples on the rubber drum rollers. |
The noise will subside without any intervention. |
|
The door opens during drying. |
Excessive load on the door (too much laundry in the drum). |
Reduce the amount of laundry. |
|
Unevenly dried laundry. |
Laundry of varying types, thickness, and excessive amount of laundry. |
Make sure you have sorted the laundry by type and thickness, whether you have added a suitable amount of laundry to the drum, and whether you have selected a suitable program. |
|
Laundry not dried or drying takes too long. |
Filter is not clean. |
|
|
Dryer is placed in a closed room; room that is too cold; or room that is too small and the air overheats as a result. |
Make sure there is adequate supply of fresh air to the dryer; for example, open the door and/or window. Check if the temperature in the room where the dryer is installed is too high or too low. |
|
|
Laundry was not sufficiently wrung or spun. |
If the load is still wet after completed drying cycle, an appropriate drying program should be run again (after cleaning filter). |
|
|
Amount of laundry dried in the appliance is too large or insufficient. |
Use a suitable program or extra functions. |
|
|
Laundry (such as bedding) gets tangled. |
Close the buttons or zippers on the laundry before drying. Select a suitable program (e.g. the bedding program). After the drying process, loosen the laundry and select an additional drying program (e.g. timed drying program). |
Failure display
If a failure occurs while a program is running, Error X will be shown on the display. Press and hold the INFO (4) button to view the error description on the display. Switch off the dryer and turn it back on.
The following errors may appear on the display (depending on the model):
|
Problem/ Error |
Error indication on the display |
What to do? |
|---|---|---|
|
E0 |
Control unit failure. |
Control unit failure. Call service center. |
|
E1.1, E1.2, E1.3 |
Thermistor error. |
Temperature sensor failure. Call service center. |
|
E2 |
Communication error. |
Communication error. Call service center. |
|
E3 |
Pump error. |
Pump error when draining condensed water into the water tank. Call service center. |
|
E6 |
Relay failure. |
Control unit failure. Call service center. |
|
E7 |
Door failure. |
Control unit failure. Call service center. |
|
E8 |
Button failure. |
Control unit failure. Call service center. |
|
E9 |
PB/UI software versions are not compatible. |
Call service center. |
|
E11 |
Error in BLDC motor communication. |
Call service center. |
INFORMATION before, during, and after the program (depending on the model)
|
Error indication on the display |
What to do? |
|---|---|
|
Please close the door before pressing start. |
Close the dryer door before starting or resuming the program. |
|
Cycle was interrupted by power failure. Please resume. |
Press the Start/Pause button to restart or resume the program. |
|
Clean the lint filter. |
|
|
The lock is active. Press and hold the (2) and (4) buttons for 3 seconds to unlock. |
Service and warranty
Limited Warranty – Residential and Professional Appliances
This Limited Warranty covers parts and labor, except as set forth in this Limited Warranty. Service must be provided by an authorized ASKO service company. YOUR SOLE AND EXCLUSIVE REMEDY UNDER THIS LIMITED WARRANTY SHALL BE PRODUCT REPAIR AS PROVIDED HEREIN. This Limited Warranty is valid only when the ASKO Product is used in the country in which it was purchased. Proof of original purchase date is required to obtain service under this Limited Warranty. This warranty only applies to the original purchaser and is non-transferable.
Residential ASKO Products Used Exclusively for Household/Personal Purposes:
Two (2) Years limited Warranty – Any warranty service claims for residential ASKO Products must be filed with ASKO within two (2) years from date of purchase. Service will be provided during normal business hours. ASKO Dishwashers eligible under 2024-2025 5-Year Warranty Promotion must be registered via us.asko.com website within ninety (90) days of the date of purchase.
Residential ASKO Products Not Used Exclusively for Household/Personal Purposes or used Commercially or used in Marine, Mobile or Aeronautical Applications:
One (1) Year limited Warranty – Any warranty service claims for ASKO Products not used exclusively for household and personal use, or used commercially or used in marine, mobile, or aeronautical applications must be filed with ASKO within one (1) year from date of purchase. Service will be provided during normal business hours.
Professional ASKO Products Used In Residential or Commercial Applications:
Two (2) Years limited Warranty – Any warranty service claims for residential ASKO Products must be filed with ASKO within two (2) years from date of purchase. Service will be provided during normal business hours.
Items excluded from warranty
This limited warranty does not cover:
-
Replacement parts or repair labor if the ASKO Product is used in a manner that is inconsistent with published user or operator instructions and/or installation instructions.
-
Service calls to correct the installation of the ASKO Product, to instruct you on how to use the ASKO Product, to replace or repair house fuses, or to correct house wiring or plumbing.
-
Consumable items and parts, such as filters.
-
Damage resulting from accident, alteration, misuse, abuse, negligence, fire, flood, natural disasters, improper use, improper installation, installation not in accordance with electrical or plumbing codes, or use of products not approved by ASKO, as well as any attempted repair by other than authorized ASKO service companies.
-
Cosmetic damage, including scratches, dents, chips or other damage to the finish of the ASKO Product, unless such damage results from defects in materials or workmanship and is reported to ASKO within 5 days from date of purchase.
-
Pickup and delivery. The ASKO Product is intended to be repaired in your home.
-
Repairs to parts or systems resulting from unauthorized modifications made to the ASKO Product.
-
Expenses for travel and transportation for product service if the ASKO Product is located in a remote area where service by an authorized ASKO service company is not available.
-
The removal and reinstallation of the ASKO Product if it is installed in an inaccessible location or is not installed in accordance with ASKO’s published installation instructions.
-
Replacement parts or repair labor on ASKO Products with original model/serial numbers that have been removed, altered or cannot be easily determined.
Disclaimer
YOUR SOLE AND EXCLUSIVE REMEDY UNDER THIS LIMITED WARRANTY SHALL BE PRODUCT REPAIR AS PROVIDED HEREIN. EXPRESSLY DISCLAIMED ARE ALL OTHER EXPRESS AND IMPLIED WARRANTIES, INCLUDING ANY IMPLIED WARRANTIES OF MERCHANTABILITY AND FITNESS FOR A PARTICULAR PURPOSE. Some jurisdictions do not allow exclusion or limitations regarding warranty rights. This Limited Warranty gives you specific legal rights and you may have other rights that vary from jurisdiction to jurisdiction. Attempted repair by any person other than an authorized ASKO service company will void this Limited Warranty.
Limitation of liability
IN NO EVENT SHALL ASKO OR THE MANUFACTURER AND THEIR RESPECTIVE PARENTS, SUBSIDIARIES AND AFFILIATES BE LIABLE FOR CONSEQUENTIAL, INCIDENTAL, EXEMPLARY, PUNITIVE OR SPECIAL DAMAGES. IN NO EVENT SHALL ASKO OR THE MANUFACTURER AND THEIR RESPECTIVE PARENTS, SUBSIDIARIES AND AFFILIATES BE LIABLE FOR DAMAGES OTHER THAN ACTUAL DAMAGES AND IN NO EVENT FOR DAMAGES IN EXCESS OF THE PRICE PAID FOR THE ASKO PRODUCT AS TO WHICH A CLAIM IS MADE. Some jurisdictions do not allow the exclusion or limitation of incidental, consequential or other damages, so these limitations and exclusions may not apply to you. This Limited Warranty gives you specific legal rights. You also may have other rights that vary from jurisdiction to jurisdiction.
ASKO Customer Care
Read the chapter before contacting the service department. If you have encountered a problem that you cannot resolve, please contact your nearest dealer.
|
Address ASKO: |
Service/support: |
||
|
5995 Windward Pkwy, Alpharetta, GA 30005, USA, +1-800-898-1879 |
USA |
us.asko.com, +1-800-898-1879 |
|
|
CANADA |
ca.asko.com, +1-800-561-7265, service@distinctive-online.com |
||
|
MEXICO |
asko.com/mx, +52-800-400-4372, atencionalcliente@sub-zeromx.com |
Service after expiration of limited warranty
For information about obtaining parts and labor after expiration of this Limited Warranty or arising outside the scope of this Limited Warranty, please contact ASKO Customer Care.
Service
Before calling customer service
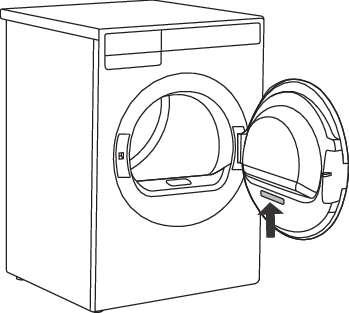
See the chapters and and see if you can resolve the problem yourself.
When you contact a service centre, please state the model (2), type (1), and serial number (3) of your dryer.
Model, type, and serial number are indicated on the rating (type) plate located on the interior side of the dryer door.
The QR and AUID codes are also located on the rating plate.
1 - Model type
2 - Model
3 - Serial number
4 - QR code
5 - AUID code
6 - Article number
7 - FCC ID & IC ID
A list of spare parts and repair tips in accordance with the current Ecodesign Directive can be found by scanning the QR code located on the inside of the door of the dryer.
Or on the following link: https://auid.connectlife.io
Report any malfunction to your local call center; all information can be found in the enclosed warranty statement. Contact details of your authorized service center are available in the warranty statement supplied with the appliance and on the website by scanning the QR code on the rating plate (see chapter ).
In case of a failure, only use approved spare parts by authorized manufacturers.
Repair or any warranty claim resulting from incorrect connection or use of the dryer shall not be covered by the warranty. In such cases, the costs of repair shall be charged to the user.
Electrical Hazard – Warning During Servicing
Certain internal parts are intentionally not grounded and may present a risk of electric shock only during servicing. Service Personnel – Do not contact the following parts while the appliance is energized: motor, pump, and control unit.
Technical information
|
Technical data |
|
|---|---|
|
Height |
33 1/2" (850 mm) |
|
Width |
23 1/2" (595 mm) |
|
Depth |
24 3/4" (628 mm) |
|
Drum capacity |
4.20 cu.ft. (119 L) |
|
Maximum drying load |
See the rating plate |
|
Rated power |
See the rating plate |
|
Drum material |
Stainless steel |
|
Housing material |
Hot-dip galvanized and powder coated sheet metal, or stainless steel sheet. |
Typeface License Notice
This product includes the Noto Sans font, which is licensed under the SIL Open Font License, Version 1.1.
The full text of the license is available at: https://openfontlicense.org
Noto Sans is an open-source typeface developed by Google, and it may be used, modified, and redistributed under the terms of the SIL Open Font License.
|
Radio equipment type |
|
|---|---|
|
(depending on the model) |
HL3215STG, HLW3215-TG, HLW3215-TG01 |
|
Wi-Fi |
|
|
Operating frequency range |
2.4000 GHz - 2.4835 GHz |
|
Maximum output power |
≤10 dBm/MHz (EIRP) (Antenna gain <10 dBi) |
|
Maximum antenna gain |
Gain: 0 dBi |
|
Bluetooth |
|
|
Operating frequency range |
2.400 GHz - 2.4835 GHz |
|
Carrier output |
6 dBm (≤ 10 dBm) |
|
Emission type |
F1D |
Declaration of conformity
The company declares that the device with the ConnectLife function complies with the essential requirements and other relevant provisions of Directive 2014/53/EU. The detailed Declaration of Conformity can be found at the web address https://auid.connectlife.io on your device page under additional documents.
Wi-Fi Network Requirements and Recommendations
1. Access Point and Coverage
-
Standard 2,4 GHz Band Wi-Fi network IEEE 802.11b/g/n required,
-
use a stable router or access point with adequate signal strength (minimum −60 dBm) at the appliance installation location,
-
avoid excessive channel overlap; use non-overlapping 2,4 GHz channels (1, 6, or 11) and 20 MHz channel width,
-
Wi-Fi network capacity must be dimensioned appropriately in multi-appliance installations.
2. Security and Encryption
-
Network must use WPA2-PSK (AES) or WPA/WPA2 encryption,
-
open (unencrypted) networks are not supported,
-
appliance and mobile device must be connected to the same SSID during initial setup,
-
continuous internet connection is required for operation of remote features.
3. Unsupported Network Types
-
Networks with captive portals (browser-based login pages) or public Wi-Fi networks (hotel, guest hotspot with login, etc.),
-
networks requiring proxy servers or VPN tunnels,
-
networks with strict MAC filtering (unless appliance MAC is manually whitelisted),
-
networks enforcing client-based default-deny access control (unless appliance is manually granted access).
Table of consumption values
The table shows the drying time and power consumption values for drying a test load of laundry spun at various spin speeds in the washing machine.
The following requirements apply to the consumption values specified below.
|
Inlet air temperature |
room temperature |
|
Inlet air humidity |
50–60% |
|
Drying temperature |
Normal |
|
Program |
Load |
Spin speed (rpm) |
Program duration (h:min) |
Energy consumption (kWh/cycle) |
|---|---|---|---|---|
|
Normal Cotton |
Full |
1400 |
01:40 |
3,25 |
|
Partial |
1400 |
01:09 |
2,34 |
|
|
Small |
1400 |
00:50 |
1,72 |
|
|
Storage dry cotton |
Full |
1400 |
01:49 |
3,49 |
|
Partial |
1400 |
01:25 |
2,79 |
|
|
Small |
1400 |
01:03 |
1,96 |
|
|
lron Dry cotton |
Full |
1400 |
01:15 |
2,45 |
|
Partial |
1400 |
00:54 |
1,78 |
|
|
Full |
1400 |
00:40 |
1,31 |
|
|
Synthetics |
Partial |
1000 |
00:45 |
1,42 |
|
Mixed laundry |
Partial |
1200 |
00:51 |
2,09 |
|
|
All values in the table are provided per drying cycle. |
You can save energy by filling up the household tumble dryer to the maximum capacity specified for each programe.
Due to variations in the type and amount of laundry, power supply fluctuations, and ambient temperature and humidity, the values measured by the end user may differ from those listed in the table.
DISPOSAL
|
Packaging is made of environmentally friendly materials that can be recycled, disposed of, or destroyed without any hazard to the environment. To this end, packaging materials are labelled appropriately. |
|
|
|
The symbol on the product or its packaging indicates that the product should not be treated as normal household waste. Take the product to an authorized collection center for waste electric and electronic equipment processing. |
|
When disposing of the appliance at the end of its useful life, remove all power cords, and destroy the door latch and switch to prevent the door from locking or latching (child safety). |
|
|
Correct disposal of the product will help prevent any negative effects on the environment and health of people, which could occur in case of incorrect product removal. For detailed information on removal and processing of the product, please contact the relevant municipal body in charge of waste management, your waste disposal service, or the store where you bought the product. |

Notes
We reserve the right to make changes.