Symptom
User Manual
Cooker hood
CW4938GGC
CW4938PGC
CI41038GGC
CI41038PGC
Pictograms used
The following symbols are used throughout the manual, and they have the following meanings:
Information, advice, tip, or recommendation
Warning – general danger
Warning – danger of electric shock
Warning – danger of hot surface
Warning – danger of fire
It is important that you carefully read the instructions.
Safety
READ CAREFULLY AND KEEP IT FOR FUTURE REFERENCE!
Safe use
The manufacturer cannot be held liable for any damage resulting from failure to follow the safety instructions and warnings.
Damage caused by incorrect connection, incorrect fitting, or incorrect use is not covered by the warranty.
-
This appliance can be used by children aged from 8 years and above and persons with reduced physical, sensory or mental capabilities or lack of experience and knowledge if they have been given supervision or instruction concerning use of the appliance in a safe way and understand the hazards involved.
-
This appliance and the accessible parts will become hot during use. Do not touch hot parts. Keep children younger than 8 away from the appliance unless they are under continuous supervision.
-
Children shall not play with the appliance. Cleaning and user maintenance shall not be made by children without supervision.
-
This appliance is only designed for household use.
-
Always provide adequate ventilation!
-
There shall be adequate ventilation of the room when the range hood is used at the same time as appliances burning gas or other fuels.
-
When the range hood and appliances supplied with energy other than electricity are simultaneously in operation, the negative pressure in the room must not exceed 4 Pa (4 × 10⁻⁵ bar).
-
Local regulations concerning the discharge of air have to be fulfilled.
-
Never use a steam cleaner for cleaning the appliance. Only clean the appliance when switched off. The steam of a steam cleaner could reach the conducting parts and cause an electrical short.
Avoid the risk of electric shock; make sure the appliance is switched off before cleaning the appliance.
-
Only use the appliance inside the home.
-
Do not use the cooker hood if the grease filter has not been fitted properly!
-
Do not lean against the cooker hood.
-
Never use the cooker hood as a working surface unless this is indicated explicitly.
-
Grease and oil are inflammable when overheated. Remain in the cooking area when preparing meals.
-
To prevent hot fat from catching fire, you should only deep-fry under continuous supervision.
-
The cooker hood should be cleaned regularly both on the outside as well as the inside (at least 1 x per month). Insufficient cleaning or a delay in the replacement of filters can cause a fire hazard.
-
Clean the filters on time.
-
The grease filters can become hot during use. After cooking wait at least 30 minutes before cleaning.
-
Please note! Intensive use can lead to condensation on the cooker hood. Condensation is simple to remove with a dry cloth.
-
Follow the instructions in the manual for cleaning or replacing the grease filters and/or carbon filters!
-
There is a risk of fire if the instructions for cleaning or replacing grease filters and/or carbon filters are not followed.
-
Through grease deposits in the metal grease filter. Never work with open flame under the appliance (eg. flambéing). Always use the appliance with the metal grease filter. Clean the grease filter regularly.
-
Through overheated fat or oil. Never extinguish a fire with water; always use a fire blanket, lid or plate.
-
The appliance may have sharp edges; please be careful during cleaning.
-
The light emitted by LED lights is very dazzling and can damage the eyes. Do not look directly into the switched on LED lights for longer than 100 seconds.
-
When washing grease filters in the dishwasher it is recommended to use a short, non-intensive programme. Check the grease filter after washing in the dishwasher for wear (loose material). Wear can occur as a result of frequent washing. If loose material is visible, replace the filters in order to prevent this loose material from ending up in the food that is cooked.
-
Do not use the appliance in temperatures below 5 °C.
-
Keep a 20 cm separation distance to the appliance.
Your cooker hood
Dear customer!
Welcome to our growing ASKO family!
We are proud of our appliances. We hope that this appliance will be an appreciated and dependable aid for many years to come.
Please read the operating instructions before use. They include general tips, information about the settings and adjustments you can make, and the best way to take care of your appliance.
You can find the most recent version of the instructions for use on our website.
Enjoy your cooking!
Description user interface

-
Switching on/off and dimming the lighting
-
Reducing air extraction capacity and switching off
-
Grease filter and combi filter cleaning indicator
-
Proximity sensor
-
Display status
-
Proximity sensor
-
Wi-Fi
-
Switching on and increasing air extraction capacity
-
Switch on automatic delayed shut-off
Cooker hood functions
Recirculation
If it is not possible to discharge the air to the outside via an exhaust duct, you can choose to filter the extracted air and blow it back into the kitchen, the recirculation system. When using the recirculation system, the air after passing the grease filters is purified by a combi-filter and blown back into the kitchen. This system is energy efficient because no warm air is discharged to the outside.
If you use the recirculation system, you should activate the 'Filter cleaning indicator' described in the ‘Maintenance’ paragraph.
Active mode
The proximity sensor detects a user standing in front of the hood and will illuminate the icons.
Automatic delayed shut-off
The time-controlled delayed shut-off ensures that the last cooking vapours are still extracted. The delayed shut-off mode switches off automatically after 10 minutes.
Clean Air function
The Clean Air function switch on automatically for 10 minutes every 24 hours at the lowest speed setting.
Operation
Switching extraction on and off


-
Touch the + (plus) key.
-
The cooker hood will switch on at the lowest setting.
-
-
Touch the + (plus) key for a higher fan setting. Touch the + (plus) key for 2 seconds to select the highest setting (boost) (see 'Switch on the boost setting').
-
Touch the – (minus) key to select a lower setting.
-
The extraction setting can be read in the display.
-
The extraction setting can be set between speeds level 1 to 5.
-
-
If the extraction setting is set at 1, you can switch off the cooker hood by touching the – (minus) key.
-
Touch the – (minus) key for at least 2 seconds to switch off the cooker hood.
Switch on the boost setting


-
Touch the + (plus) key for at least 2 seconds.
-
The boost setting (setting ‘b’) is switched on for 10 minutes. The display will flash during this period. The original extraction setting will be reactivated after this period.
-
-
Short touch the – (minus) key to switch off the boost setting.
Boost is not available in recirculation mode.
Switching on automatic delayed shut-off

-
Touch the automatic delayed shut-off key.
-
The automatic delayed shut-off indicator will flash.
-
The cooker hood will switch off automatically after 10 minutes.
-
-
Switch off automatic delayed shut-off by touching a random key (except the lighting key).
If the boost setting has been selected, the timer function cannot be activated.
Switching the light on and off

-
Short touch the lighting key.
-
The lighting changes from maximum to minimum strength and vice versa.
-
-
Long touch the lighting key to set the lighting strength.
-
Short touch the lighting key to turn off the light.
Changing the colour temperature
You can adjust the lighting temperature.
-
Long touch the lighting key and simultaneously the – (minus) key to make the light ‘colder’ or the + (plus) key to select a ‘warmer’ light.
Recirculation use
On delivery, this cooker hood is set for exhaust air to the outside. The hood can also be set to recirculation use (the air is blown back into the room after filtration through grease filters and a combi-filter).
With an RMS kit (recirculation modification set), the air will first be cleaned by the grease filters, and then odours will be filtered by the combi-filter. The cleaned air is recirculated back into the kitchen.
Switching on the recirculation function


-
Continuously touch the timer key and the lighting key simultaneously until the filter indicator flashes 3 times.
-
The cooker hood is set for recirculation use.
-
Switch off the recirculation function
-
Simultaneously short touch the timer key and the lighting key until the filter indicator stays on.
Clean Air function


The Clean Air function allows you to freshen the air in your kitchen for a maximum of 24 hours at level 1.
-
Switch off the cooker hood.
-
Touch the timer key for approximately 3 seconds.
-
The cooker hood will switch on automatically for 10 minutes every hour at the lowest speed setting. During extraction, the display will show a fast-moving ‘snake’. When the hood switches off after 10 minutes, the display will show a slow-moving ‘snake’ until the hood switches on again after 50 minutes.
-
-
Switch off the Clean Air function in the meantime by touching a random key (any key other than the lighting key).
Active mode
The proximity sensor detects a user standing in front of the hood and will illuminate the icons.
Disable the active mode

-
Simultaneously touch the + (plus) key and timer key for 3 seconds.
-
The active mode is disabled.
-
The display shows a static ‘U’.
-
Enable the active mode
-
Simultaneously touch the + (plus) key and timer key for 3 seconds.
-
The active mode is enabled.
-
-
The display shows 3 times a blinking ‘U’.
Making the connection between cooker hood and hob
To operate the cooker hood with the hob, you must make a connection between the hob and the hood.
To make the connection, the Connection setup mode of the cooker hood and the hob must be activated.
See also the manual for the hob. Check our website for the full range of hobs that can be connected to your cooker hood.
-
The hood and lights must be switched off.
-
Touch and hold simultaneously the – (minus) key and the + (plus) key for 3 seconds.
-
The lighting key, the + (plus) key, the – (minus) key and the timer key will flash simultaneously for a maximum of 3 minutes.
-
-
On your hob, activate the pairing mode in the user menu (see the hob manual)
-
The connection to the hob is established.
-
-
If the connection is successful, the cooker hood will return to standby.
When manually operating the hood in connection mode, the pairing will be lost and must be paired again.
Wi-Fi-connectivity
Wi-Fi/ConnectLife-app
The appliance is fitted with a Wi-Fi module that allows the appliance to connect to a mobile device such as a smartphone or tablet. It offers to monitor the appliance status via the mobile device.
The monitoring function via mobile device shall not be used to replace the personal supervision of the cooking process directly on the appliance.
Requirements:
-
To use the Wi-Fi connectivity of the appliance, the range of your Wi-Fi router must extend to the appliance. The appliance only supports 2.4 GHz networks. If during the connection setup, your home network is not shown, check the router settings for 2.4 GHz, that the network is not hidden, and the signal is strong enough.
-
Additionally, a mobile device with an installed ConnectLife-app and a registered user account is required (see chapter 'ConnectLife-app').
 ConnectLife-app
The ConnectLife-app is available on the Apple App Store and Google Play Store. After pairing with the appliance, the app can be used to monitor the status of the appliance.
Go to www.connectlife.io/getstarted to download the ConnectLife-app, information about the system, support and available features. Find additional options under www.connectlife.io.
Getting started with the ConnectLife-app
Get started with your ConnectLife-app in 3 easy steps. Please check as addition chapter “First steps to set up the Wi-Fi connectivity”. More help under www.connectlife.io/getstarted.
-
Registration:
-
Install the ConnectLife-app.
-
Start the app.
-
Choose “Get Started” and follow the process.
-
If you are already registered, use the “Sign In” option.
-
-
Add the appliance:
-
In the app: Go to “Appliances”.
-
Choose “Add Appliances” or touch the + (plus) key.
-
Make sure Wi-Fi on the appliance is turned ON and the appliance is in Connection Setup Mode (see as addition 'First steps to set up the Wi-Fi connectivity').
-
Follow the instructions of the ConnectLife-app.
-
-
Start cooking:
Congratulation, you can now start using ConnectLife together with your appliance.
First steps to set up the Wi-Fi connectivity:
Within the following steps, the “Connection setup” is performed:



-
Check the “Requirements” as described above.
-
The hood and lights must be switched off.
-
Touch and hold simultaneously the – (minus) and timer key for 3 seconds to enter the Wi-Fi menu. The ‘Light' icon will be turned off.
-
Touch and hold simultaneously the – (minus) and timer key for 3 seconds to turn on Wi-Fi. ‘o’ will blink 3 times. Wi-Fi symbol will blink.
-
Touch and hold simultaneously the + (plus) and timer key for 3 seconds. The display will show an ‘C’. Confirm with the timer key to start the 'Connection menu'. This mode will be disabled automatically after 5 minutes.
-
In the ConnectLife-app, select the option 'Add Appliance' and follow the instructions.
-
If the ConnectLife-app does not connect to the device, wait 10 minutes and repeat the steps described.
-
Optionally: When the process was successful, and you want to pair another user, you can use the 'Pairing mode' of the Wi-Fi menu and the 'Pairing' or 'Discovery' option of the ConnectLife-app.
Troubleshoot quickly by turning the Wi-Fi module off and on again. You can find more help in the "Wi-Fi troubleshooting" section.
Depending on the Wi-Fi state, there are 1 to 3 options available in the menu:
-
The Connection Setup Mode
-
The Pairing Mode
-
Remote control mode
If more than 1 option is available then use the + (plus) and - (minus) keys to toggle between the options.
Connection Setup Mode
The appliance must be connected to the Cloud for the application to monitor and control the appliance remotely.
‘C’ is shown on the display. Touch the timer key to enable 'Connection Setup Mode'. The Wi-Fi symbol will flash. This mode will be disabled automatically after 5 minutes.
Pairing Mode
By pairing, you gain monitoring functionality inside the ConnectLife-app. During pairing, you connect your appliance to your ConnectLife user account.
Pairing Mode is only available if the Wi-Fi connectivity setup has been performed.
‘P’ is shown on the display. Touch the timer key to enable 'Pairing mode'. The Wi-Fi symbol will flash. This mode will be disabled automatically after 3 minutes.
On the ConnectLife-app, use the 'Pairing' or 'Discovery' option of the ConnectLife app to pair another user.
Remote control mode
To change function settings remotely, the appliance must be switched on, and the ConnectLife-app must be enabled.
‘c’ is shown on the display. Remote control mode is only available if the Wi-Fi connectivity setup has been performed. Touch the timer key to enable 'Remote control'.
Blinking ‘c’: Remote control is enabled.
Static ‘c’: Remote control is disabled.
To close the Wi-Fi menu, touch and hold the – (minus) key for 3 seconds. If no key is touched within 10 minutes, the Wi-Fi menu will be switched off automatically; the hood will be back in standby mode.
Wi-Fi menu
To access the Wi-Fi menu, the hood must be on standby. Touch and hold simultaneously the – (minus) key and timer key for 3 seconds. Depending on the Wi-Fi state, there are 1 to 3 options available in the menu: ‘C’, ‘P’, and ‘c’. If more than 1 option is available, then use the + (plus) and – (minus) keys to toggle between the options. Confirm the selected option by touching the timer key.
Switching on Wi-Fi:
-
The hood must be switched off.
-
Touch and hold simultaneously the – (minus) and timer key for 3 seconds to enter the Wi-Fi menu. The ‘Light' icon will be turned off.
-
Touch and hold simultaneously the – (minus) and timer key for 3 seconds to turn on Wi-Fi. ‘o’ will blink 3 times. Wi-Fi symbol will blink.
Switching off Wi-Fi:
-
The hood must be switched off.
-
Touch and hold simultaneously the – (minus) and timer key for 3 seconds to enter the Wi-Fi menu. The ‘Light' icon will be turned off.
-
Touch and hold simultaneously the – (minus) and timer key for 3 seconds to turn off Wi-Fi. ‘o’ will be static enlightened. The Wi-Fi symbol will turn off.
Displaying the Wi-Fi status:
-
Wi-Fi module disabled: Wi-Fi symbol not displayed.
-
Configuration in progress: Wi-Fi symbol flashes.
-
Connected to home network router: Wi-Fi symbol flashes.
-
Connected to home network router and cloud: Wi-Fi symbol continuously lit.
Wi-Fi troubleshooting
|
|
Possible cause |
Solution |
|---|---|---|
|
Wi-Fi icon not shown. |
Wi-Fi turned off. |
Switch on Wi-Fi (see 'Switching on Wi-Fi'). |
|
Wi-Fi setup failed. |
Home network issues. |
Check that your home network signal is strong and internet connection is working. |
|
Home network is not displayed during connection setup. |
The home network is not on 2.4 GHz, the network is hidden, or the signal strength is too weak. |
Please check the network settings. Ensure a 2.4 GHz and visible network. If the signal is too weak, try to move the network router closer to the appliance. |
|
Appliance is shown disconnected on the mobile app. |
Wi-Fi is disabled or home network issues. |
Ensure that Wi-Fi is enabled, and the internet connection of your home network is working. Repeat the connection setup if necessary. |
|
Other Wi-Fi problem. |
Different causes. |
First disable the Wi-Fi and enable it again. Check that the internet connection in your home network is working. Repeat the connection setup if necessary. Further troubleshooting available on www.connectlife.io or contact the service department. |
Unpair: When the appliance needs to be connected to another network, use the setting ‘unpair’ in the app. The appliance will be deleted from the app and will not be linked to the current user account.
Maintenance
Cleaning
Important! For all maintenance, first, switch off the mains power to the cooker hood by pulling the plug out of the socket or by turning off the home's master switch. The hood needs to be cleaned regularly, both inside as well as outside (at least as often as the grease filter).
Do not use abrasive cleaning products. Do not use alcohol!
If the instructions regarding cleaning the appliance or replacing the filters are not followed, this can cause a fire. These instructions must be followed! The manufacturer is not liable for damage to the hood or fire damage resulting from incompetent maintenance or from non-adherence to the safety instruction above.
Cooker hood
Clean the cooker hood with soapy water and a soft cloth.
Then rinse with clean water. Do not use aggressive cleaning agents such as caustic soda. The cooker hood finish stays in good condition if it is buffed periodically following the application of wax.
Stainless steel cooker hoods
Do not use scouring pads or other abrasive cleaners on stainless steel cooker hoods. Finish with a non-abrasive, non-polishing agent and buff the stainless steel in the direction of the grain.
Filter cleaning indicator
The filter indicator will light after 30 operating hours.
-
The grease filters should then be cleaned.
-
Metal grease filters should be cleaned once a month (or when indicated by the filter cleaning indicator) using a neutral cleaning agent, either by hand or in the dishwasher on a short, low-temperature program.
-
Place the grease filters with the openings facing downwards in the dishwasher so the water can drain out of the filter. Aluminium grease filters become dull as a result of dishwasher cleaning agents. This is normal and does not affect the working. Allow the filters to drain well before replacing.
-
Reset the memory by long touching the – (minus) key until the filter indicator goes off.
Removing cassette filter
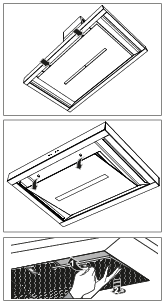
-
Switch off the motor and lighting.
-
Push in the latches and open the panel.
-
Open the filter’s access latch. Support the filter with your hand.
-
Remove the filter from the hood.
Inserting cassette filter
The filter should be placed with the locking mechanism on the front. Open the filter access latch. The notches at the front of the filter will then slot in. Hold the access latch in this position when placing the filters.
-
Slot the notches at the back of the filter in the specially designed opening of the cooker hood.
-
Tilt the filter upwards.
-
Release the filter access hatch. The notches at the back of the filter will extend outwards and slot into the specially designed openings of the cooker hood.
The filter is now in position again.
-
Press the glass plate firmly in the seal again (you will hear a click).
The glass plate can be removed for cleaning. Two people are required when removing the glass plate (due to its weight)!
Replacing the odour/particulate matters (PM2.5) filter
The odour/fine particle filter must be replaced annually (or indicated by the odour/fine particle filter cleaning indicator).
The filter indicator will flash after 360 operating hours.
-
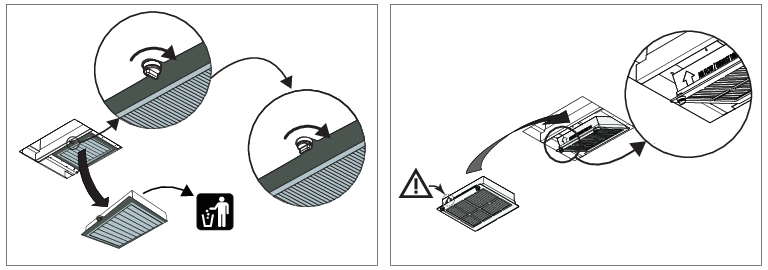
Remove the screw at the front securing the filter holder by turning it anti-clockwise.
-
Remove the filter holder with the filter out of the hood.
-
Remove the old filter and dispose of it with your residual waste.
-
Replace the new filter in the holder. Note: The arrow on the side indicates the airflow direction.
-
Replace the filter holder by first inserting the back into the notches.
-
Re-tighten the filter holder.
-
Reset the memory by long touching the – (minus) key until the filter indicator goes off.
-
More noise is produced when odour filters are used than when the cooker hood is used with an exhaust vent.
-
Odour filters function optimally at a lower motor speed. Consequently, you should avoid the intensive setting as much as possible.
The saturation of the filter depends on the intensity of use, the manner of cooking and the regularity with which the grease filters are cleaned.
Lighting
Please note!
The hood is fitted with LED lights. An authorized technician must replace these. Do not attempt to replace the LED lights yourself.
Technical data
EU Product Sheet
Data determined according to:
Standard EN61591 and Commission Regulations (EU) no. 65/2014 and (EU) no. 66/2014.
|
Type of model |
CW4938GGC |
CI41038GGC |
|---|---|---|
|
Trademark |
ASKO |
ASKO |
|
Annual Energy Consumption (AEChood) [kWh/a] |
23.8 |
25.3 |
|
Energy efficiency class |
A++ |
A++ |
|
Fluid Dynamic Efficiency (FDEhood) [%] |
39.2 |
38.4 |
|
Fluid Dynamic Efficiency class |
A |
A |
|
Lighting Efficiency (LEhood) [lux/W] |
53.8 |
53.8 |
|
Lighting Efficiency class |
A |
A |
|
Grease Filtering Efficiency (GFEhood) [%] |
89.4 |
89.4 |
|
Grease Filtering Efficiency class |
B |
B |
|
Air flow at minimum and maximum speed in normal use [m3/h] |
322 / 439 |
321 / 444 |
|
Air flow at intensive or boost setting [m3/h] |
761 |
783 |
|
Airborne acoustical A-weighted sound power emissions at minimum and maximum speed in normal use [dB(A)] |
46 / 53 |
46 / 53 |
|
Airborne acoustical A-weighted sound power emissions at intensive or boost setting [dB(A)] |
66 |
66 |
|
Power consumption off mode (Po) |
- |
- |
|
Power consumption in standby mode (Ps) [W] |
0.36 |
0.36 |
EU Product Fiche
|
CW4938GGC |
CI41038GGC |
|
|---|---|---|
|
Time increase factor (f) |
0.6 |
0.6 |
|
Energy Efficiency Index (EEIhood) |
34.4 |
36.8 |
|
Measured air flow rate at best efficiency point (QBEP) [m3/h] |
301.9 |
327.3 |
|
Measured air pressure at best efficiency point (PBEP) |
386 |
377 |
|
Measured electric power input at best efficiency point (WBEP) |
82.5 |
89.3 |
|
Nominal power of the lighting system (WL) |
5.3 |
5.3 |
|
Average illumination of the lighting system on the cooking surface (Emiddle) [lux] |
419.3 |
419.3 |
Compliance information
|
Radio equipment type |
RF module |
|
Operating frequency range |
2402 - 2477 MHz (16 channels) |
|
Maximum output power |
-5.2 dBm EIRP average (calculated) |
|
Maximum antenna gain |
-7 dBi |
|
Radio equipment type |
Wi-Fi module |
|
Operating frequency range |
2412 - 2472 MHz (16 channels) |
|
Maximum output power |
17.7 dBm EIRP average (calculated) |
|
Maximum antenna gain |
2.7 dBi |
Hereby, ASKO declares that the radio equipment type Cooker hood is in compliance with Directive 2014/53/EU.
Installation
Safety regulations
This appliance should only be connected by a registered installer.
-
Always follow the installation instructions in the installation manual provided.
-
Check the appliance for transport damage. Do not connect a damaged appliance.
-
Faulty parts may only be replaced by original parts. The manufacturer can only guarantee that original parts meet safety requirements.
-
If the supply cord is damaged, it must be replaced by the manufacturer, its service agent or similarly qualified persons in order to avoid a hazard.
-
Always use the original Supply cord to connect the appliance.
-
The electrical connection must comply with national and local regulations.
-
The wall plug socket and plug should always be accessible.
-
If a stationary appliance is not fitted with a supply cord and a plug, or with other means for disconnection from the supply mains having a contact separation in all poles that provide full disconnection under overvoltage category III conditions, the means for disconnection must be incorporated in the fixed wiring in accordance with the wiring rules. This is also applicable for appliances with a supply cord and plug when the plug is not accessible after installing the appliance. Using an omnipolar switch with a contact separation of at least 3 mm fitted in the fixed wiring will fulfil this requirement.
-
The appliance should not be connected to the mains via a multi-plug adapter or extension cable, as the safe use of the equipment cannot be guaranteed.
-
Extraction hoods and other appliances that extract cooking vapours can affect the safe operation of appliances that burn gas or other fuel (including those in other rooms) by backflowing combustion gases. These gases can potentially lead to carbon monoxide poisoning. After installing an extraction hood or other vapour extractor, the operation of appliances with flue gas extraction must be tested by a competent person to ensure that the combustion gases do not flow back.
Never open the casing of the appliance.
-
Disconnect the appliance from the mains supply before starting any repair work.
-
We advise you to wear protective gloves when assembling the cooker hood because of the possible sharp edges.
-
The distance between the lowest point of the cooker hood and the supporting surface for the cooking vessels gas hob should be at least 65 cm.
-
If the instructions of the gas hob specify a greater distance, this has to be taken into account.
Failure to install screws or fixing devices in accordance with these instructions may result in an electrical hazard.
If the safety instructions and warnings are not followed, the manufacturer cannot be held responsible for any resulting damage.
If you decide to discontinue using the appliance because of a fault, we recommend you cut off the cable after removing the plug from the plug socket. Take the appliance to your municipality’s waste disposal site.
Place the appliance in an environment that meets the following conditions:
-
Ambiant temperature range: +5….+40 °C;
-
Humidity: 30….70% RH;
-
Maximum altitude: 2000 meters above sea level.
Preparations for installation
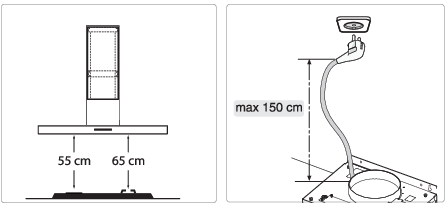
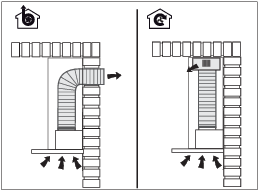
Electrical connection
This appliance is manufactured in class I; it must therefore be connected to the earth system.
Make sure the supply voltage ratings correspond with those stated on the appliance data plate. The connection to the mains is carried out as follows:
-
BROWN = L phase
-
BLUE = N zero
-
YELLOW/GREEN = Earth
During the electrical connection, make sure that the electrical socket is equipped with an earth connection.
This cooker hood has been provided with a power plug. When installing the hood, make sure that this plug remains accessible.
If you want to make a fixed connection, ensure that an omnipolar switch with a contact separation of at least 3 mm is fitted in the supply line.
Appliance dimensions
|
Wall hoods |
Island hoods |
|---|---|
|
|
|
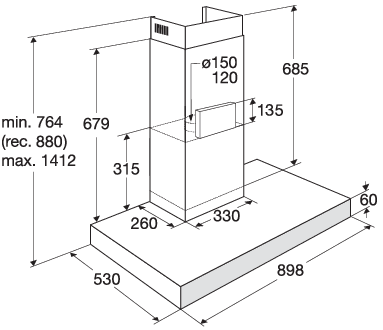
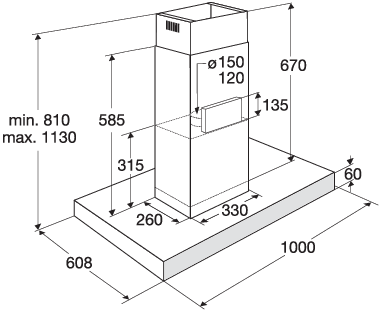
Built-in
Wall hoods
|
1 |
2 |
|---|---|
|
|
|
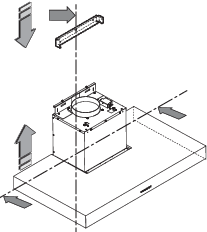
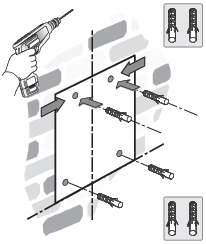
|
3 |
|---|
|
|
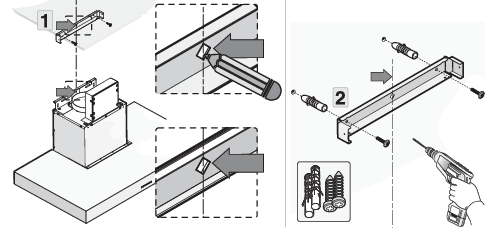
|
4 |
|---|
|
|
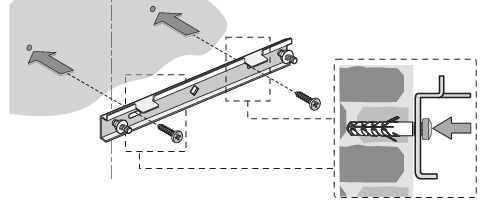
|
5 |
6 |
|---|---|
|
|
|
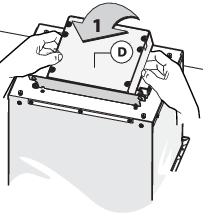
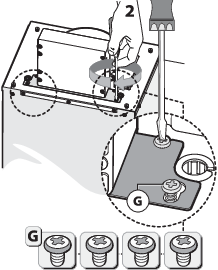
|
7 |
|---|
|
|
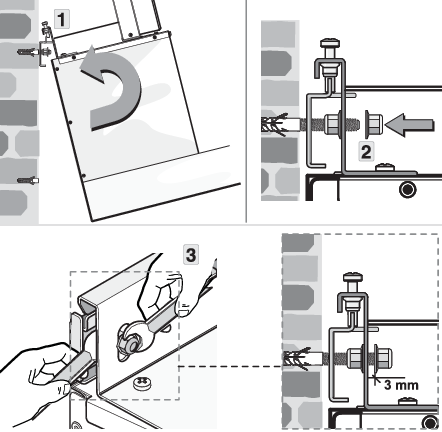
|
8 |
|---|
|
|
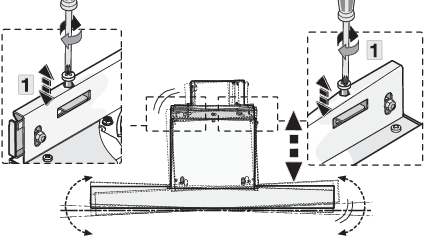
|
9 |
|---|
|
|
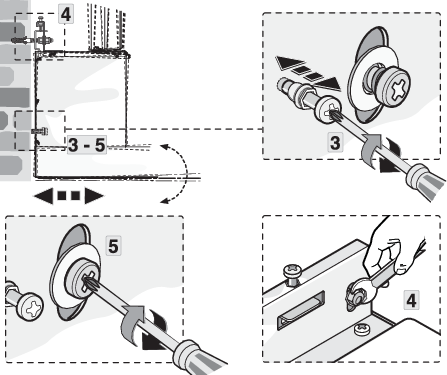
|
10 |
|---|
|
|
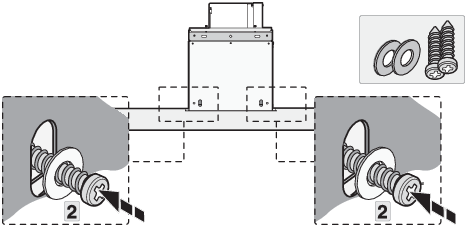
|
11 |
12 |
|---|---|
|
|
|
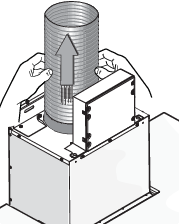
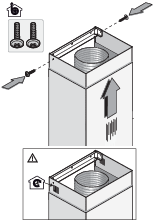
Island hoods
|
1 |
2 |
|---|---|
|
|
|
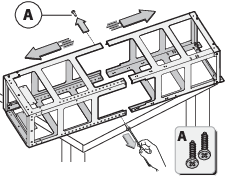
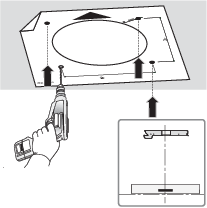
|
3 |
4 |
|---|---|
|
|
|
|
5 |
6 |
|---|---|
|
|
|
|
7 |
8 |
|---|---|
|
|
|
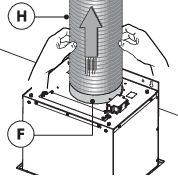
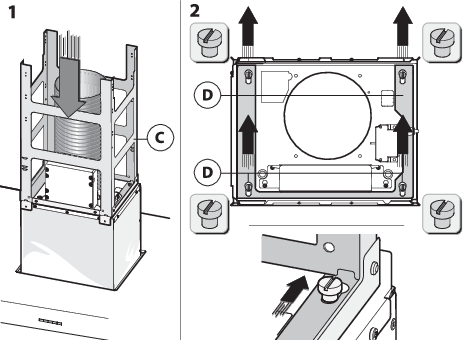
|
9 |
10 |
|---|---|
|
|
|
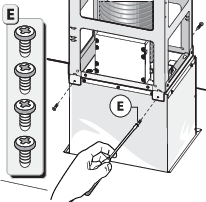
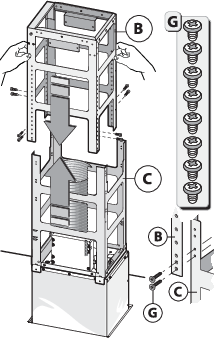
|
11 |
12 |
|---|---|
|
|
|
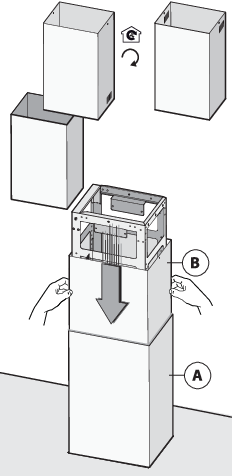
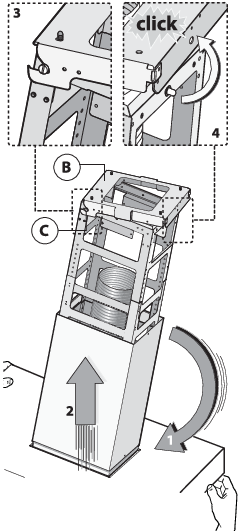
|
13 |
14 |
|---|---|
|
|
|
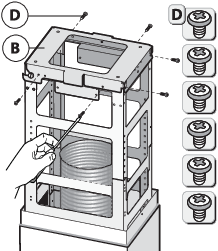
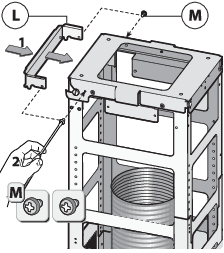
|
15 |
16 |
|---|---|
|
|
|
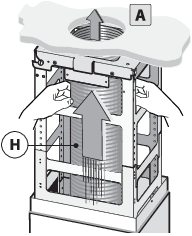
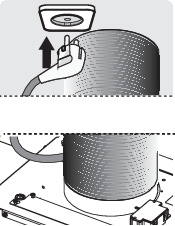
|
17 |
|---|
|
|
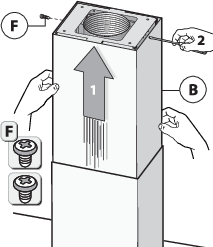
Environmental aspects
Tips for energy-efficient cooking with hoods
-
Use a low extractor setting and use the highest setting (boost) if necessary.
-
A well-ventilated kitchen makes the range hood more efficient.
-
Clean filters regularly and replace filters when needed to keep the filter efficiency high, as a saturated filter cannot perform and leads to longer usage times.
Disposal of the appliance and packaging
Sustainable materials have been used during the manufacture of this appliance. This appliance must be disposed of responsibly at the end of its service life. Ask your local authorities for more information about how to do this.
The appliance packaging is recyclable. The following may have been used:
-
cardboard;
-
polyethylene film (PE);
-
CFC-free polystyrene (PS rigid foam).
Dispose of these materials in a responsible manner and in accordance with government regulations.

The product has been marked with a crossed-out dustbin symbol to remind you of the obligation to dispose of electrical household appliances separately. This means that the appliance may not be included with normal domestic refuse at the end of its service life. The appliance must be taken to a special municipal centre for separated waste collection or to a dealer providing this service.
A separate collection of household appliances helps to prevent any potential negative impact on the environment and on human health caused by improper disposal. It ensures that the materials of which the appliance is composed can be recovered to obtain significant savings in energy and raw materials.

Declaration of conformity
We hereby declare that our products satisfy the applicable European directives, orders and regulations, as well as the requirements stated in the referenced standards.
Your notes
We reserve the right to make changes.